


Related Resources
Anime faces are easy to recognize: their main characteristic are those big, expressive eyes with a reflective gleam that take up one-third of the face (if not more).
But it’s not just the eyes that make drawing anime faces unique.
In this beginner-friendly guide, BioWar’s lead comic book artist Gonçalo Lopes will show you how to draw anime faces with guides for drawing both girls and boys.
Now let’s explore what makes this drawing style so unique step-by-step!
Key Characteristics Of Anime Face Drawings
When learning how to draw anime faces, focus on these distinct characteristics:
- Oversized eyes
- Small nose
- Tiny mouth
- Pointy chin
- Often wild, vividly colored hair

The Tools You’ll Need For Anime Face Drawings
To learn how to draw anime faces, the right tools can make your job a lot easier.
We recommend:
- An H pencil: This type of pencil leaves a light trace on paper, so it’s perfect when you’re learning how to draw and create basic outlines. The light trace is easy to erase, so you can easily fix any mistakes. the trace, the easier it is to erase mistakes and unnecessary details. Example: Staedtler’s Mars Lumograph H pencil.
- An HB pencil: We recommend using this pencil to softly shade your drawing and make the lines more prominent. Example: Staedtler’s Mars Lumograph HB pencil.
- A kneaded eraser: This type of eraser is soft, so you can change its shape and erase unwanted bits without messing up the rest of your drawing. easily erase even ear easy to stretch so you can tweak its shape as needed; as such, it’s perfect not just to remove mistakes but also to highlight parts of your mouth sketch. Example: Faber Castell’s kneaded eraser.
- Lightly textured sketch paper: The reason we suggest you get this kind of paper is because of its smooth surface, which means that your drawing experience is guaranteed to be pleasant! Example: Moleskine’s Art Sketchbook.
If you already have a pencil you enjoy using, by all means, stick with it as you learn how to draw anime faces.

How To Draw Anime Girl’s Face In 15 Steps
To show you how to draw an anime girl’s face, we’re going to take you through 15 steps, starting with the basics.
Step 1. Draw The Head Base
Recommended pencil: an H pencil
The first step to drawing an anime girl’s face is to sketch a circle, like this:

We’re going to use the basic shapes, including the circle and the square, to simplify the process of drawing anime faces.
A lot of beginners struggle with the proportions and find it challenging to get them right, so using basic shapes helps make the drawing process a lot easier!
Make sure not to apply too much pressure on your pencil at this stage because these are just the outlines that you’ll erase when you’re done drawing.
Step 2. Add The Guidelines For The Eyes
Recommended pencil: an H pencil
Anime eyes are oversized and they take up the majority of a character’s face.
They are exaggerated on purpose because anime artists use them to reflect characters’ emotions and their personalities!
If you’re a beginner, you may find it difficult to decide just how big the eyes should be.
That’s why the best thing to do is make guidelines for the eyes.
Draw a vertical line that splits the circle in half.
Then, add a horizontal line that also goes through the circle’s middle. This line marks the position where the upper eyelids should be.
The lower eyelids have to be placed low, near the circle’s bottom, like so:

As you can see, we also added another horizontal line slightly above the area where the upper eyelids will be. That’s where we’ll draw the eyebrows later on!
If you wish to learn how to draw realistic eyes non-anime style, check out our step-by-step guide on drawing eyes!
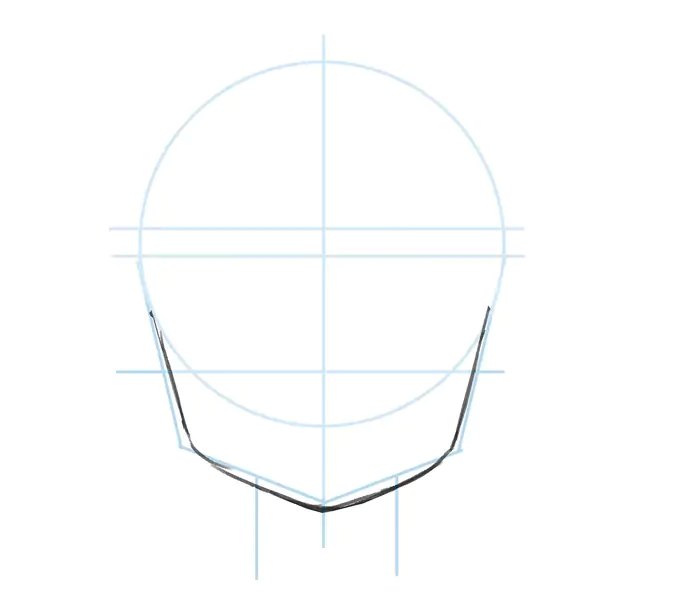
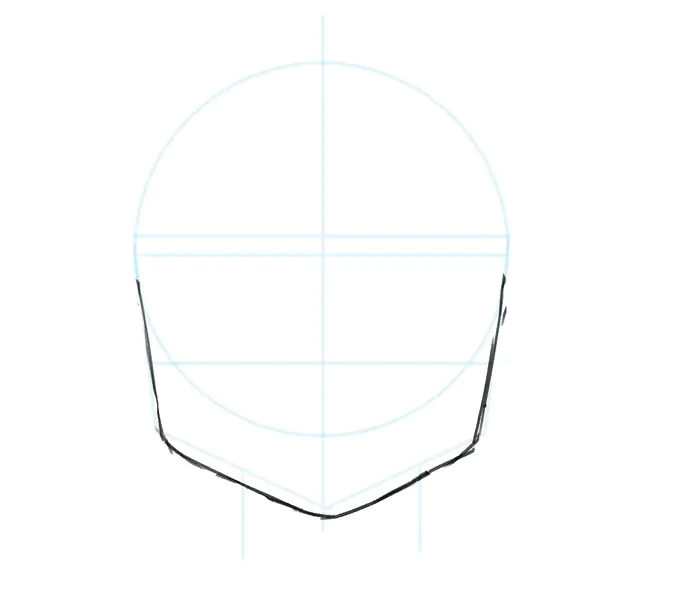
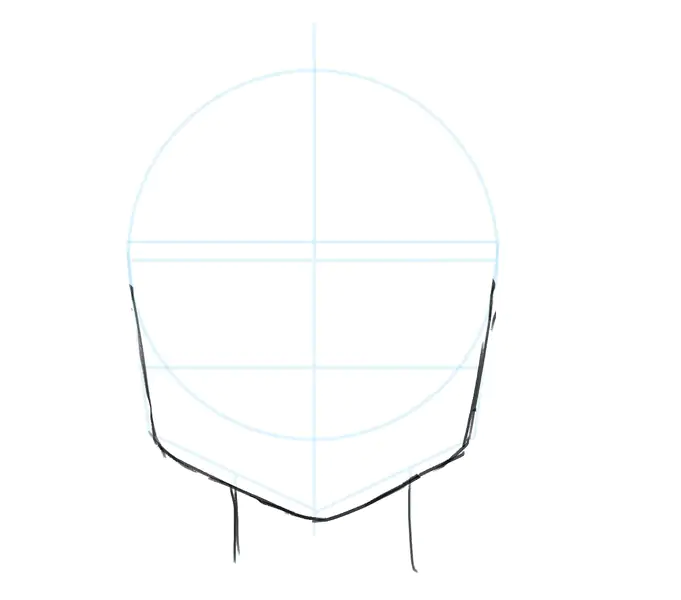
Step 3. Position The Chin And The Neck
Recommended pencil: an H pencil
Anime characters have sharply-structured, pointy chins, which makes them easy to draw.
Start by sketching one short straight line on either side of the anime girl’s face.
Make sure to angle the lines slightly toward the center of the face. The lower end of these two lines is where the cheeks will be.
Then, connect these two lines with the vertical line to form the jaw and the chin:

As for the neck, you can draw it using two straight, simple lines which are connected to the jaw. Position these lines towards the centers of the jaw to make the neck thin and elegant.
Step 4. Draw The Jaw
Recommended pencil: an H pencil
Although anime girl characters tend to have sharp jawlines, their features are softer than the boy’s. Keep this in mind as you draw anime faces.
Apply more pressure to your H pencil and go over the jawline and the chin, making them ever slightly rounder, like this:
Step 5. Shade The Neck
Recommended pencils: an H and an HB pencil
Hold onto your H pencil and go over the neck outline to make the lines darker.
Then, pick up an HB pencil and shade the area under the chin, like this:
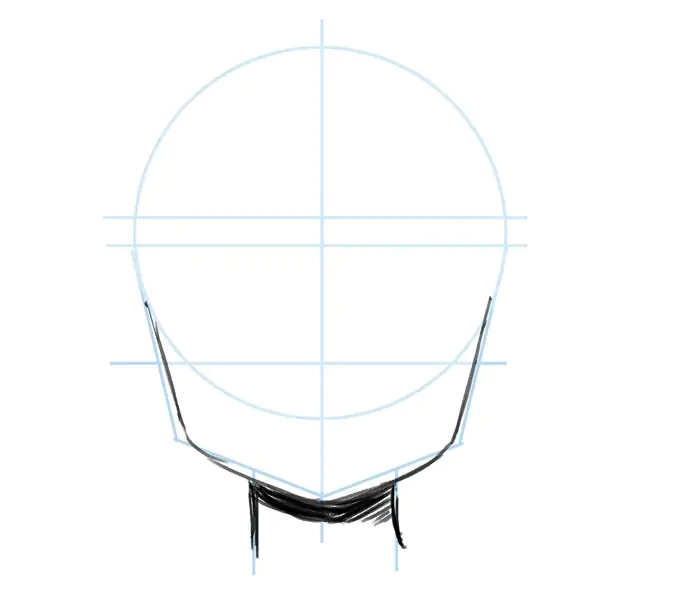
This will give your anime girl’s face some dimension. See how the drawing is beginning to take shape?
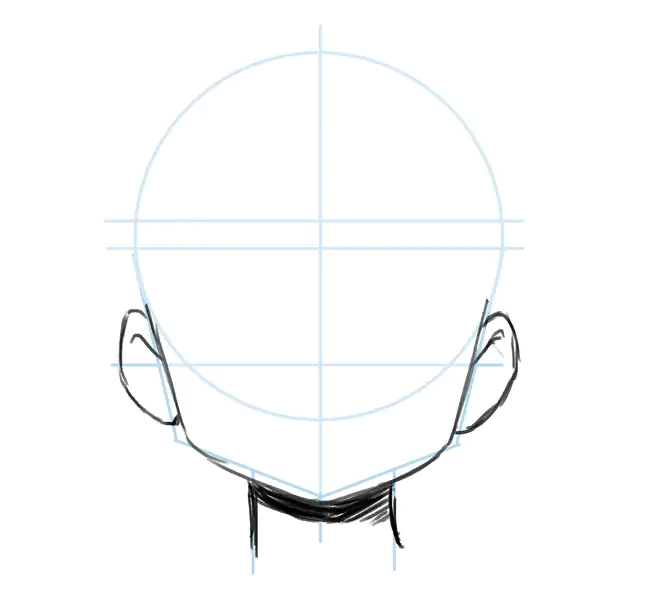
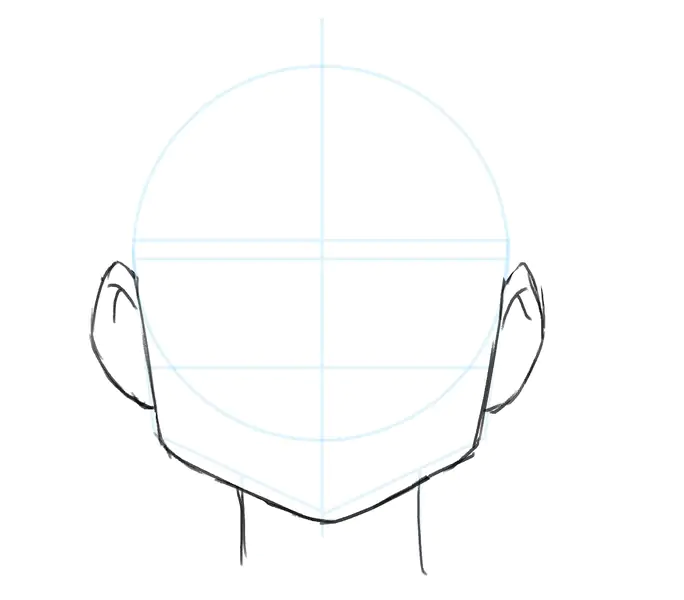
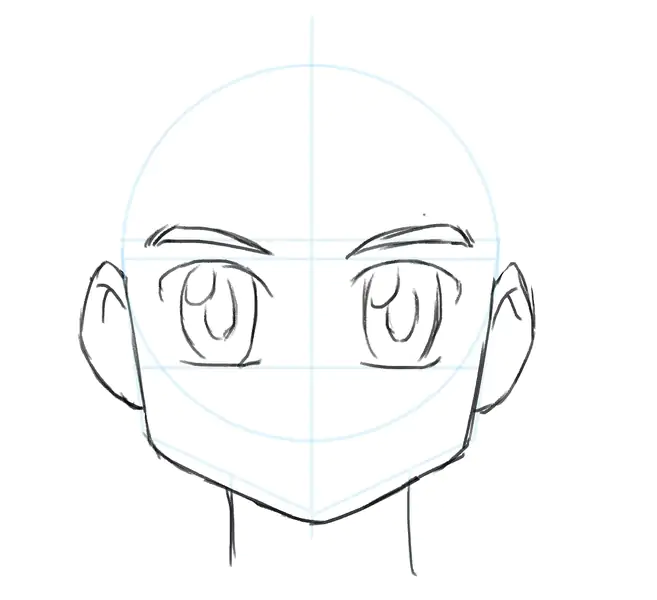
Step 6. Draw The Ears
Recommended pencil: an H pencil
Now’s the time to start adding some features to your anime face drawing.
First, let’s illustrate the ears.
They should be placed low, along the jawline. To find the ideal positioning, mark two faint lines first: one at the intersection of the circle and the cheek lines, and another slightly above the jaw angle.
Use these marks to draw simple C-shapes on either side of the face and add just one short line inside the ear to make it look like the ear has a rim, like this:
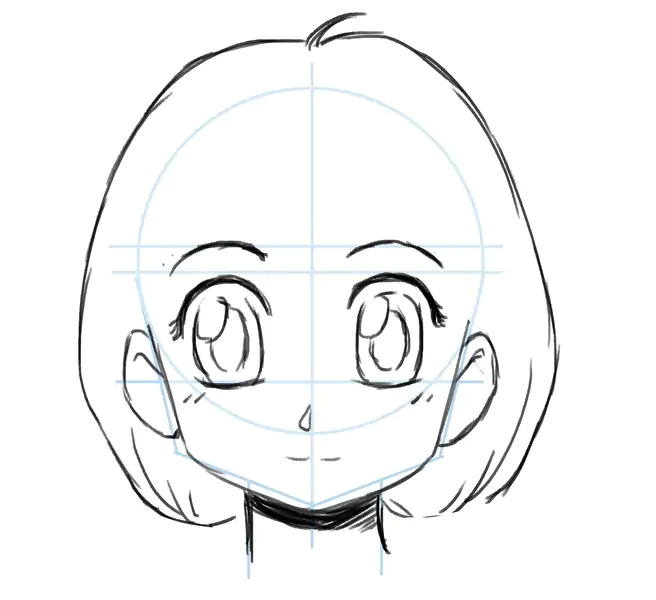
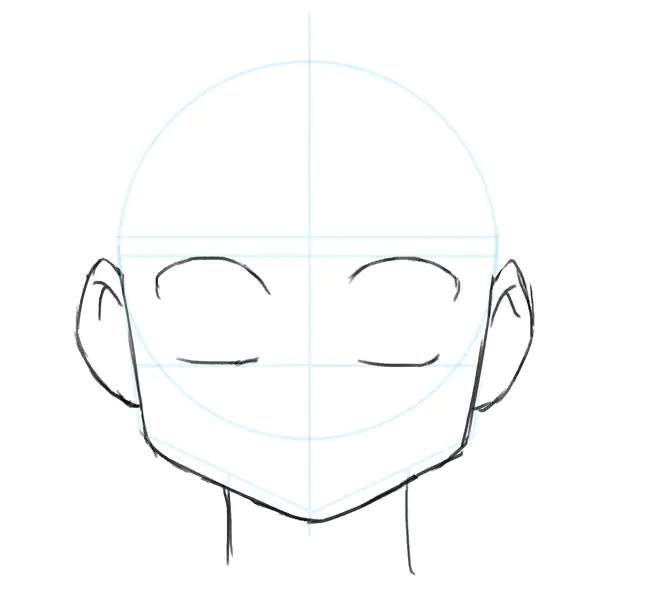
Step 7. Draw The Eyelids
Recommended pencils: an H and an HB pencils
Now, let’s draw the eyelids using an H pencil.
Use the central (middle) line as the limit to the upper lid arch and the lower guideline as the limit for the lower lid.
Position both lids in the center of their respective face portions (so to speak), if not slightly closer to the ears than to the center of the face.
The lower eyelids look like short, slightly curved lines.
The upper eyelids resemble half circles, with the outer corners placed slightly lower than the inner corners:
Now, pick up your HB pencil, and make the upper eyelids dark and thick.
Then, add tiny eyelashes around the outer end of the eyes.
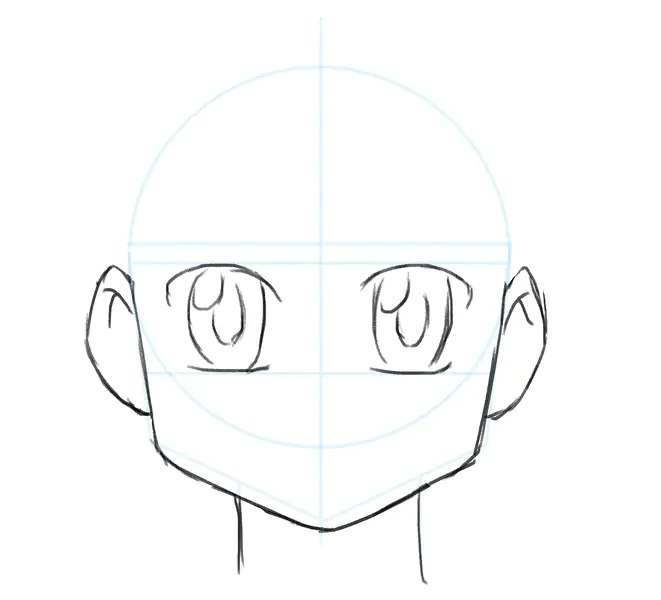
Step 8. Finish Drawing The Eyes
Recommended pencil: an H pencil
Anime characters may have different types of eyes, but the most common shape is this:
Draw large, oval shapes for irises and large, oval pupils.
Oh, and make sure to leave room for the light reflection in both eyes!
By the way, we recently shared a guide on drawing realistic eyes, so, make sure to check it out!
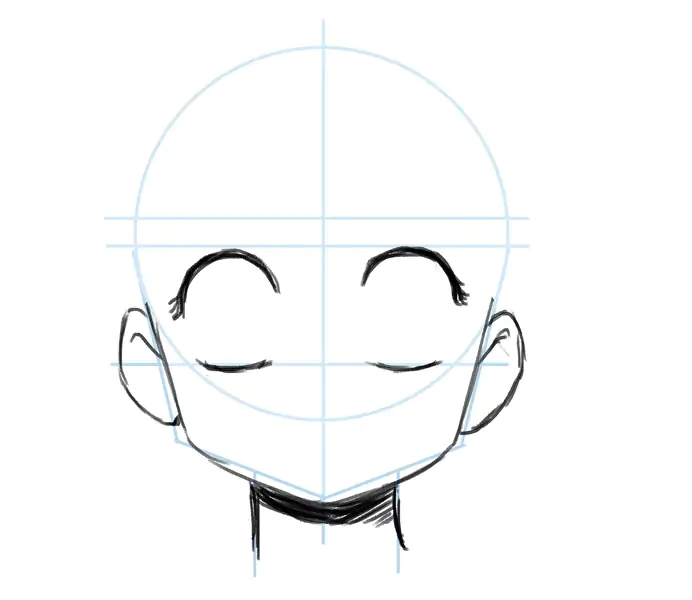
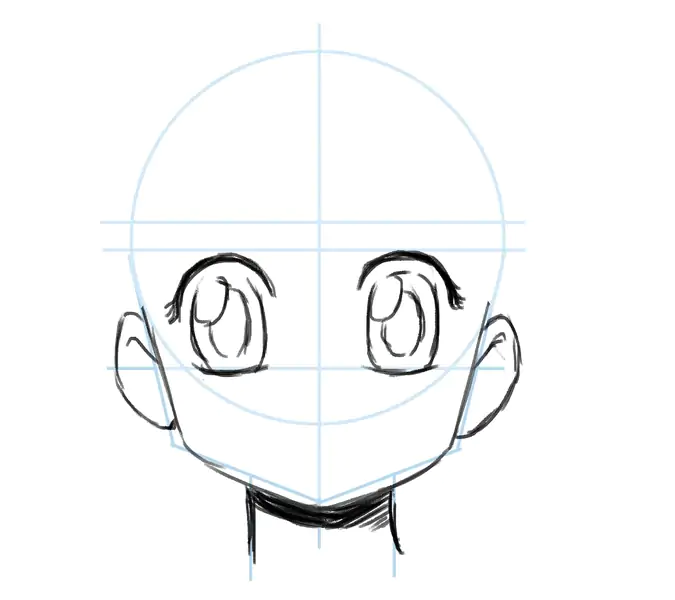
Step 9. Add The Eyebrows
Recommended pencil: an H pencil
We drew a horizontal line for the eyebrows earlier, remember?
Let’s sketch some arched eyebrows making sure their top doesn’t go over the upper guideline. The eyebrow shape should pretty much mimic the shape of the upper lid like so:
Step 10. Draw The Mouth
Recommended pencil: an H pencil
Lips may be the easiest feature to tackle when drawing anime faces.
Gonçalo drew the lips as a tiny, thin, slightly curved line so the girl character looks as if she has a soft smile on her face.
You should position the lips approximately halfway between the chin and the circle.
As for their width, make them as wide as the space between the lower eyelids:
For more details on how to draw lips realistically, read this guide on how to draw a mouth!
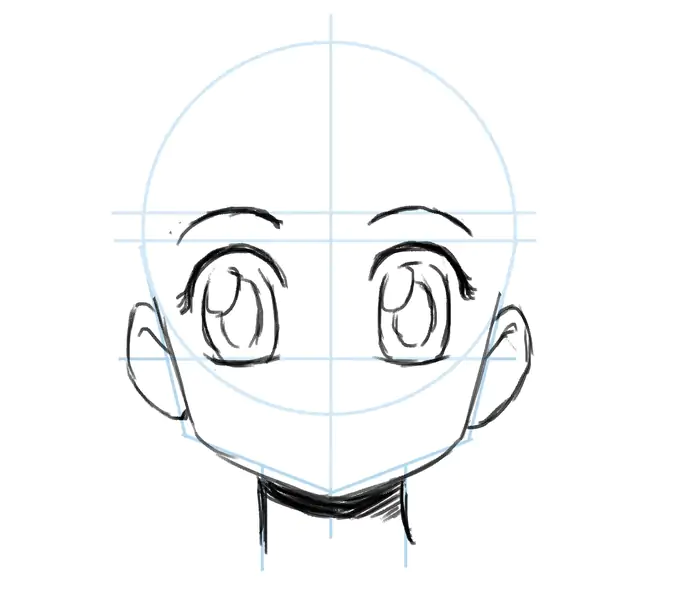
Step 11. Draw The Nose
Recommended pencil: an H pencil
How cute are anime noses?!
They’re usually very small and slightly pointy.
Draw the nose slightly below the lower guideline in the circle and right above the bottom of the circle:
In most cases, anime noses don’t have nostrils, which makes them super easy to draw.
In case you’re interested in mastering the skill of drawing a nose in non-anime style in five steps, we got you covered!
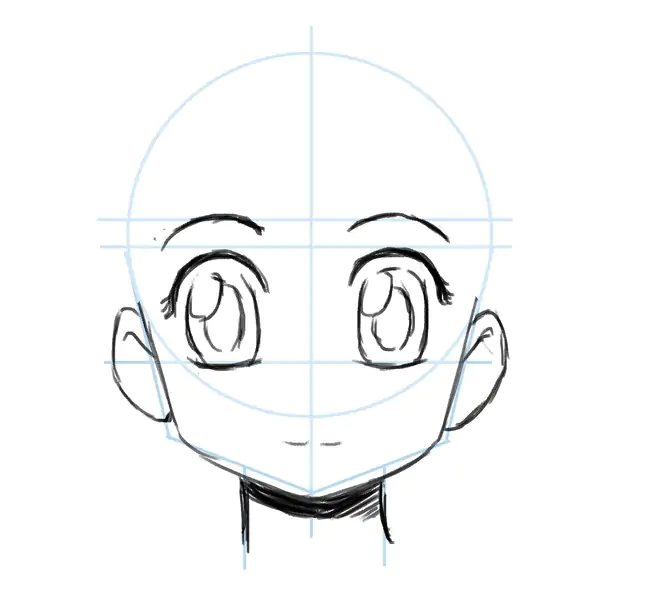
Step 12. Add The Lines Under The Eyes
Recommended pencil: an H pencil
Sometimes, anime characters have lines under their eyes that may look like fine lines, but that’s now what they are.
Instead, these lines further highlight the character’s emotions!
Since we’re drawing a cute, happy anime girl character, we’re going to add two tiny lines below each eye, like this:

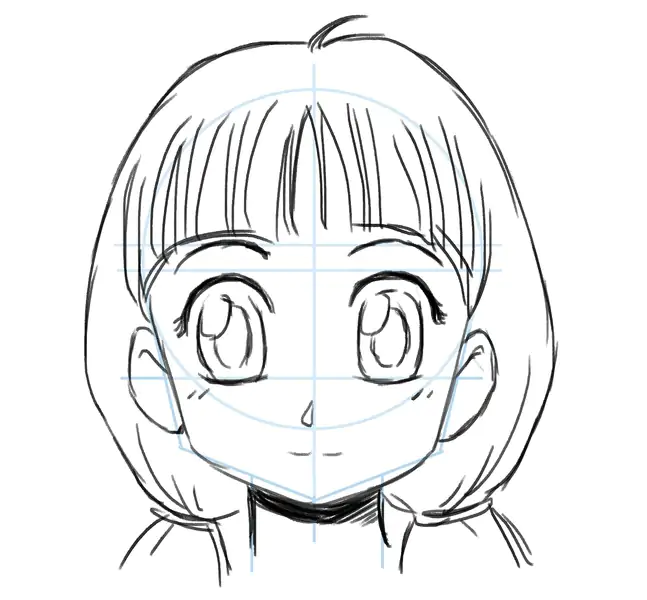
Step 13. Start Sketching The Hair
Recommended pencil: an H pencil
Anime character’s hair differs from one character to the next.
Some have pink hair; others rock green or black hairstyles.
You can go crazy with how you’re going to style your character’s hair. The only thing that matters is that the hair reflects her personality!
We’re going to start by drawing a short bob:
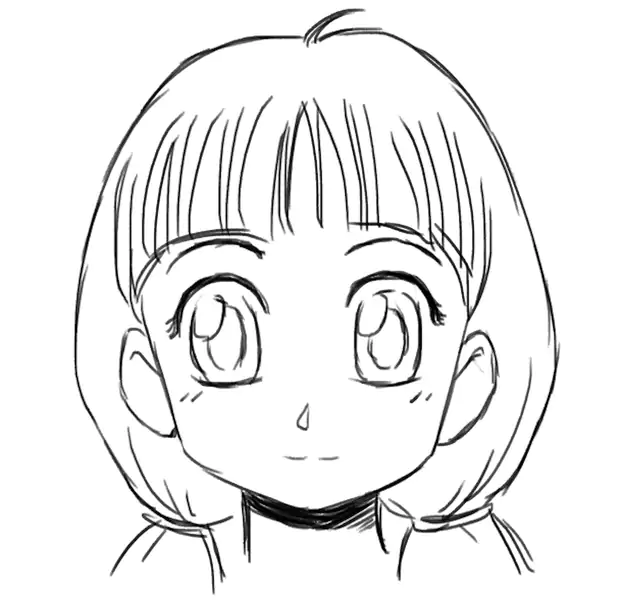
Step 14. Finish Drawing The Hair
Recommended pencil: an H pencil
Since we’re drawing a sweet and young anime girl, we think that she would like to wear low pigtails, don’t you agree?
Oh, and the bangs are a must for this cutie!
Step 15. Erase The Guidelines
Recommended tool: a kneaded eraser
Congrats, you just finished drawing an anime girl’s face!
All that’s left to do now is get rid of the guidelines so that the finished drawing looks like this:
If you wish to learn how to illustrate realistic faces, follow this guide!
How To Draw Anime Boy’s Face In 14 Steps
Now, it’s time we showed you how to draw an anime boy’s face!
Step 1. Start With The Base
Recommended pencil: an H pencil
As you could see, the easiest way to draw anime faces is to start from the basic shapes.
So, let’s draw a circle first, shall we?

Step 2. Add The Guidelines
Recommended pencil: an H pencil
Now, let’s add the guidelines for the eyes and the eyebrows.
First, draw a vertical line to split the circle into halves.
Then, add a horizontal line through the middle to mark where the upper eyelids will be.
Add one more vertical line slightly above the one in the middle — this is where you’ll draw the eyebrows in a few steps.
And lastly, you need one more vertical line toward the bottom of the circle:

Step 3. Position The Chin And The Neck
Recommended pencil: an H pencil
Let’s draw the chin now.
Use straight, thin lines to form a sharp jawline and a pointy chin, like so:

Step 4. Draw The Jaw
Recommended pencil: an H pencil
When drawing anime faces, remember that boys’ faces have sharper features than girls’.
That’s why their jawline should have prominent jawlines, like this:
Step 5. Draw The Neck
Recommended pencil: an H pencil
The boys’ necks are usually wider than the girls’, so make sure the difference shows on your drawings!
Step 6. Sketch The Ears
Recommended pencil: an H pencil
Next up, draw the ears.
The top of the ears should reach the horizontal line that goes through the circle’s middle and the earlobe should be in line with the bottom of the circle.
Now that you have the two marks, simply connect them by drawing two C-lines:
Step 7. Draw The Eyelids
Recommended pencil: an H pencil
Anime boy faces can also have a variety of different eye styles, but we want this boy’s face to be as cute as the girl’s face we drew earlier.
So, let’s draw curved lines for the upper eyelids making sure their top touches the horizontal guideline.
This time around, we won’t add the pretty eyelashes since they don’t have to be so obvious on a boy’s face.
Then, draw the lower eyelids along the bottom horizontal line:
Step 8. Draw The Eyes
Recommended pencil: an H pencil
Now, let’s sketch soft eyes, like the ones on the girl’s character.
As you could see, drawing the big, anime eyes is quite easy since the irises and pupils are oval.
Just don’t forget about the light reflection in the eye corners!
Step 9. Draw The Eyebrows
Recommended pencil: an H pencil
Boys usually have thicker eyebrows than the girls, so we gave this fella some eye-catching eyebrows:
Step 10. Draw The Lips
Recommended pencil: an H pencil
To draw the lips, go for a line that slightly curves upwards on one end.
That way your character will appear as if he were smirking!
Place the mouth along the circle’s bottom end and make them as wide as the space between the lower eyelids:

Step 11. Draw The Nose
Recommended pencil: an H pencil
Anime boy characters usually have small, pointed noses, like girls:

Again, you don’t have to draw the nostrils.
A tiny nose right under the lower horizontal line in the circle is perfect!
Step 12. Start Drawing The Hair
Recommended pencil: an H pencil
We don’t want to go too wild with the hairstyles.
We want to keep our character’s hair tame, so we’re going to give him a typical boy haircut:

You should feel free to experiment with different hairstyles if you like, but if you’re a beginner, keep things as simple as possible until you loosen up your arm and feel more comfortable drawing anime faces.
Step 13. Finish Drawing The Hair
Recommended pencil: an H pencil
Let’s finish drawing the hair.
We wanted to go for a messy look, so we drew the hair with lots of spikes:
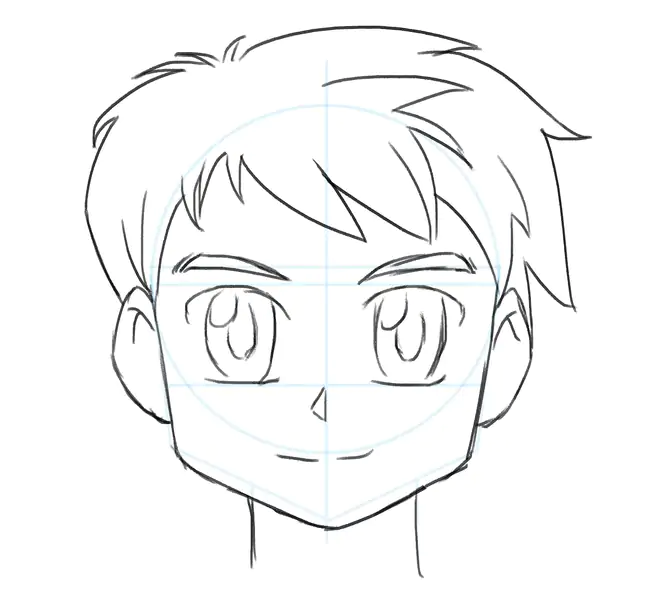
You don’t have to color the hair, because what matters is that you practice drawing the hair outline. You can experiment with different colors later on!
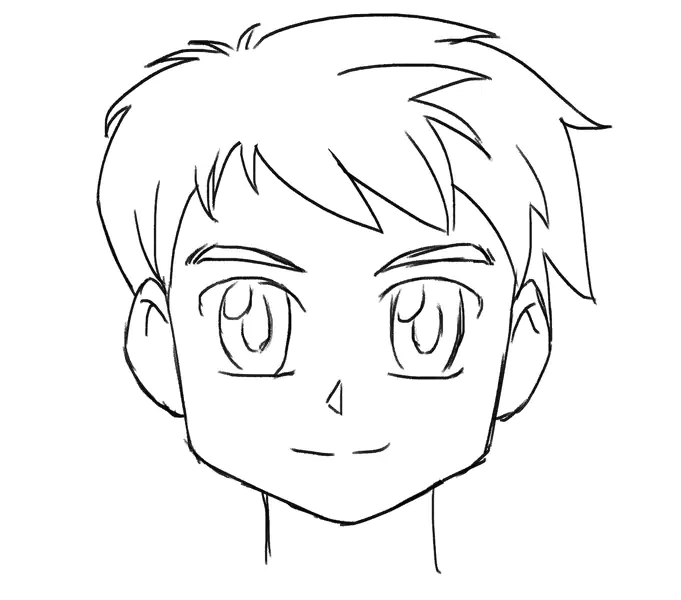
Step 14. Erase The Guidelines
Recommended tool: a kneaded eraser
Congratulations, you just finished drawing an anime boy’s face!
That wasn’t so hard now, was it?
Now, get your eraser and get rid of the guidelines and any superfluous details:
Takeaways On How To Draw Anime Faces
To draw an anime face, all you need are:
- An H pencil
- An eraser
- A piece of textured paper
You can also use an HB pencil to make your illustration more eye-catching and gently shade it to add more depth to it.
Whether you’re drawing an anime boy or an anime girl face, in both cases you should start by illustrating a circle first and then add the guidelines that will help you position the face elements.
Then, draw the eyes, the ears, the eyebrows, and the rest of your character’s face.


