


Related Resources
John Singer Sargent, one of the most successful portrait painters of the late 19th and early 20th century, famously said:
“A portrait is a painting with something wrong with the mouth.”
This statement often turns out to be true.
If you’re a beginner and you’re sketching a face, you’re probably finding it hard to get your mouth drawing right. But you’re not the only one.
Illustrating the correct shape and the size of the mouth is challenging for most new artists. That isn’t surprising, especially when you know that, just like fingertips, we all have unique lips! You read that right — no lip print is the same!
Learning how to draw a mouth well is important because the way they look greatly impacts the appearance of the entire face drawing. And that’s where the lead Biowars illustrator Gonçalo Lopes comes to the rescue with his video tutorial on easy mouth drawing:
You can watch the video and then continue reading this post since we’ll break the tutorial into steps so you can explore them and practice drawing a mouth at your own pace.
Here’s also the video guide to drawing mouth from smiling to yelling:
The Tools You Need For Your Mouth Drawing
To learn how to draw a mouth step by step, you can go the old-fashioned way and use a pencil and paper or practice on a digital drawing device.
Since we already published a separate post on digital drawing tools, we’ll now recommend the types of pencils you can use for your drawing:
- An H pencil: “H”, i.e., “hard” type of lead, leaves a light trace on paper; you should use an H pencil first to create the basic outline for the mouth drawing.
- An HB pencil: “HB” stands for “hard black”; these pencils have a “medium-hard” lead, and they’re the best choice to add details and soft shadows to your drawing.
- A B pencil: “B” or “black” is the type of pencil with the softest lead, meaning it leaves the darkest trace; when you wish to shade your drawing, a B pencil is a way to go.
- A kneaded eraser is easy to stretch or compress, and as such, it’s perfect not just to remove mistakes but also to highlight parts of your mouth sketch.
- Lightly textured sketch paper that allows you to move your pencil over the paper’s surface smoothly and easily erase mistakes.

First Steps To Learning How To Draw A Mouth
In our previous tutorials on how to draw head shapes and the eyes, we showed you that the easiest way to start is to go from the basics and draw the key shapes first.
We’ll do the same now and break down the process of mouth drawing into several steps.
We’ll show you how to draw a closed mouth, because they’re the easiest to illustrate. It’s important you learn the ropes first, and then you can move on to practice illustrating different facial expressions.
Step #1: Draw The Line Where The Lips Meet
The first step to creating an easy mouth drawing is to draw a straight horizontal line.
Apply light pressure to your H pencil and draw a line, like this:

This is where the upper and lower lips touch.
Make it as long as you’d like the mouth to be wide.
Later on, we’ll make the line a little less straight, but for now, let’s keep it as it is!
Step #2: Determine The Mouth Fullness
Next, let’s decide how full a mouth should be.
To do that, you should draw a short horizontal line above and the other one below the line where the lips meet.
The former should mark where Cupid’s bow will be and the latter the width of the lower lip.

Everyone’s lips are different, so we’ll leave it up to you to determine how full you’d want the sketched lips to be.
Again, gently press the pencil so you can later erase all unnecessary lines.

Steps To Complete The Outline Of Your Mouth Drawing
After you decide how wide and full the mouth you’re drawing should be, it’s time to complete the outline.
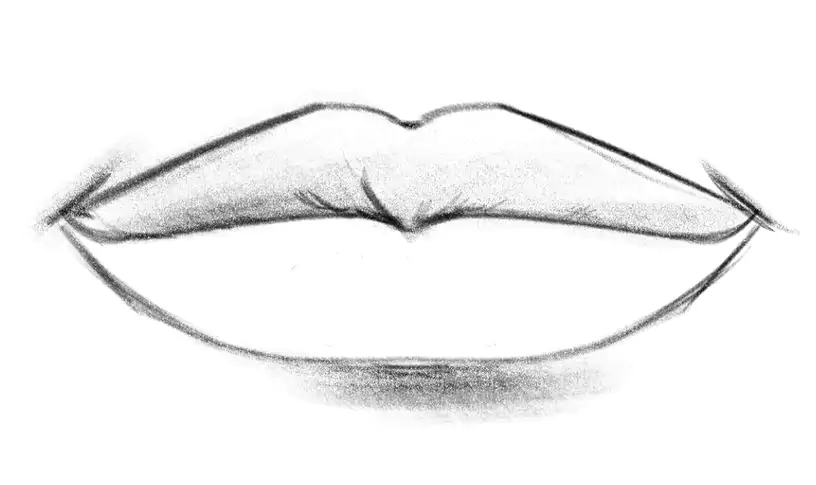
Step #3: Draw The Upper Lip
Before we show you how to draw the upper lip, let’s add a slight curve to the horizontal line where the lips meet.
All you should do now is simply add upward curves at both ends, like this:

Since the corners of the mouth are the darkest, you can apply more pressure when adding upward curves.
Now, to illustrate the upper lip, let’s first mark where the center of the mouth is. To do that, you should just connect the lines you drew earlier when deciding how full the mouth should be, i.e., connect the top and the bottom of the lips.
The top point of the line marks the dip of Cupid’s bow.
By the way, do you know why we call this part of our lips the Cupid’s bow?
Cupid is the Roman god of love. He’s usually depicted as a chubby, cherub-looking baby with wings and a bow that fires arrows at others to make them fall in love. You’ve probably seen Cupid on Valentine’s Day cards.
Anyway, some people say that the shape of your upper lip, with curved corners and the dip in the middle looks just like Cupid’s bow hence why we call it that way. Others suggest that the outline of the upper lip looks like a heart, and since Cupid is the god of love, this may be how Cupid’s bow got its name!
Now, let’s draw the peaks of Cupid’s bow, just like this:

Next, to complete the upper lip outline, simply connect the Cupid’s bow to the mouth corners. These lines that separate the mouth from the rest of your face are called the vermilion border.
Even though the color of the lips differs from one person to the next, the vermilion border marks the space where the color of the lips ends and the color of the face begins.
After you finish illustrating Cupid’s bow, it’s time to add a small dip in the middle of the line where the upper and lower lip meet, like so:

You don’t want the line in the middle to be straight because the mouth then won’t look realistic!
Step #4: Sketch The Lower Lip
Once you’re done sketching the upper lip, drawing the lower lip comes easy.
The first thing you want to do is go over the bottom of the lower vermilion border and make it more pronounced, just like Gonçalo did:

Then, all that’s left to do to complete the mouth outline is connect the lip corners with the bottom of the lower vermilion border.

Finalize Your Mouth Drawing
To finish your mouth drawing and make it more realistic, let’s enhance some of the details of your sketch.
Step #5: Shade Your Mouth Sketch
We suggest you pick up your HB pencil and use it to go over the final outline.
Then, erase all the lines that no longer belong to your mouth drawing.
The next thing you should do is shade your illustration.
You don’t have to go overboard, but adding even just a little bit of shadow will make the mouth look realistic.
Using your B pencil, you could add a bit of shadow right below the center of the lower lip. The lower lip naturally sticks out and casts a slight shadow over the skin below.
After that, add a bit of shade around the center lip line, like this:
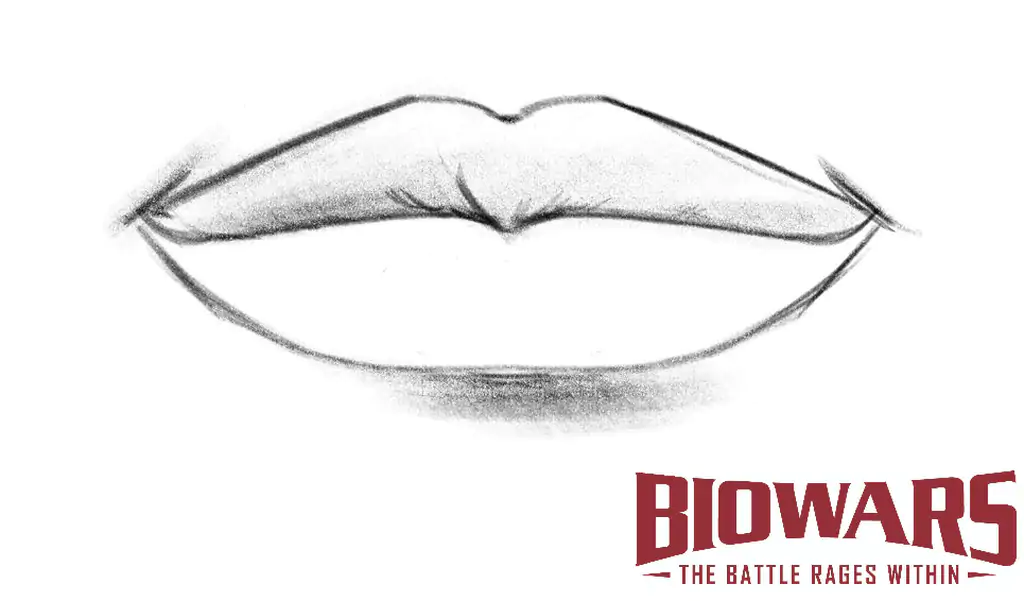
If you’re only just starting out to draw, you can keep the shading to a minimum, but do your best to shade the right points, just like Gonçalo. As you can see, he made his mouth drawing realistic by shading just the elements he needed to, including the area around the center line of the lips and the skin below the lower lip.
He also drew tiny lines by the corners of the mouth, the so-called marionette lines.
The older a person is, the more pronounced the marionette lines are.
We suggest you add them to your sketch to make the mouth appear even more realistic.

Recap On How To Draw A Mouth Step By Step
Learning how to draw any body part requires patience and practice.
Whether you want to learn how to draw hands, how to sketch a person, or illustrate an eye, head angles, or a mouth, the process is always the same — you should build your drawing slowly and go from sketching basic shapes to creating detailed illustrations.
To ensure your mouth drawing doesn’t look cartoonish, the best thing you can do is start from the center lip line, and then slowly add the Cupid’s bow, vermilion borders, and, lastly, shades.
Be patient with yourself and practice drawing all kinds of lips, be they thin, wide, downward-turned, or full. The more often you sketch, the better you’ll become!


