


Related Resources
Did you know that there are 206 bones and more than 600 muscles in the human body?
While these numbers might sound intimidating when it comes to drawing a person, we’re here to break down and simplify the process for budding artists like you!
We asked the BioWars artist Gonçalo Lopes to create a video tutorial to help you learn how to draw a person with ease.
To better follow Gonçalo’s instructions, make sure to download this how-to-draw-a-person sheet.
And if you’d like to learn how to draw your character in 3D, once you tackle the basics, check out this tutorial:
In addition, we also created a step-by-step tutorial with pictures explaining the process of how to draw a person easily. Learning how to do it can come in handy when creating your own comic book characters, whether they’re fully human or hybrid creatures with superpowers.
We’ll cover the step-by-step process of how to draw a human, plus share the tools you’ll need and expert hacks to help you along the way.
Let’s get started!

How To Draw A Person Easily: Tools You’ll Need
While a pencil is a fundamental tool for any artist, a regular pencil isn’t enough to help you draw a realistic person.
Why?
Because a regular pencil limits your shading ability and only allows you to reach certain darkness.
Here are the tools you’ll need to draw a person:
- H pencil: Used for drawing the lightest lines, like basic shapes and outlines
- HB pencil: Used for simple sketching or when drawing more intricate details
- 4B pencil: A great choice for darker shading or when you need to make your drawing more realistic
- Kneaded eraser: Used to highlight and blur edges while erasing highlighting mediums such as graphite
- Ruler: Used for drawing straight lines
- Sketch paper: Perforated paper used for practice drawing – a lighter version of drawing paper

Using The Grid Method To Get Accurate Proportions
Creating and maintaining accurate body proportions may be the most challenging part of drawing a person.
In fact, a 2016 study found that non-artists draw the eyes too high when they base the position just off of observation.
You can use the grid method to get the proportions right even if you’re just starting out as an artist.
The Grid Method
The grid method consists of vertical and horizontal lines on your paper that form a grid of equal ratio (see image below).
A grid allows you to see the proportions of your drawing in real time and breaks down your drawing into smaller segments. The grid ensures that the area you’re working on is placed in the correct section of the canvas.
For example, a grid can help you determine if one arm is longer than the other arm.

How To Draw a Person In 9 Steps
From ensuring accurate body proportions to adding final touches, here are nine steps to follow when drawing a person.
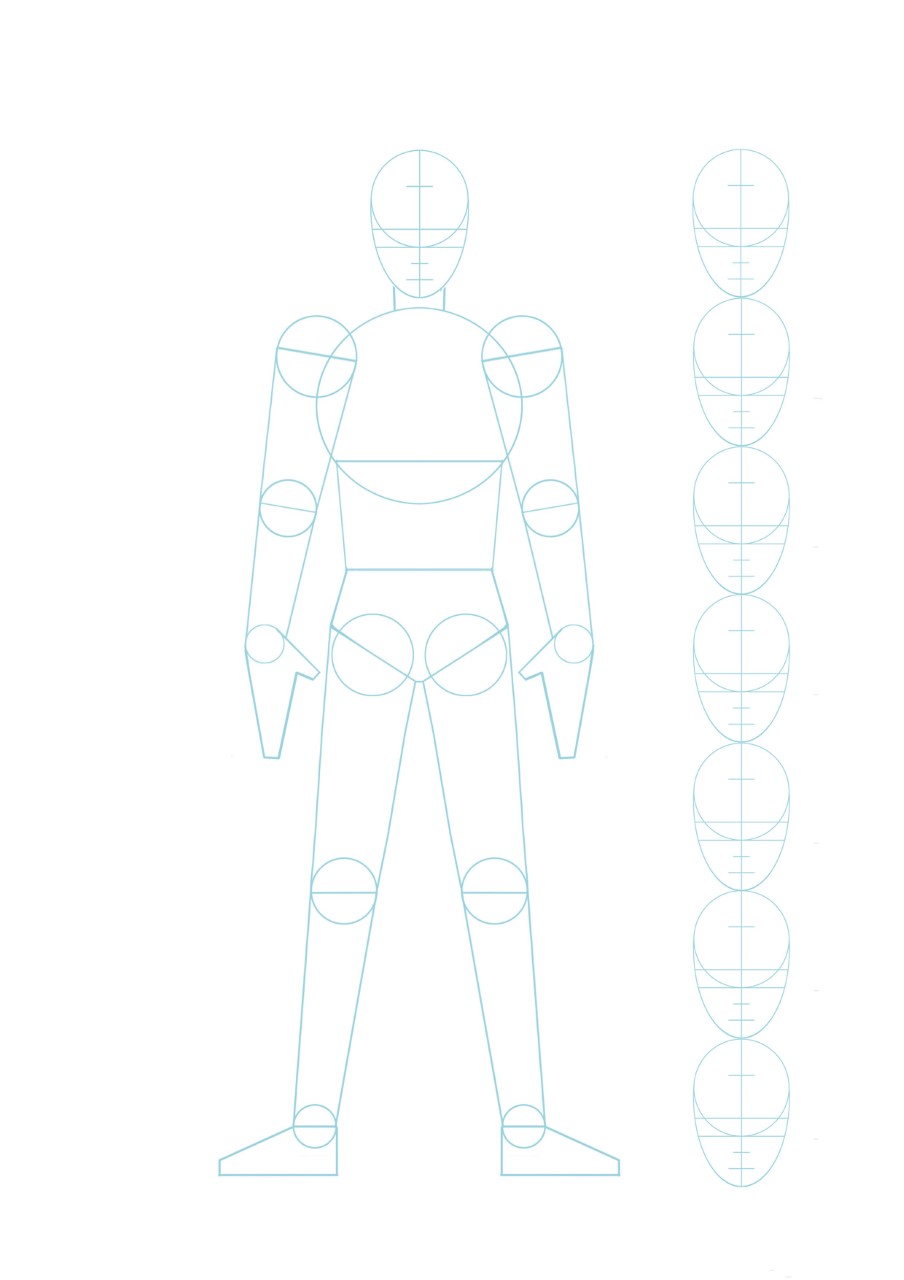
Step #1: Measure The Height Of The Person
To define the height and dimensions of your person, draw a vertical line using your ruler, then divide it into eight equal sections.
For example, let’s say the figure you want to draw is 16cm tall.
To find the midpoint of your figure, use your ruler to make a mark at 8cm. From there, you can start dividing your vertical line into eight horizontal sections, which would be every 2cm.

Once you have eight equal sections, you can start allocating a body part to each section:
- Section 1: Head
- Section 2: Arms, torso, shoulders and ribcage
- Section 3: Arms
- Section 4: Arms and pelvis
- Section 5: Thighs
- Section 6: Knees
- Section 7: Lower legs
- Section 8: Feet
Sectioning this way helps ensure your body proportions end up looking realistic.
Step #2: Draw The Head & Map Out Facial Features
Now that you have each section mapped out, you can begin drawing your person. Start from the top and work your way down.
Draw an upside-down egg shape on your paper and divide it into quarters by drawing a vertical line down the center of the head, which will divide the two halves of your person’s face.

Next, draw three horizontal lines to divide the head into four equal parts, like so:

Now, let’s draw the eyes along the horizontal line halfway between the top of the head and the chin:

Then, let’s add two more horizontal lines to divide the sections above and below the eyes in two.
Once the lines are in place, let’s sketch the nose.
You don’t have to go overboard with details at this stage — it’s enough to draw a simple U-like shape on the second line from the bottom, like this:

To complete the face outline, let’s add the mouth and the ears.
Again, the shapes should be simple.
For the mouth, draw a thin, curved line on the bottom line.
As for the ears, sketch two C-shaped lines between the lines in the middle, like so:


Step #3: Draw The Ribcage
Once the head is in place, draw the neck using short, straight horizontal lines and connect them in the in the middle.
Now’s the time to draw the ribcage.
You can sketch the ribcage by drawing an egg-like shape that spans from the shoulder to the navel.
At the bottom of the ribcage, draw an inverted “V.”
One-third of the way down the rib cage, draw the pelvis in a similar shape to a bucket.
Outline a “U” shape in the front of the pelvis to mark the abdomen, which you’ll work on later:

Step #4: Draw The Arms
To draw the arms, start by adding a circle on each side of the body — that’s where the shoulders will be.
Then, draw a line from each shoulder and point them toward the bottom of the third section — that’s where the elbows will be:

For the forearms, continue drawing a line from the elbow all the way down to the wrist, which should be placed at the bottom of the fourth section:

Next comes drawing the hands. Make them reach the lower half of the fifth section, like so:

We created a separate guide on easy hand drawing and we invite you to explore it to discover how to draw hands the easy way!
When you add the hands to your sketch, connect them to the forearms using oblong shapes that will form the fingers and palm.
Step #5: Draw The Legs
Draw a short line that slants down from each side of the pelvis to form the hip joints.
For the thighs, continue to draw the line slanting down on each side, slightly coming in to meet each other.
The bottom of the knees should end just above the seventh section.

Extend the legs from the knees towards the calves — this part of the sketch should take up the seventh and almost the entire eight section:

For the feet, don’t bother with too many details at this stage.
Instead, draw a simple outline, like this:

Step #6: Draw The Limbs
Start drawing the legs from the thigh area.
To draw the thigh, draw a curve facing downwards and form a tube that reaches the midpoint between sections five and six, just above the kneecaps.
Ensure that the thighs are thicker than the lower part of the legs or calves.
Next are the kneecaps which will serve as the boundary between the thigh and calves.
Fill in the kneecaps using oblong shapes and as you go down the calves, ensure that the tubes become narrower as they reach the ankle.
For the arms, make sure that they become thinner as they approach the wrists.
Step #7: Fill In The Facial Features
In step two, you created a foundation for each facial feature. Now it’s time to draw them!
Begin with the eyes, then follow with the nose, eyebrows, mouth, ears and hair.
Step #8: Add The Details
Use thin lines to highlight bony landmarks of the body such as the kneecaps and clavicle, and curves to emphasize muscle or fat.
Draw the muscle in the inner thigh to indicate that it overlaps with the other muscles in the leg area.
Add curves in the inner side of the calves to show the muscles and add the curves that are positioned outside for the ankles to emphasize a bone structure:

Step #9: Remove Unnecessary Lines & Shade In Your Drawing
Use a kneaded eraser to remove the horizontal and vertical lines you used in the first step to divide the body into eight sections.
When you’re finished with your drawing, shade the skin (such as the inner calves and arms) and hair using your 4B pencil to make the person look more realistic.


How To Draw A Person The Easy Way: Tips And Tricks
Here are five tips and tricks from our comic book artists to help you create a realistic drawing of a human person.
1. Start With Basic Poses
Before diving into more complex poses, you can start drawing a person in their basic poses such as standing or sitting.
If you’re ready for more advanced poses, you can start by learning how people hold their bodies naturally or how their hair falls a certain way. To do this, observe people when they’re walking, sitting or performing other poses. This can help you understand posture, facial expressions and more.
2. Practice Your Drawing Skills Using Portraits
Practicing with a portrait helps you sharpen your skills, because a still reference allows you to study the subject for as long as you need.
A portrait also helps you learn aesthetically pleasing poses, which you can implement when you’re ready to draw a person on your own.
3. Use Basic Shapes As A Starting Point
Use triangles, cylinders and spheres to set up the basics of your human body. This can help you accurately place body parts and keep sizes and proportions in check, until you can go back and fill in the features.
4. Sketch Before Drawing
Sketching can help you familiarize yourself with different body positions and also help you capture the mood and overall feeling of the pose you want.
Do you want the person in your drawing to wave his hand? Or should your person’s facial expression be sad and forlorn?
This method will require a lot of trial and error (and erasing, but that’s part of the process!
Key Takeaways On How To Draw A Human
In order to make a realistic and accurate drawing of a human, it’s important to focus on getting the proportions right before fixating on the smaller details such as defining the muscles.
The secret to drawing a human body you’re proud of? Take your time mastering each step and be consistent with practicing.
We hope that this tutorial will help you advance in your journey of creating your own original comic book character!


