


Related Resources
Drawing head angles becomes easier when you start with simple shapes.
The head is a complex part of the human body that differs from one person to the next, making drawing head angles and illustrating faces particularly challenging for most aspiring artists.
That’s why we asked the BioWars lead artist Gonçalo to help us out once again and create a beginner-friendly video tutorial in which he will teach you how to draw several head angles with ease:
Now, let’s break the video into several steps so you can follow them at your own pace.
How To Start Drawing Head Angles
The best way to start drawing head angles is to start with simple shapes.
And what’s the shape that immediately comes to mind?
You guessed it: a sphere!

The skull, which is the largest bone structure in the head, is shaped like a sphere. It is comprised of 22 bones that protect arguably the most important organ in your body — the brain. In the BIOWARS comic book, the skull is the home of the Council of the Mind, responsible for transmitting messages throughout the Biocosmos.
The skull is also the framework for the face and the head!
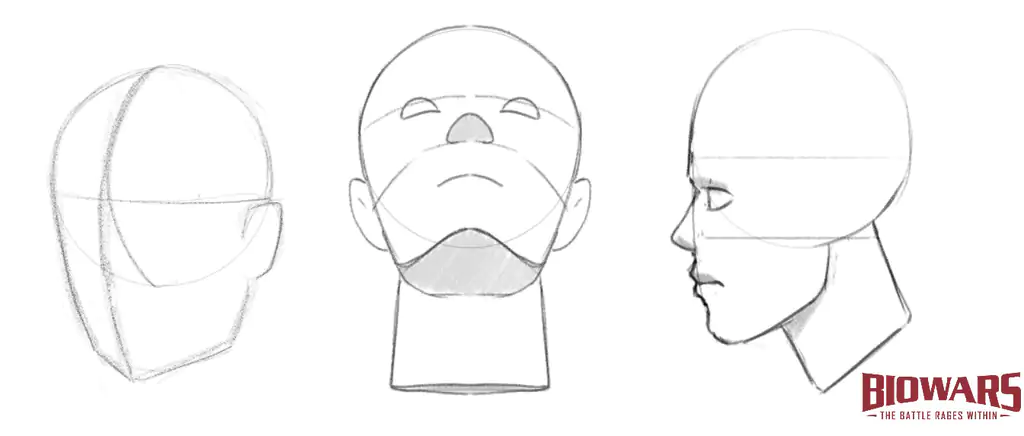
Now, the first step to learning how to draw head angles is to practice drawing a sphere!

No matter the angle you observe a sphere from, its outline is a circle, so, let’s draw that first.
Don’t worry if your circle doesn’t have the perfect shape. You’re learning the basics, and, at this point, it’s important you understand what elements and shapes make up the human head.
Next, add a vertical and horizontal line that meet at the circle’s center to add dimension to the basic shape.
In the video tutorial, Gonçalo starts with a sphere facing forward. He illustrates it by drawing a straight vertical and horizontal line that meet in the middle of the circle. He also shows you several more ways to project a sphere in 3D space.
For example, if you wish to draw a head looking to the left, you should imagine the sphere rotating lightly towards the left.
To illustrate that, you’d want to sketch a circle and move the center of your drawing to the left side.
So, instead of adding straight vertical and horizontal lines and have them meet at the circle’s center, you should draw slightly curved lines and place them closer to the left edge of the circle.
The position of the lines that go through the sphere depends on the head angle you wish to draw.
For instance, if your character is looking down and to the left, you’d want to position the horizontal curved line closer to the bottom of the sphere and move the curved vertical line to the left.

Now that you know what the basic head forms are and how to draw them, let’s move on to the next step of drawing head angles.
Drawing A Head From Different Angles
Once you master drawing a sphere, it will be easier for you to illustrate different head angles.
Now, before you do anything, decide on the head angle you wish to draw.
Then, draw a sphere rotated in the desired direction and add a jaw to your drawing. You can determine its length by extending the center vertical line, like this:
Again, don’t worry too much about drawing the perfect jaw shape. You can draw it in two simple moves by connecting two lines one to the other. If the jaw looks pointy, that’s fine. Right now, it’s important you get a sense of proportion.
As for the shape of the jaw, that will change depending on the head angle you wish to sketch. For example, if you’re drawing a character looking to the left, the left side of the jaw shouldn’t be as visible as the right; therefore, you should move the center of the jaw slightly to the left, as Gonçalo did in the tutorial.
When it comes to drawing the eyes, nose, mouth and ears, we recommend you take a look at our tutorial on how to draw faces. You don’t have to make them look realistic right away; for instance, the eyes can be just dots and the mouth a slightly curved line. However, do try to position face features correctly, so the whole head appears proportional.
When you’re a beginner, the less you worry about the appearance of facial features, the easier it will be to master drawing head angles.

Drawing A Head Looking Up
Drawing a head looking up is one of the most challenging angles even professional artists often struggle with. It just seems too difficult to draw a chin at an appropriate angle and place the elements of the face correctly when depicting this head angle.
To draw a head looking up from a straight-on or any other angle, let’s start with the basic head forms elements.
The skull, again, should be shaped like a sphere.
You can then add a vertical line in the middle of the sphere and slightly extend it downward to mark where the tip of the chin should be. You can also add a horizontal line near the sphere’s center to determine the position of the eyes and the ears.
Now, since you’re drawing a chin tilted upwards, you should visualize the part between the chin and the neck, i.e. the so-called submental space.
You can draw it as a triangle, except its tip should be rounded instead of acute. The hypothenuse marks the spot where the neck begins.
After you add the triangle, you can draw an upward line at each tip of the hypothenuse and extend the lines toward where the ears will be.
If you wish also to illustrate a neck, picture it as a rectangle with a narrower top and wider bottom. You should connect its upper part to the hypothenuse.

At this point, the base of the head looking up is ready. All that’s left is to draw the elements of the face. If you’re still learning how to draw, keep all elements simple. For example, when drawing this head angle, you can sketch the nose like a triangle or a tiny pyramid, while the eyes can look like quarter-moons.

How To Draw The Back Of A Head
The back of the head is arguably the simplest of all angles to draw, mainly because the face elements aren’t visible.

When drawing a head from behind, you don’t have to draw a sphere. Instead, you can just illustrate an oval shape as the basic head form.
You can draw two short, straight lines for the neck and connect them with the bottom of the circle.
Depending on what kind of character you’re drawing and how prominent their facial features are, parts of the jaw should show when drawing the head from the back.
You can simply draw a straight line from the left and the right side of the circle and add the curve of the face to join the circle to the neck.
As for the ears, you’d want the lobule to end where the jaw starts. As always, keep everything simple because you’re still learning; for example, you can use “C” and reversed “C” shapes as ears.
If you plan on drawing a character with long hair, the ears and the neck won’t even show. However, you should still draw the oval head shape first and then add details to it because that will help you avoid illustrating a disproportionate head.
If you want to draw a character from the back with their head turned slightly to the side, you need to sketch more of their jaw.
In this case, you’d still want to start with a circle shape. But this time, don’t draw the full circle. Instead, sketch the top and the left or right side of the circle, depending on the direction the character is facing.
You can use a vertical and horizontal line to help you determine the position of the eyes and the ears, just like Gonçalo showed you in his tutorial on how to draw faces.
Then, add the basic neck lines and connect the top of the circle with the neck. But, instead of just drawing a convex line to connect the two points, make sure to add the jawline and attach it to the neck.
You can then add an eye socket; it can look like a triangle without the hypothenuse. You can add eyelashes to it or even illustrate a small part of the character’s eyebrows.
And lastly, don’t forget to draw the ears. Alternatively, you can sketch a character with longer hair, so their ears won’t show.

How To Draw A Face From The Side
Many people find drawing a face from the side tricky because they often struggle to get the proportions right.
But, if you deconstruct the head and sketch one element at a time, drawing a proportionate head from a side becomes much less complicated.
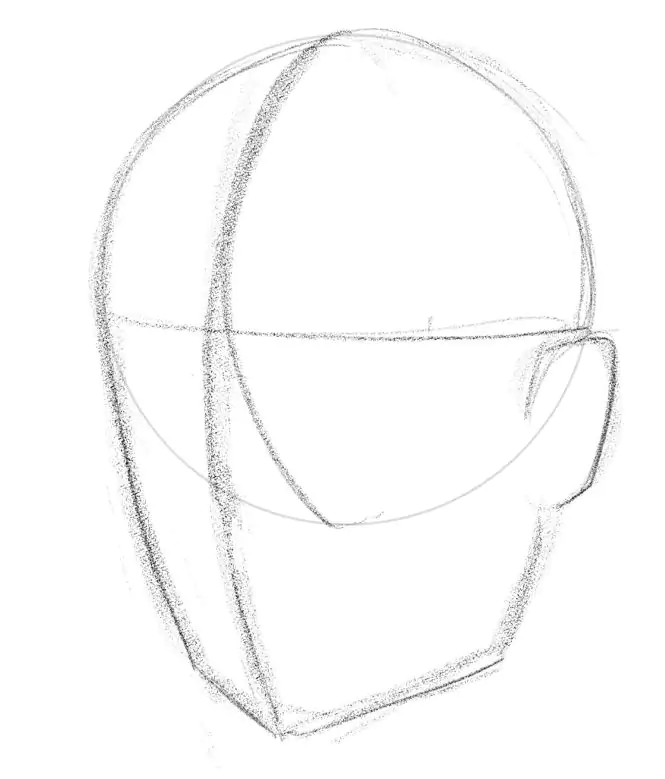
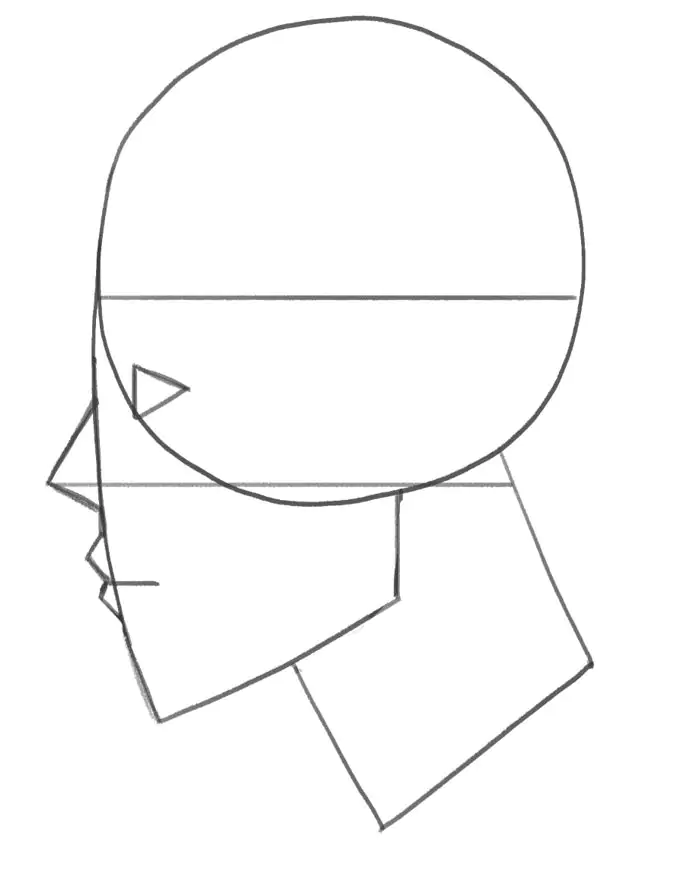
As with most head and face angles, the first step to drawing the head from the side is to draw an oval shape.
Then, draw a vertical line down the middle and add a horizontal line through the center of the basic head shape. Extend the vertical line and have its end mark the tip of the chin you’ll sketch later.
Now, choose the direction your character is facing.
Say you want to draw a person looking to the left.
In that case, you should draw a straight downward line from the left side of the circle. That’s going to be your character’s jaw. You should make the line as long as the vertical line you previously drew through the middle of the head.
Next, connect the straight line to the bottom of the oval shape. You can use a straight line, but you could also bend it slightly upwards to illustrate the ramus jawbone. Ramus is the back, vertical part of the lower jaw!
When you look at the eyes from a side, they resemble triangles with eyelashes and partly visible eyebrows.
So, to sketch an eye, go for a small triangle shape and place the eyebrows right above it.
You can use the triangle shape also for the nose. You could leave it as it is, or, if you want, add a nostril shaped like a tiny circle to it.
For the lips, use straight, short lines. Depending on the emotion you want to illustrate, you can press the lines together or draw them slightly apart. If your character has their mouth open, you can draw the mouth as a reversed “C”.
The top of the ear should be in line with the outer eye corner, while its bottom should be attached to the jaw, i.e. the ramus.
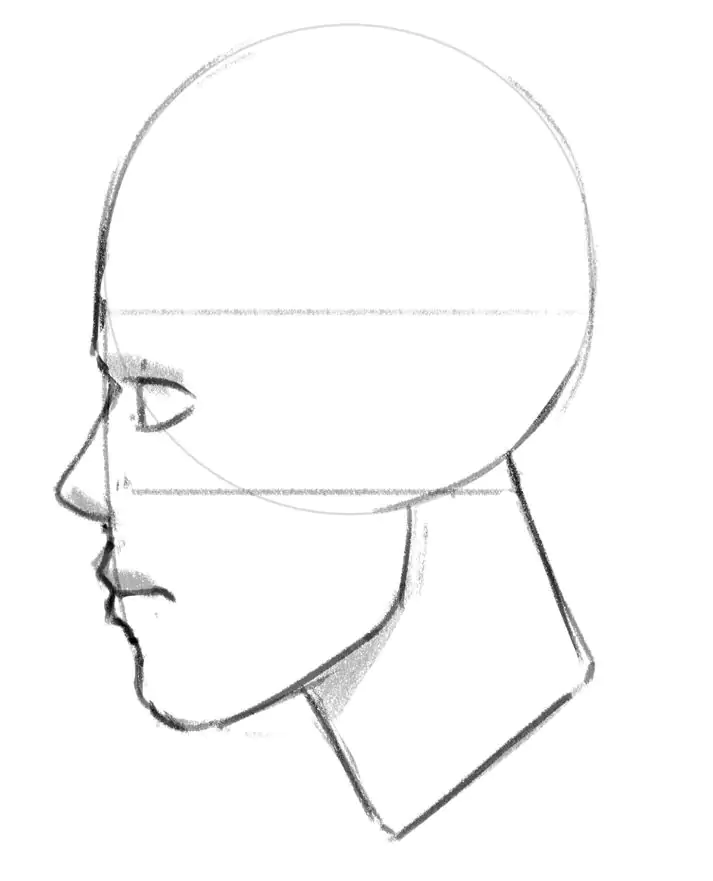
This is what our rough sketch of the head from the side looks like:
Once the backbone of your drawing is ready, you can make the lines of the sketch less sharp, especially for the eyes, the nose, and the mouth.
You can also make the jaw less straight and add the labiomental groove.
That will make your drawing look more realistic, like this:
Recap On Drawing Head Angles
No matter how intimidating drawing head angles may seem, the process becomes much easier when you focus on the basic shapes that make up the head and the face elements.
We recommend you always sketch the skull first because it’s like the framework for your head drawing that helps you draw a proportionate head.
Practice drawing spheres first, then slowly progress to adding the jaw. Once you perfect the basics, you can then draw the rest of the face elements and add finer details to your illustration.


