


Related Resources
Facial expressions are a way to depict your comic book characters’ emotions and personalities.
In one of our previous tutorials, we showed you how to draw a face from the front, but for that guide, we purposely used a subject with a neutral expression.
This time around, we’ll share a tutorial that will help you learn how to draw facial expressions in several steps with two beginner-friendly guides: first one showing you how to draw a happy face, and the next one showing you how to draw a sad face.
But first, a couple of useful resources!
The Tools You’ll Need To Draw Expressions
When learning how to draw facial expressions, using the right tools can make your job a lot easier.
We suggest these:
- An H pencil: “H”, i.e., “hard” type of lead; it leaves a light trace on paper, so it’s perfect when creating basic outlines. The lighter the trace, the easier it is to erase mistakes and unnecessary details. We recommend trying Staedtler’s Mars Lumograph H pencil.
- A kneaded eraser: This type of eraser is easy to stretch so you can tweak its shape as needed; as such, it’s perfect not just to remove mistakes but also to highlight parts of your mouth sketch. Faber Castell’s kneaded eraser is a good choice!
- Lightly textured sketch paper: This paper is the best choice when drawing because it allows you to move your pencil over the paper’s surface smoothly and easily erase mistakes. You can try Moleskine’s Art Sketchbook!
These are just recommendations, but any other pencil, eraser and paper will do!

How To Draw A Happy Face In 11 Steps
Let’s kick things off with a guide on how to draw a happy face.
1. Draw The Head Outline
The first step to drawing facial expressions is sketching the head.
If you need help illustrating a head, this tutorial on drawing head angles is for you! In this guide, we share step-by-step instructions to show you how to draw a head from the front and the side, from behind and a head looking up.
Gonçalo drew a head slightly from the side, with one ear showing, like this:

And if you struggle drawing an ear, follow this step-by-step guide on how to draw ears!
2. Sketch The Upper Eyelids
Now, let’s add the eyes to the sketch.
First up, draw the upper eyelids.
We’re drawing a happy face, and when we’re happy, our eyes go big and our pupils dilate.
So, draw upper eyelids like half-circles or crescent moons, like this:

3. Add The Lower Eyelids
Now, sketch lower eyelids by connecting one eye corner to the other, like so:

4. Sketch The Irises
Next up, let’s add the irises.
Simply draw two circles and place them where you want your character to look.

If you want to illustrate realistic eyes, check out our detailed guide on how to draw eyes!
5. Draw The Nose
Once the eyes are in place, next comes sketching a nose.
We created an in-depth tutorial on how to draw a nose, so you can check it out if you need help drawing a nose from the front and the side.
Since our character’s head is gently turned to the side, only one side of the nose is visible:

6. Draw The Eyebrows
Since you’re drawing a happy person, their eyebrows are likely raised. For now, just draw simple arches and you’ll add details to them later on.
Here’s how Gonçalo illustrated the eyebrows:

7. Start Sketching The Upper Lip
When you’re happy, you have a big smile plastered on your face, right?
The character you’re drawing shouldn’t be any different.
So, draw the bottom line of the upper lip like a letter “W”, like this:

8. Finish Drawing The Upper Lip
Now, illustrate the upper lip as thin or as full as you like.
Gonçalo drew it like this:

Gonçalo also created a step-by-step tutorial on how to draw a mouth, so make sure to give it a look to learn how to draw a mouth!
9. Sketch The Lower Lip
A happy smiling face has a mouth slightly agape.
After all, they are stretched into a gorgeous smile.
So, when drawing the lower lip, leave a bit of space between the upper and lower lip:

It’s up to you to decide how full the mouth should be, but we fancied drawing full lips on this happy face.
10. Add The Finishing Touches To The Happy Face
Now’s the time to add dimension to your drawing.
For example, you can make the eyebrows a bit thicker, or lightly shade them so they appear thin.
Then, draw the eyelid crease and add some fine lines around the eyes. These fine lines should be upward facing, so your eyes appear to be smiling too.
You can also draw the Cupid’s bow and some fine lines around the mouth to give them more depth.
And lastly, add a short line to mark where the mentolabial sulcus is. That’s just a fancy name for the fold between your mouth and the chin.
Here’s how Gonçalo’s sketch looks like at this point:

11. Finish Drawing A Happy Face
You’re almost done!
Let’s use light vs. dark lines to create a visual hierarchy.
For example, here we are adding dimension to the face by darkening the lines that protrude on an average face, like the nose and eyebrows/browbone, and we are lightening the elements that are a little more sunken in compared to them like the mouth, chin and the eyes.

We purposefully avoided drawing hair since we wanted to illustrate a gender-neutral face.
Feel free to add whatever kind of hairstyle and accessories you like to your sketch!

How To Draw A Sad Face In 9 Steps
In comic books, like in life, things don’t always work in the good guys’ favor.
So, if you plan on creating your own comic book, it’s important you learn how to draw a sad face too.
1. Draw The Head Outline
First things first — start off by drawing a head outline.
That way, you won’t struggle with proportions when you start adding the eyes, nose and mouth.
Gonçalo drew the head the same way he did while drawing a happy face:

2. Sketch The Upper Eyelids
Next comes illustrating the upper eyelid.
Since you’re drawing a sad face now, the eyes should reflect the sentiment.
So, no sketching wide, excited eyes this time around.
Instead, draw a short, wavy line that slightly curves toward the outer eye corner, like this:

3. Add The Lower Eyelids
Now, add the lower eyelids, but make sure that the crease of the upper eyelid remains visible. You want the upper line to gently curve upwards, because, remember, this face needs to look sad, so you’ll want to make the eyes look a bit droopy.
This is what Gonçalo’s eye outline looks like:

4. Sketch The Irises
To complete the eye drawing, draw the irises. They are simple circles that should take up about ¾ of the eye area, or more if you’re drawing a face at an angle like we here.
Check out how Gonçalo positioned the irises:

5. Draw The Nose
The nose remains pretty much the same as on the happy expression, so just follow the same steps here. When drawing a sad face, it is the eyes and the mouth that carry the expression.

Of course, you should feel free to change the shape of the nose depending on how you want your character to look!
6. Start Drawing The Mouth
Now we move lower and we’re going to draw the mouth.
When people are sad, the corners of their lips are pulled down, resembling the letter “M”, like this:

7. Add The Eyebrows
One of the surefire ways to tell if someone is sad is to look at their eyebrows.
In most cases, sad people have the inner corners of their eyebrows slightly angled-up:

At this point, you can draw the eyebrows as two thin lines. We’ll add texture to them later!
8. Add The Finishing Touches To The Sad Face
Let’s add some more dimension to this sad face, shall we?
You can add creases around the eyes, one on the upper eyelid and the other under the inner eye corners.
When someone’s sad, their whole face crumples, so you can draw short marionette lines if you like. Since a sad person’s lips pull down, creases around them are bound to form! Marionette lines run from your mouth corners toward the chin and they become more pronounced the older and sadder you get.
Let’s not forget about the Cupid’s bow either! That’s a tiny detail that makes the face look more realistic.
Then, add just a short line to mark the lower lip, and another line below the lower lip to mark the fold between the mouth and the chin:

9. Finish Drawing A Sad Face
You are close to finishing your sad face drawing!
All that’s left to do is draw a crease between the eyebrows and some more worry lines below each brow, like this:

And if you prefer bushier to thin eyebrows, now’s the time to change their look!
Meet The Artist
This guide on drawing facial expressions was created by the lead BIOWARS artist — Goncalo Lopes.
He’s in charge of giving the BIOWARS characters a unique look and feel, but also of creating simple art guides for beginners.
If you follow Goncalo’s step-by-step instructions, you can easily improve your drawing skills even if you’re completely new to the world of art!

A Recap On How To Draw Facial Expressions
Let’s do a recap on how to draw facial expressions!
Using an H pencil, you can draw both a happy and a sad face.
In both cases, start by drawing a head shape first and then add the eyes and the nose.
The mouth comes next.
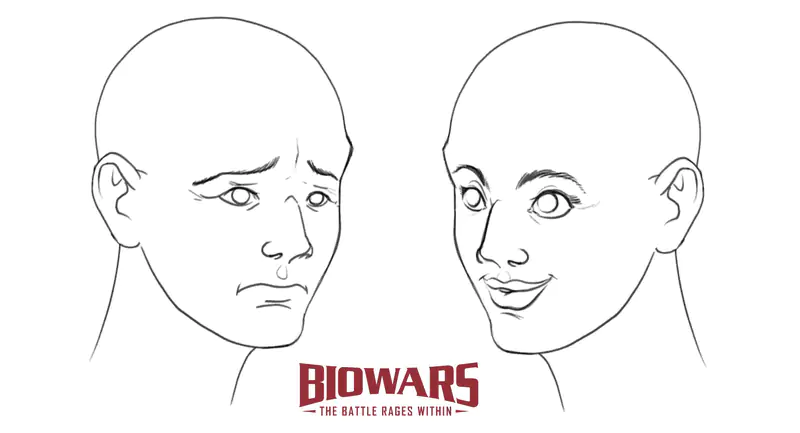
When illustrating a happy face, make sure the mouth corners are angled upwards. For a sad face, the mouth corners should be angled down.
Then, move to the eyebrows, and ensure their shape corresponds to the facial expression you’re drawing. If someone’s happy, their eyebrows are likely to shoot up. When they’re sad, the inner eyebrow corners are pulled up and a crease appears between the eyebrows.
Lastly, add some creases around the eyes and the mouth, to ensure your drawing looks realistic.


