


Related Resources
Time to learn how to draw a dragon!
What’s not to love about dragons?! They’re mighty, mythical, mysterious and are the integral part of many epic stories, comic books included.
Remember Tony Stark’s nemesis White Dragon?
Yes, dragons are awesome, but they are a pain to draw! If you tried, we feel you.
So, we turned to our lead comic book artist to create a beginner-friendly tutorial and help you learn how to draw a dragon:
The Tools To Use When Learning How To Draw A Dragon
If you enjoy drawing with a pencil, we recommend you get your hands on these tools:
- An H pencil: The hard type of lead allows you to create light lines, which are perfect for outlining and easy to erase.
- An HB pencil: This type of pencil is the golden mean. HB pencils have a medium-hard lead, so they leave a moderately dark trace. That makes them ideal for soft shading, but you can also apply some pressure and use them to make the contours more prominent.
- A kneaded eraser: We like to recommend kneaded erasers because they are highly malleable, so you can easily change their shape depending on what you need to erase or even highlight.
- Lightly sketched paper: This kind of paper has a smooth surface, so your pencil easily glides over it.
Don’t have any of these? No worries; Just pick up your favorite pencil and just watch the pressure you apply with it!

How To Draw A Dragon Step-By-Step [Visual Guide]
Since dragons exist only in our imagination, there are a ton of different imaginations of them. So, have fun with it! And draw a dragon that fits your storyline.
For example, just compare Shrek’s red dragon(esse) with full makeup on with Game of Thrones’ super-serious-next-level-CGI dragons.
Each representation of this creature serves a different story and environment.
We’re going to show you how to draw a fierce dragon with wings in 6 steps.
We’ll start building the sketch using simple shapes to position the different body parts and get the proportions right.
So, grab your pencil and let’s dive in!
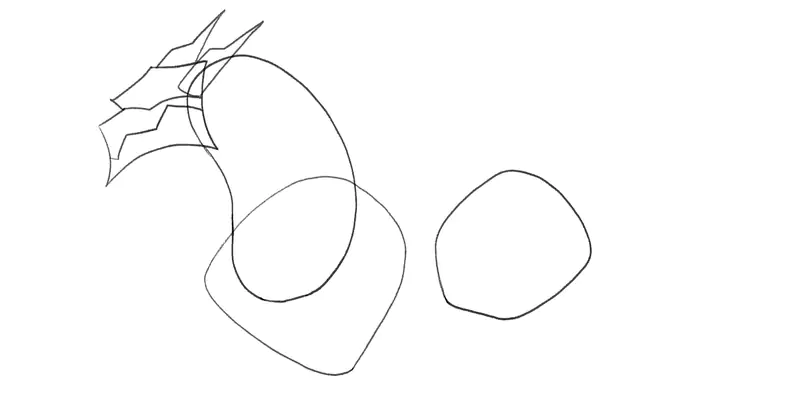
1. Torso Sketch
Recommended pencil: an H pencil
The first thing you should draw is the dragon’s chest.
Aim to draw this shape somewhere in the middle of your paper to leave enough room for the wings, legs, and tail to come in.
The base for the dragon’s chest looks like a slanted rectangle with rounded edges that’s also slightly wider on the left side, like so:

Then, let’s add the base for the dragon’s hips:

This part is about two-thirds of the size of the chest.
It looks almost like an outline of a house, with rounded edges and a pointy roof.
You should leave some space between the chest and the hips and position them so that the top angle of the hips is just a tiny bit above the chest.
Now’s the time to outline the neck.
You can draw it by sketching a simple kidney bean.
Check this out:

Draw a kidney bean and make it overlap with the chest —more than one-half of the chest’s size.
The neck’s length depends on your preferences, but we drew it about one-sixth longer than the chest.
Once the neck is in place, you can draw the head outline.
2. Head Sketch
The dragon we’re illustrating is looking to the left.
The head outline should slightly overlap the neck outline.
Oh, and it also resembles a reversed capital B but with sharp lines and without them meeting in the middle. Use slightly curved lines to draw the head:

Now’s the time to add some lines to position and outline:
- The horns
- The eyes (i.e. the eye because we’re drawing a semi-profile)
- The mouth
Now, let’s give this mighty creature something to stand on!
3. Arms And Legs Sketch
Now we’re adding guidelines for the dragon’s arms and legs.
Start with its left arm. Remember, these are just guidelines, so we’ll continue using simple shapes to place everything in its position.
Draw it by joining together two almost oval shapes, like this:

The dragon’s front left thigh is as long as its chest.
The upper oval shape touches the neck and it goes a bit under the lower chest line. The bottom oval shape is attached to the chest.
Now, let’s add the shin.
First, draw a straight line and make it intersect the bottom of the thigh at a right angle.
Then, connect the ends of the line by drawing a curved line, like so:

Once you finish drawing the shin, the dragon’s left front hand comes next.
Take a look at the image below.
Doesn’t the dragon’s hand look like two small mountain outlines glued together?

Since the dragon we’re illustrating is standing on all fours, the hand is placed firmly on the ground at a 90-degree angle. Oh, and it’s spikey because dragons have claws on their feet!
While we’re on the subject of drawing hands, if you struggle to sketch a human foot, check out our beginner-friendly guide on drawing hands!
Let’s draw the arm on the right. We’re drawing the dragon’s semi-profile, so only parts of this arm will show.
Let’s do a little triangle right below the base of the neck outline.

Now, sketch the forearm:

The forearm outline on the left and the right are the same shape. Just make sure that they’re parallel to each other!
And to finish drawing the left front arm outline, sketch the hand just like you drew the one on the left side:

Again, draw the two mountain outlines next to each other. Don’t worry if this hand is not the same size as the one of the left. Gonçalo also illustrated the right front hand larger than the left.
Since you just finished illustrating the dragon’s front legs, it’s time to draw its back legs!
Start from the back left leg.
First, draw the thigh by sketching an oval shape that covers about two-thirds of the dragon’s hip:

The dragon’s back legs are stronger than its front, so the thigh muscles are bigger and just slightly wider than the front left thigh.
The back left shin is also slightly longer than the shins at the front.
Its shape is more rectangular that the shin at the front. Also, the part that’s closer to the ground is wider than the bit below the thigh.
When sketching the back shin, you don’t have to attach it to the thigh. You’ll connect them later when contouring!
For now, draw it like this:

Next up, draw the foot.
From this point of view, the dragon’s foot looks like two large spikey teeth put next to each other:

Now, connect the dragon’s shoulder to its back and its chest to its hip.
For the former, draw a curved line that looks like the inside of a bowl, and for the latter, the shape of the contact lens, like this:

4. Tail Sketch
Dragons’ tails are usually as long as their torso, if not the whole body. Theoretically, this helps them balance their weight while flying. In practice, it just makes it grander and more intimidating.
Just like we did with other body parts, we’ll draw the tail by stitching several parts together.
For starters, draw a long, peanut-like shape, have it cover around one-third of the dragon’s hips and point it to the right, like so:

We’ll curve the tail towards the body, so overlap the tail base with a similar sized and shaped outline. Angle it at almost 90 degrees.

Add another “peanut-y” shape and angle it towards the calf of the back leg.
Ensure that the third shape in the row is one-third of the first because you want the tail to gradually become narrower the further away from the back it goes!

The fourth part of the tail is the thinnest.
Overlap the calf of the back leg and curl it toward the thigh:

Curve the next part of the tail towards the front leg, touching the elbow. This outline should be about half the width of its predecessor:

To finish drawing the tail, add a large spike at its end, like so:

Now that you drew the dragon’s tail and its upper body, let’s finish illustrating its legs.
To sketch the back right leg, draw a line from the intersection of the hip and the stomach and add another one slightly in front of it.
Make this leg parallel to the back left leg and have the claws of both legs in line with each other.
Since the front leg is covering a portion of the back right leg, only a tiny bit of the foot claws shows, like this:

5. Wings Sketch
Draw a teardrop shape between the dragon’s neck and the top of its thigh:

Then, attach an elongated spike (it should almost align with the top of the dragon’s head), make it touch the dragon’s back and point it away from its body at a 45-degree angle, like so:

Now, draw another spikey shape; make it one-third shorter than the previous element and point it to the left, toward the dragon’s head:

At this point, you can add a little claw at the top of the dragon’s wing and bend it to the left, close to the dragon’s neck:

To finish illustrating the left wing, draw a shape that resembles the scythe’s blade. (You know, the Grim Reaper’s tool).
Bend the wing down to the second element of the tail, then curve it upward above the tail and have it touch the dragon’s backside. From there, follow the shape of the dragon’s hips and finally connect the wing to the teardrop shape you drew at the beginning:

The right-wing looks the same, except that not all of it shows from this point of view — you’ll see it below!
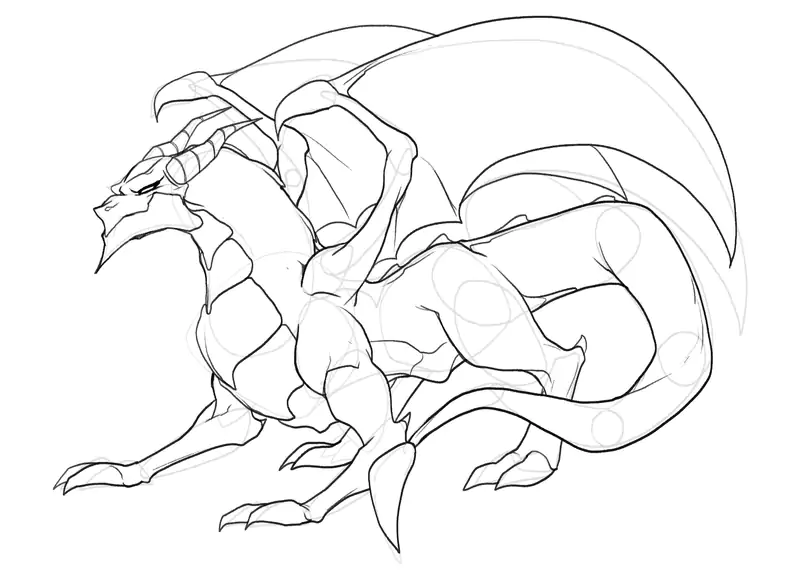
6. Drawing In The Details
Recommended pencil: an HB pencil
Congrats, you finished drawing the framework of the dragon’s body!
See, that wasn’t so hard because we did it step by step by drawing simpler shapes and gluing them together to form a big, powerful dragon body!
Now’s the time to draw the contours to make the drawing more cohesive.
For the contours, we recommend you take an HB pencil because it will allow you to make darker strokes, and you’ll want the contours to be eye-catching!
Let’s start from the head.
Go over the outline first.
Then, add a small nostril and draw an eye above the mouth line.
We’re illustrating a dangerous beast, so the eye should appear elongated but narrow, like this:

To divide the left half of the face from the right, sketch a line from the nose to the top of the dragon’s head.
Once you finish adding details to the face, add several parallel curved lines to the horns, to give them more texture and dimension.
Next comes contouring the dragon’s neck and its chest.
Make sure to draw the scale pattern on the neck and the chest, similar to the crocodiles’:

Next, contour the front left arm.
Those oval shapes you sketched earlier represent the arm muscles, but when contouring, you should just follow the outer outline and avoid connecting the muscles in the middle
At this point, you can also add a tiny horn above the joint, like so:

Draw the contours on the front right arm, too:

Next, let’s outline a part of the left wing with the claw at the top:
Next, let’s outline a part of the left wing with the claw at the top:

Now, contour the hips and the back legs.
Again, follow the basic shapes outlines to ensure the legs look strong and muscular, like this:

Once you finish drawing the legs, continue contouring the tail!

Next, let’s contour the right wing from the shoulder to the claw:

Now, draw the rest of the wing contour, like so:

Another way of making a dragon look intimidating is to add spikes on its back.
Draw them like mountain or dune outlines and make sure there’s some space between them:

You’re only two steps away from completing your dragon drawing!
Now, let’s add some finishing touches to the sketch.
Continue drawing the scale pattern from the neck and the chest to the rest of the dragon’s belly.
Then, add short lines around the joints and some on the wings, too, to add more dimension to the sketch:
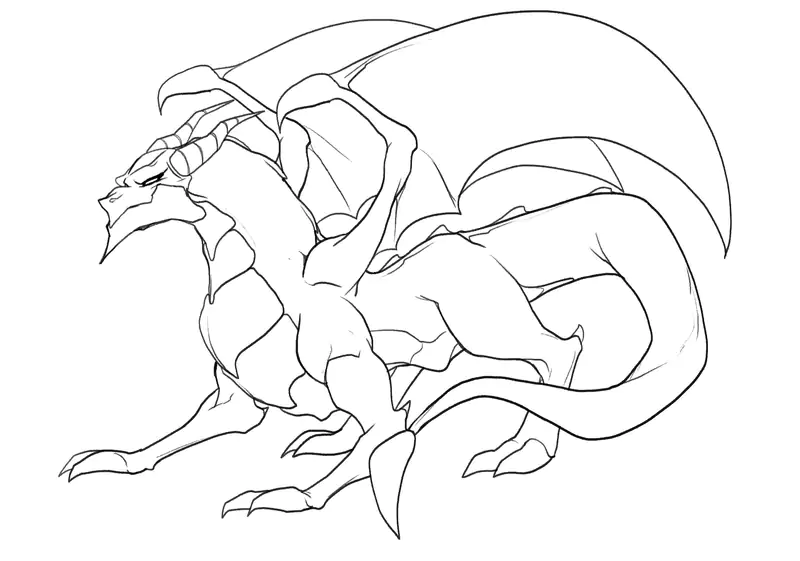
7. Erase The Sketch Guidelines
Recommended tool: a kneaded eraser
The last step to drawing a dragon is to get rid of the guidelines that helped you draw a dragon!
Grab your kneaded eraser and carefully erase the lines between the contours since you don’t need them anymore.
The finished illustration of the dragon’s body looks like this:
Finished Drawing A Dragon? Try These Next!
Once you make it to this step, congrats are in order!
We know how challenging illustrating a dragon may be and you did an awesome job following all the steps!
Now that you know how to draw a dragon, are you ready to learn how to draw the rest of the animal kingdom:

Meet The Artist
This guide on dragon drawing (and every other art tutorial in our library) was created by Goncalo Lopes — the resident BIOWARS artist.
Throughout his career, he’s worked on many well-known projects, including GI-Joe, Godzilla, Transformers, TMNT, Adventure Time, and many others!
Goncalo’s also in charge of giving the BIOWARRIORS and the invading pathogens their distinct look, so if you haven’t already, make sure to check out what our characters look like!

A Recap On How To Draw A Dragon Easy
When learning how to draw a dragon, you need:
- An H pencil
- An HB pencil
- A piece of lightly textured paper
- An eraser
- A good guide
When you have good instructions, you can easily master the skill of illustrating a dragon.
The key is to start small and draw one body element at a time, starting from the chest.
From there, you can progress onto the dragon’s neck and the head, then add the front legs, the hips, the back legs and lastly the wings.
When you finish sketching the framework with an H pencil, you can switch to the HB pencil and add the contours and the finishing touches to the sketch.


