


Related Resources
Your hands have 27 bones each.
There are quite a lot of them and they come in all shapes and sizes, which is why a skeleton hand drawing can seem challenging.
But, with the right guidance, you can easily draw a skeleton hand in just five steps. Even if you don’t have training in drawing or art in general, you can easily follow this tutorial:
If you prefer to follow illustrations, read on!
The Tools We Recommend For A Skeleton Hand Drawing
To make the process of drawing a skeleton hand easier, we suggest getting these tools:
- An H pencil: A hard lead allows for light strokes, which is just what you want when sketching.
- An HB pencil: A medium-hard lead lets you leave a darker trace on the paper, so you can use it when adding soft shadows to your sketch.
- A B pencil: A soft lead leaves a dark trace on the paper, which makes it the perfect choice for shading.
- A kneaded eraser: These erasers are easy to shape the way you want. You can easily make them shorter/longer or thicker/thinner depending on what you want to erase.
- Lightly-textured sketch paper: Paper with a soft surface is a good choice for drawing because pencils easily glide over it, and erasing mistakes is easy.
These are just our recommendations. You can use the tools you’re most comfortable with!

How To Draw A Skeleton Hand Easyly In 5 Steps
Our guide is beginner-friendly, which means that we’re going to break the hand (no pun intended) into basic shapes and draw them one by one.
That way, drawing a skeleton hand won’t be as difficult as it may seem at first!
We’ll take you through these steps:
- Drawing the palm bones
- Drawing the finger bones
- Finalizing the bone outlines
- Adding the finishing touches
- Shading the drawing
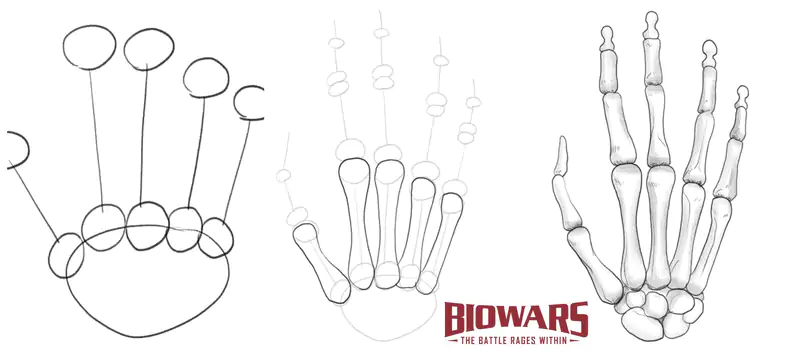
1. Draw The Palm Bones
Recommended tool: H pencil
The first step to drawing a skeleton hand is to sketch the bottom of the palm.
This is where the carpal bones are placed. They connect your hand to your forearm.
To create a rough sketch of carpals, draw an oval shape, like this:

2. Draw The Finger Bones
Recommended tool: HB pencil
Then, add five circles of roughly the same size at the top of the oval shape. These represent the bottom of the metacarpal bones.
Don’t let the big words scare you away!
“Metacarpal bones” is a fancy name for the longest bones in your fingers.
The top line of carpals should go through the middle of each circle:

Now, each finger has three bones (except for the thumb, which has two).
For starters, determine the length of the metacarpal bones and draw more circles to mark the top of each bone.
The distance between the first and the second thumb joint should be shorter than on the other fingers.
Your index and middle fingers have the longest metacarpal bones, so pay attention to that when adding joints.
We’re drawing a skeleton of a right hand, so the thumb is on the left.
Draw five more circles and make them parallel to the circles at the bottom, like so:

Then, connect the circles to form the basis for metacarpal bones:

Next comes drawing proximal phalanges.
These are the middle bones of your fingers (or the top bones of your thumbs).
Again, the easiest way to draw the bones is to first mark where they start and end, and then connect the two ends.
So, draw five circles the same size as before on top of the metacarpal bones:

To finalize the outline of the proximal phalanges, add circles to mark the top of the bones.
The middle finger has the longest proximal phalange, then the pointer finger, and so on.
Now, connect the circles:

Next comes drawing the middle phalanges.
You know the drill by now.
Start by drawing the circular bottom of each of the five bones.
The thumb has one bone less than other fingers, so don’t draw the top of the bone on it.
Instead, draw a straight line slightly leaned to the right, like so:

Then, draw the top of the bone on each finger and connect the circles with straight lines:

The last part of the outline are the distal phalanges — the smallest of the bunch!
To draw them, simply add short, straight lines, like so:

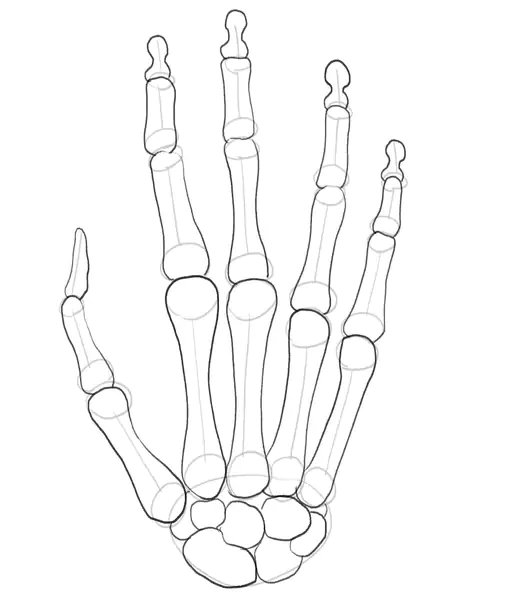
3. Finalize The Bone Outlines
Recommended tool: HB pencil
Once you position the bones and determine their length, it’s time to outline them.
Start with metacarpal bones.
All you have to do is connect the circles at the top to the bottom ones.
Make sure to use round lines and have the bones become narrower in the middle:

Then, outline the proximal bones using the same technique.
So, no sharp edges and make sure the bones are narrower in the middle than around the ends.
Don’t worry if your bone sketches don’t look perfect. Some lines may not look symmetrical and others may not be as curved as the rest — and that’s okay!
Look at our sketch and notice how the bones aren’t the same:

Next comes outlining the middle phalanges.
You can skip finalizing the thumb for now; you’ll go back to it in the next step!

To finish outlining the fingers, add the distal phalanges.
These tiny bones have a wide bottom, narrow middle, and a mushroom-like, round top.
As for the thumb, you can draw its top as a long nail observed from the side:

The last step when outlining bones is to sketch carpal bones.
You can draw them as rocks of pretty much the same size, but make sure that the one at the bottom left is the largest. That’s the scaphoid bone, and it’s vital for the motion in your wrist:
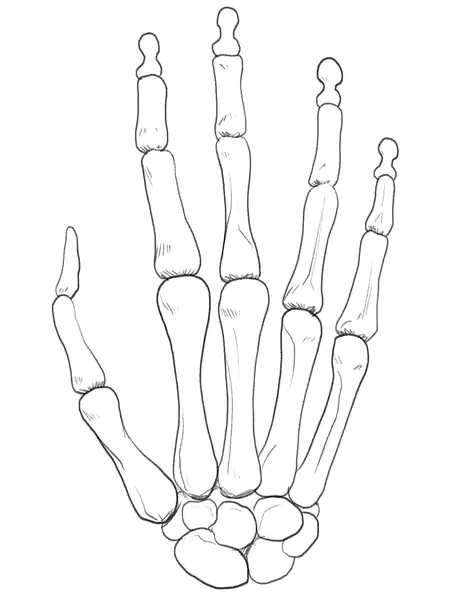
4. Add The Finishing Touches
Recommended tools: HB pencil and a kneaded eraser
Now’s the time to add some finishing touches and start shading the drawing.
For starters, you can grab an HB pencil and add a few short lines at the bottom and top of each bone:

Then, grab your eraser and carefully remove the unnecessary lines, like so:
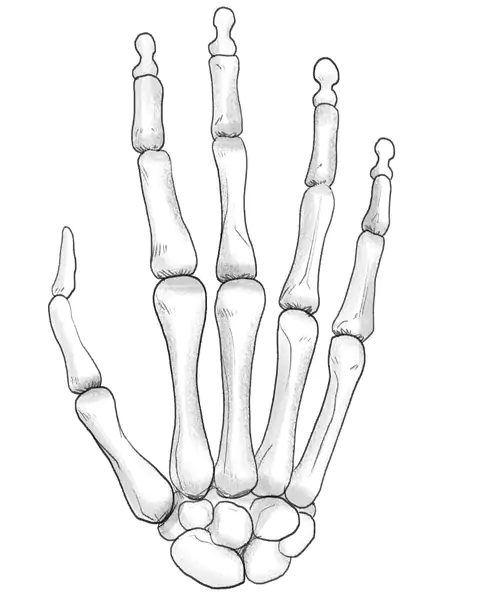
5. Shade Your Drawing
Recommended tool: B pencil
To make your skeleton hand drawing look more realistic, you can shade it.
We recommend using a B pencil because the softer lead leaves a darker mark on the paper.
You don’t have to overdo it with shading.
You can go over the outline to make the lines more pronounced and then gently shade the top and bottom of the bones and their sides.
The final sketch should look like this:
Finished Your Skeleton Hand Drawing? Try These Next!
When you complete your skeleton hand drawing, we encourage you to give our other BIOWARS tutorials a try.
We have a separate guide on how to draw hands (no bones this time), but you can also learn how to draw other parts of the human body, including:

Meet The Artist
This guide on how to draw a skeleton hand the easy way was created by Goncalo Lopes — the lead BIOWARS artist with an impressive resume.
He has worked on projects such as TMNT, Transformers, Godzilla, GI-Joe, Adventure Time, and much more.
Goncalo’s also responsible for the unique look of the BIOWARS characters — both the BIOWARRIORS and the invading pathogens.
He also makes simple how-to-draw guides for our audience, so anyone can improve their drawing skills even if they don’t have prior experience in arts!
A Recap On Easy Skeleton Hand Drawing
When creating your first skeleton hand drawing, it’s important to break the sketch into basic shapes.
You should:
- Position the palm bones first
- Mark the top and bottom of every bone by drawing small circles and then connect the circles with straight lines
- Use round lines to finish outlining the bones
- Add several short lines on the bones to add more dimension to the sketch
- Shade your drawing
Even if you’re a beginner, you’ll have no trouble drawing a skeleton hand when you follow these guidelines and work on your sketch one step at a time.


