


Related Resources
Mushrooms come in all shapes and sizes, but the most common and recognizable species are those with round caps.
In this beginner’s guide, BIOWARS lead illustrator Gonçalo Lopes shares the steps to creating a detailed mushroom drawing the easy way:
Aside from a video of his mushroom drawing process, the guide also includes helpful illustrations of each step!
The Tools You Need For Mushroom Drawing
Tools you might want to use for your detailed mushroom drawing include:
- An H pencil: A harder lead is the best option for sketching since it leaves a light trace on the paper. You can easily build but also erase lines when you make a mistake.
- An HB pencil: A medium-hard lead is a good choice when adding soft shadows to your drawing.
- A B pencil: A soft lead is best when shading, since it leaves the darkest trace of the three lead types.
- A kneaded eraser: You can shape kneaded erasers the way you want, depending on what you need to get rid of.
- Lightly textured sketch paper: This type of sketch paper has a soft surface, so your pencil can easily glide over it.
Choose the tools you’re comfortable with or the tools you want to try out. Gonçalo uses only one pencil in the video, so there’s no correct or incorrect lineup — it’s up to you!

How To Draw A Mushroom In 7 Steps
Ready to draw a mushroom in seven easy steps?
To help you practice and perfect your skills, let’s focus on mushrooms in three different sizes.
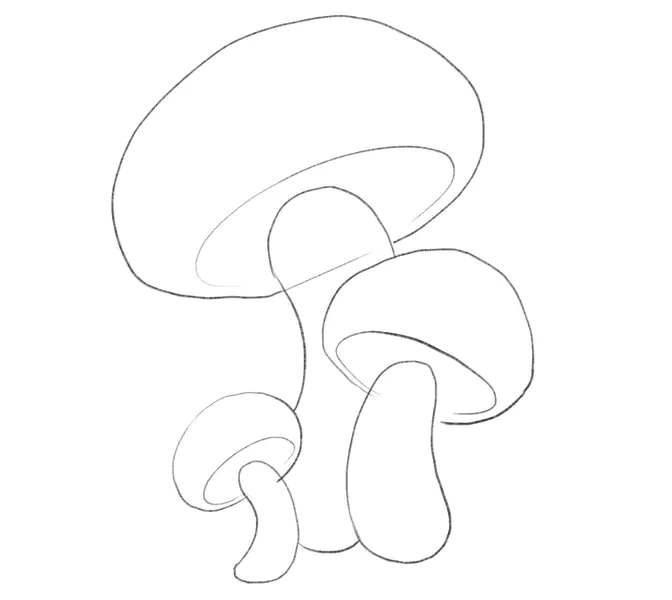
Step 1. Draw The Caps
Recommended pencil: H pencil
The first step to drawing mushrooms is to sketch the caps.
They should be spherical or umbrella-like — don’t worry about trying to draw perfectly rounded lines.
Some mushrooms can have more pointy tops than others, but try to round the sides of each cap, and make the cap in the middle the largest.
The cap on the right can be about half of the size of the middle cap, and the one on the left should be the smallest of the three.

Since we’re drawing mushrooms as if we were looking at them from underneath, let’s draw the underside of each cap.
You know that ring-like part under the cap of a Portobello mushroom?
That’s what we have in mind.
Draw a round line that covers about one-third of each cap, like this:

Step 2. Draw The Stems
Recommended pencil: H pencil
Next, it’s time to give the mushrooms something to stand on.
The stems, a.k.a. stalks, ensure the caps stay high enough above the ground so mushrooms can release their spores and make new mushrooms.
When drawing stalks, make sure the size is proportionate to the size of the caps.
Draw the stalks from the middle of the underside area and curve them in the opposite direction of the caps, like so:
Step 3. Draw The Rings
Recommended pencil: H pencil
Some mushroom species have ring-like parts on the stems.
This structure is called an annulus and its purpose is to protect the gills of immature mushrooms. (More on gills soon!)
The ring is usually at the top of the stem, right below the cap.
So, draw it like a collar that is slightly wider than the stem and ensure it covers the top quarter of the stem.

Now, imagine there’s a line that connects the rings to the underside edges on either side of the stem.
At the two points where the imaginary line and the underside circles would touch, draw short, outward-curved lines.
Then, continue adding similar curved lines along the underside. That way, you’ll add dimension to the cap and make the edges appear soft and rounded.

Step 4. Draw The Gills
Recommended pencil: H pencil
Gills or lamellae are the thin, vertical lines on the inside of the cap.
They have two important functions:
- To support the cap
- To disperse spores
Of the millions of mushroom species out there, not all have gills, but we’ll add them to our drawing.
Draw gills as thin, curved lines that stretch from the stem to the edges of the cap’s underside:

Step 5. Add Details To The Rings, Stems And Caps
Recommended pencil: HB pencil
Let’s start adding details to the sketch to give it more texture.
First, how about we add some fibers to the rings?
Add short, straight lines at the lower half of each ring.
Keep in mind — you don’t want to draw the lines the same size. Nature is full of irregularities and your drawing should reflect that!
As for the fibers at the top of the ring, you’ll want to draw them slightly curved. That way the ring won’t appear too sharp where it touches the gills.

Next, add the fiber-y texture to the stems by drawing slightly curved lines that follow the shape of the stem outline.
Again, not all lines have to go from the top to the bottom of the stem. Some can be shorter than others, just like the fibers on the rings.
Then, go over the gills and, since they face no light, make them darker, like so:

The last thing to do before you start shading is to make the caps more exciting!
Add circles and dots of various sizes to the sides of each cap.
Then, draw lines here and there and curve them from the bottom of the cap upward:

Step 6. Shade Your Step-By-Step Mushroom Drawing
Recommended pencil: B pencil
The final step in a detailed mushroom drawing is shading.
To create a soft, natural shade, pick up a B pencil and make the grills especially dark.
Don’t forget to add shade to the rings and stems, and also to the edges of the caps — especially on the smaller mushrooms. Why?
Because the largest mushroom is towering over the other two and its cap is putting the other two mushrooms in the shade.

Step 7. Finalize The Sketch
Recommended pencils: HB and B pencils
Since mushrooms grow surrounded by grass, let’s add some elements from nature to the drawing.
Draw grass around the stems and feel free to throw in some rocks.
Instead of drawing tiny grass blades, add larger spiky blades around the mushrooms, like this:

Finished Your Mushroom Drawing? Draw These Next!
When you finish drawing mushrooms, we encourage you to give other BIOWARS tutorials a try.
You can learn how to draw parts of the human face, including:
We also created several guides on drawing animals, such as:
And if you’re a fan of anime, we got that covered, too:

Meet The Artist
Gonçalo Lopes is the lead designer behind BIOWARS — a comic book that describes the epic battle raging within!
He created this mushroom drawing tutorial to help you learn how to draw mushrooms quickly and easily.
Aside from creating simple how-to-draw guides and designing Biowars characters, Gonçalo has also worked on numerous well-known TV shows, movies and games, including Transformers, GI-Joe, TMNT, Adventure Time, Godzilla and many others.
A Recap On How To Draw A Mushroom Step-By-Step
To draw a mushroom, all you really need are:
- A pencil
- A piece of textured paper
- An eraser
- Some patience
The last step is key when you’re a beginner!
Don’t rush into drawing the outline of the entire mushroom at once.
Instead, create your sketch step-by-step:
- Draw the cap
- Mark the cap’s underside
- Add the stem
- Draw the ring
- Draw the grills
- Add details to the drawing
- Shade the mushroom


