Related Resources
Did you know that braids originated in ancient Egypt about 3500 BC? Making braids takes time, and Egyptians saw making braids as a chance to socialize with others.
Not much has changed since then, except that now the entire world loves braids. And there are so many types of braids to choose from!
Box, micro, Dutch, French, cornrows, waterfall… yes, we’re still talking about braids!
In this guide, we’re going to show you how to draw three of the arguably most popular braid types:
- A regular three-strand braid
- Box braid
- Cornrows
You can also explore the illustrations below at every step and practice drawing braids at your own pace.
The Tools You Need For Drawing Braids
Tools you might want to use for your braids drawing include:
- An H pencil: A harder lead is the best choice when sketching, since it leaves a light trace on the paper, which is easy to erase if necessary and build.
- An HB pencil: A medium-hard lead is perfect for making the lines pop and softly shading your braids drawing.
- A B pencil: The softer the lead, darker its trace. B pencils are a way to go when shading because of the intense grey hues they can create.
- A blending stump: This tool may be not that popular among beginners, but it can be of use to you when shading and blending the lines.
- A kneaded eraser: You can shape kneaded erasers however you like, so you can tweak them depending on what you wish to erase.
- Lightly textured sketch paper: This type of sketch paper has a soft surface, so your pencil can easily glide over it and you can easily remove unneeded elements.
You should go with the tools you’re comfortable with or the tools you want to try out. Even the BIOWARS lead artist uses only one pencil in the video, so there’s no correct or incorrect lineup — it’s up to you!

How To Draw Braids (Three-Strand Style)
Let’s kick this guide off with steps to drawing a regular, three-strand braid.
1. Draw The Base
Recommended pencil: H pencil
Before you start drawing a braid, you want to draw a person from the back.
If you need help with that, check out our beginner’s guide on drawing head angles.
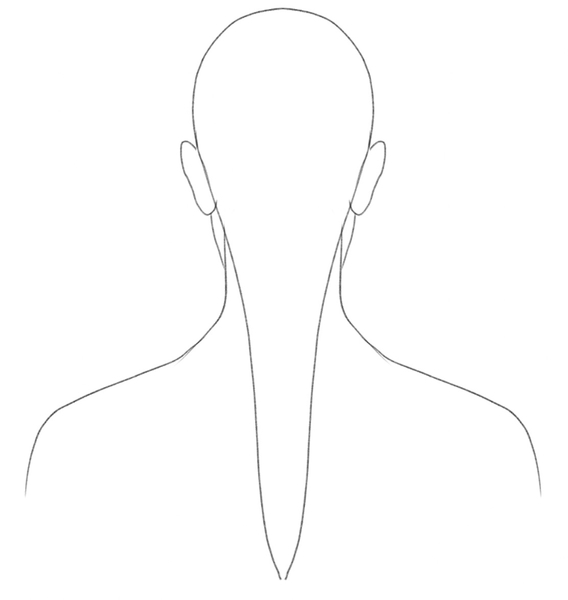
Now, the first step to drawing a regular braid is to outline its shape.
To do that, follow the shape of the head and then extend the lines on both sides toward the middle of the back.
The lower you go, the narrower the braid outline should be, like so:
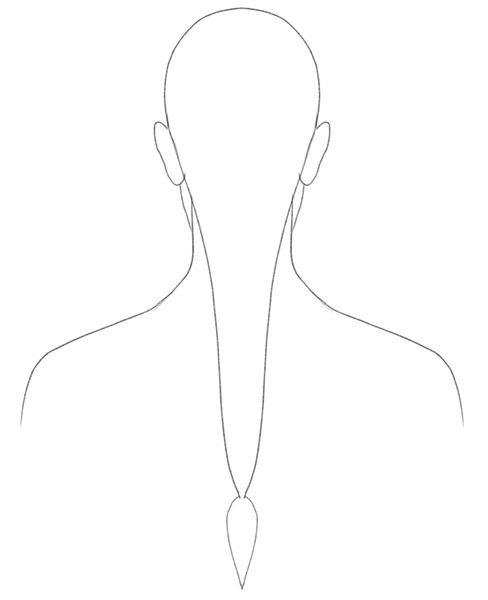
Since the braid’s going to have a little hair tie at the end, add a reversed-tear shape at the end of the braid:
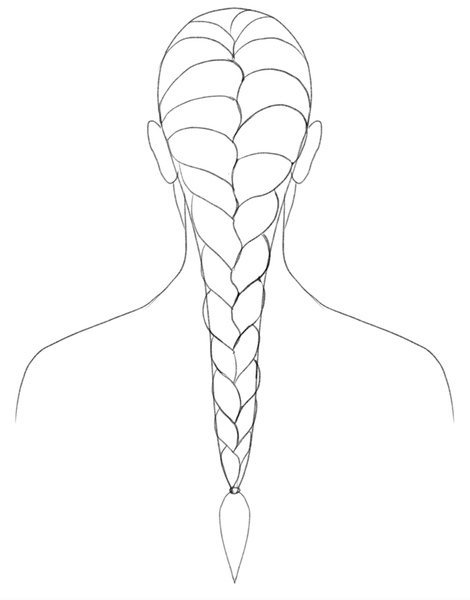
2. Start Braiding The Hair
Recommended tool: H pencil
Now’s the time to start braiding hair.
The hair strands should meet in the middle of the braid, so you want to draw short, curved lines from both left and right and have them touch at the center.
Let’s start at the top.
Draw two curved lines so that they form a “V.”
Continue adding the lines on both sides, but make sure that you leave some space between the layers. The bigger the vertical distance between the lines, the thicker the braid!
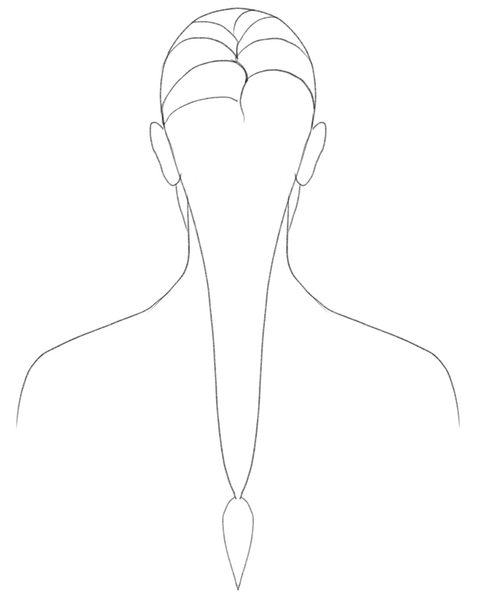
Continue drawing the curved lines so that the middle of the braid looks like a zig-zag line.
When you reach the neck area, instead of attaching the lines to the edges of the base, start gluing them to the hair above them.
Repeat the same process until you reach the bottom of the braid and sketch a tiny hair tie at the end:
3. Add The Details
Recommended tool: HB pencil
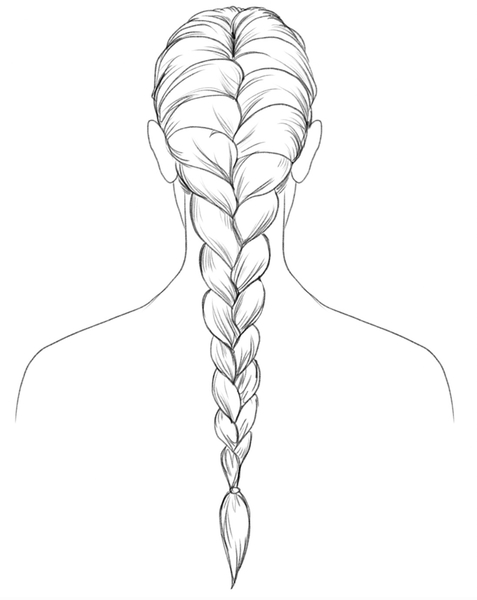
Using your HB pencil (or by applying slightly more pressure to your pencil of choice), draw short hair strands along the braid.
Make sure you follow the shape of the guidelines, like so:
4. Shade The Braid
Recommended tools: HB and B pencils, blending stump, kneaded eraser
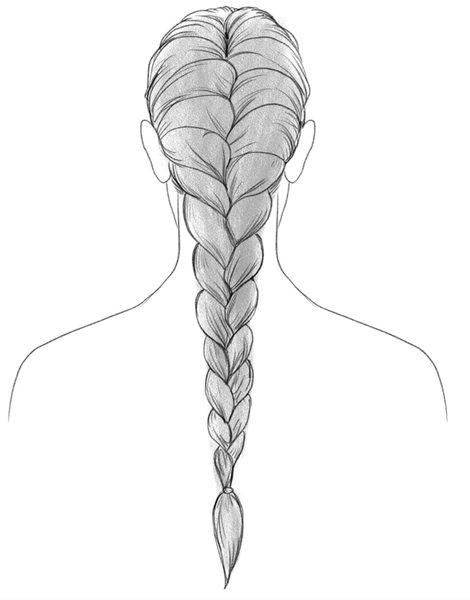
Now it’s time to shade the braid!
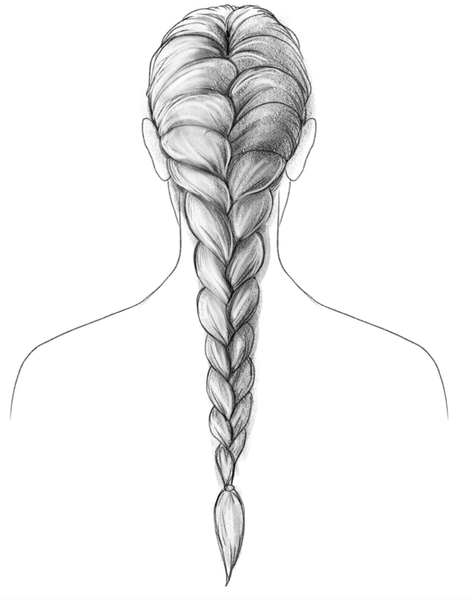
For starters, let’s go over the entire braid and gently shade it in a light grey hue, like this:
Next, let’s use a B pencil since we want to make parts of the braid darker than the rest.
For example, the zig-zag line in the middle of the braid should be darker than the braid’s edges since that’s where the strands meet:
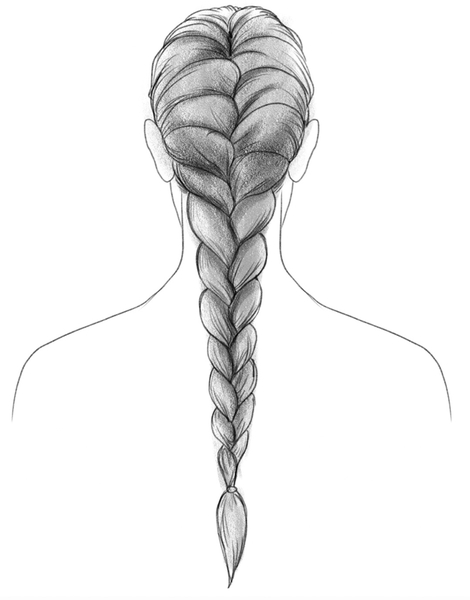
You can now add the highlights to the braid, depending on where the light is coming from.
We placed the source of light on the left, and that’s why we’re going to use the kneaded eraser to make the left side of the braid lighter than the right.
Now it’s also the time to use the blending stump if you want to make the lines particularly soft:
How To Draw Box Braids
Box braids have been around for thousands of years.
They became particularly popular in the ‘90s (yeah, we’re that old) when the legendary Janet Jackson appeared in the movie Poetic Justice.
Now, let’s find out how to draw irresistible box braids!
1. Draw The Base
Recommended tool: H pencil
Box braids can be challenging to draw, but we can help you simplify the process!
We’ll show you how to draw box braids on a man from the back.
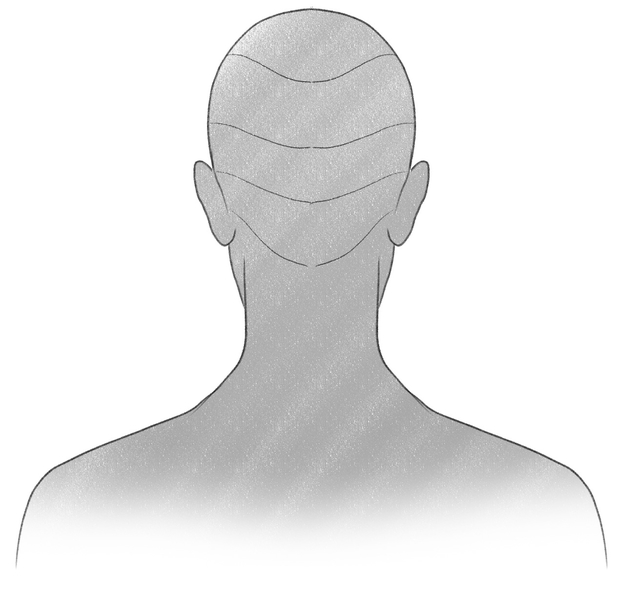
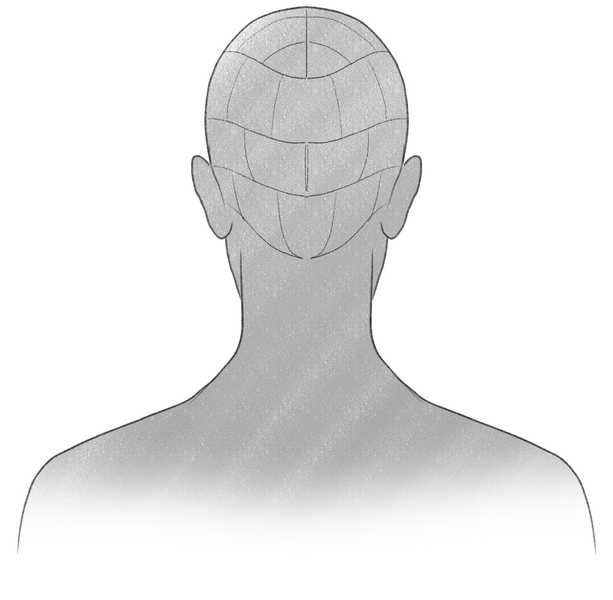
The first thing to do is to divide the hair into four parts with horizontal lines. The top two layers should be the largest of the four.
When drawing the lines from one side of the head to the other, make a little curve in the middle, like so:
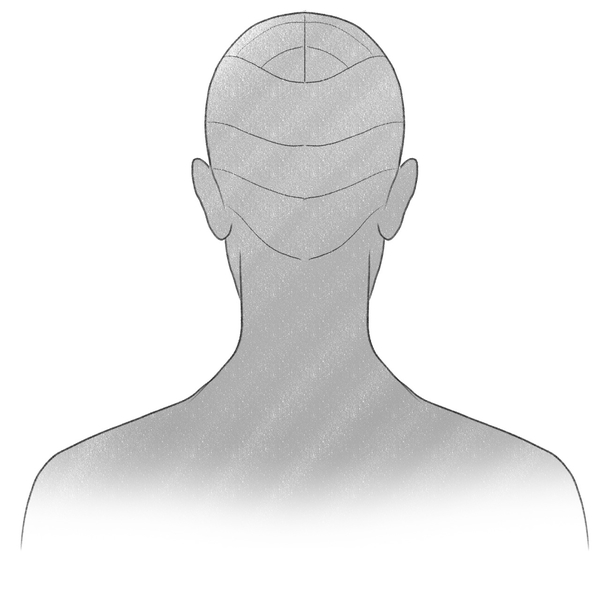
Next, divide the hair at the top with a vertical line into two parts; then, add curved lines like half-circles connecting the right side to the left:
Let’s move on to the second layer of hair.
Use vertical lines here to divide this layer into five equal parts, like this:
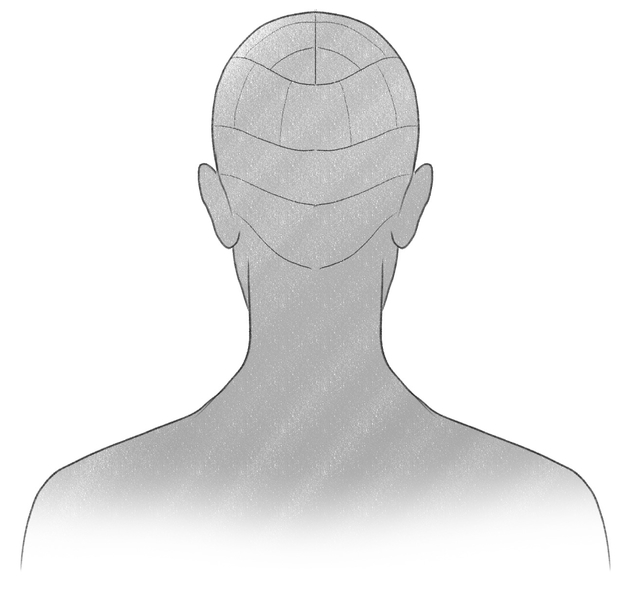
Divide the hair into the remaining two layers.
Make sure the vertical lines don’t touch; instead, they should touch the middle of the upper levels, like so:
2. Outline The Box Braids
Recommended tool: H pencil
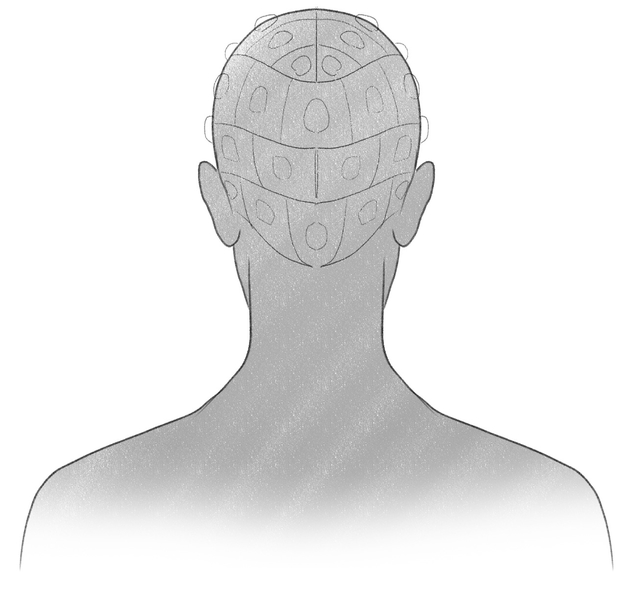
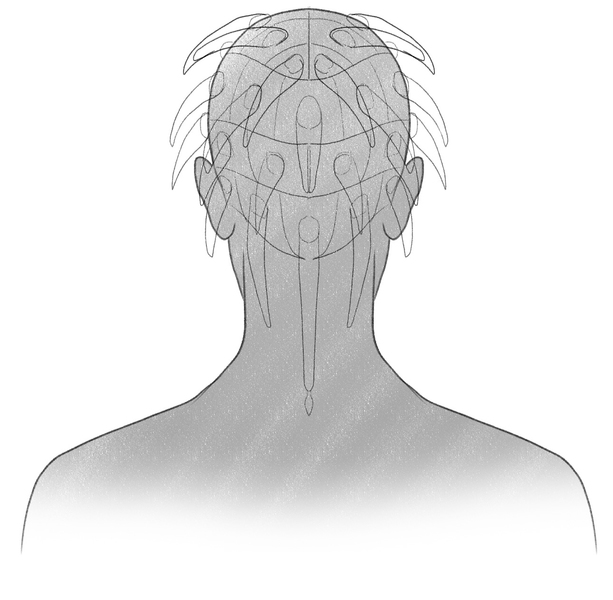
The next step to drawing box braids is to draw a circle or an oval shape within every segment of hair you drew in the previous step:
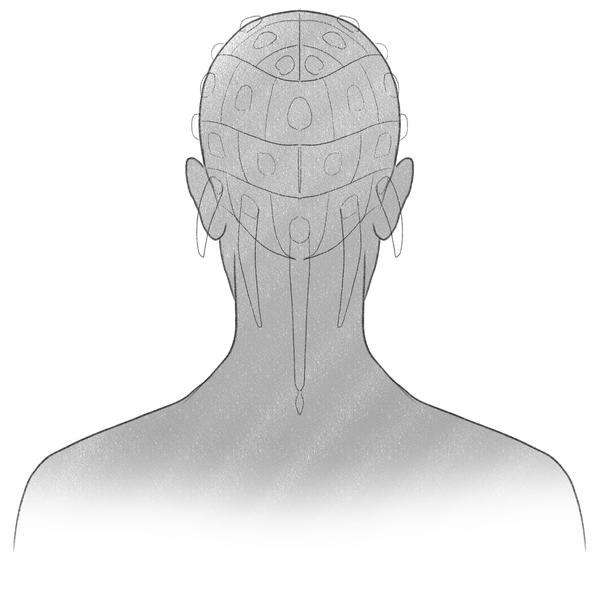
Next, it’s time to attach horn-like shapes to every circle.
Start from the layer above the neck.
The box braid in the middle should be the longest with the braids on the sides becoming gradually smaller the closer to the top of the head they get:
Continue adding the horn shapes and attaching them to circles:
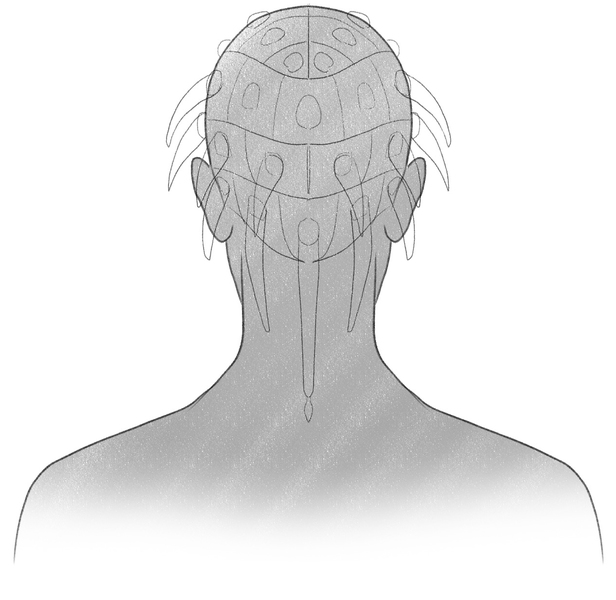
Draw the same shapes all over the boy’s head until you have a braid outline in every hair segment, like so:
3. Draw The Box Braids
Recommended tool: HB pencil
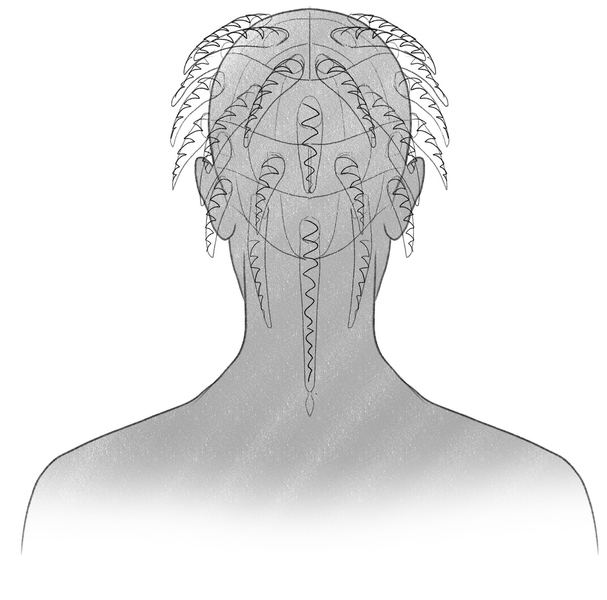
To draw box braids, the key is to add a vertical zig-zag line in the middle of every braid outline, like this:
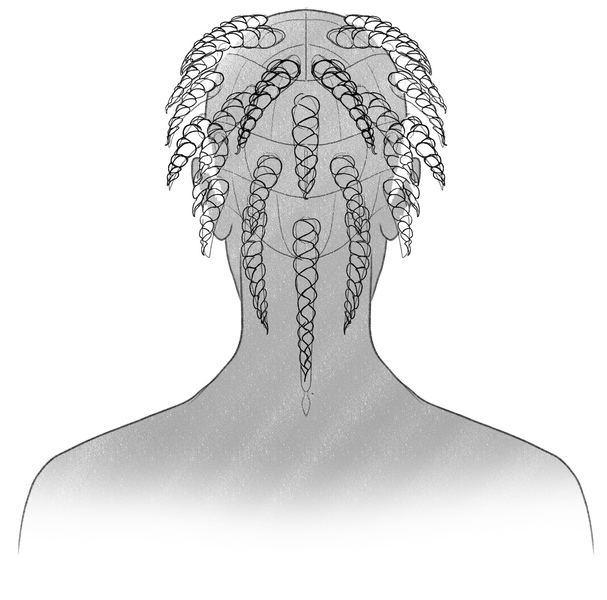
To finish drawing the box braids, add another zig-zag line within the braid outline, but this time, have it face the opposite direction. Intertwine the lines so you get this result:
4. Shade Your Drawing
Recommended tool: HB and B pencils, kneaded eraser
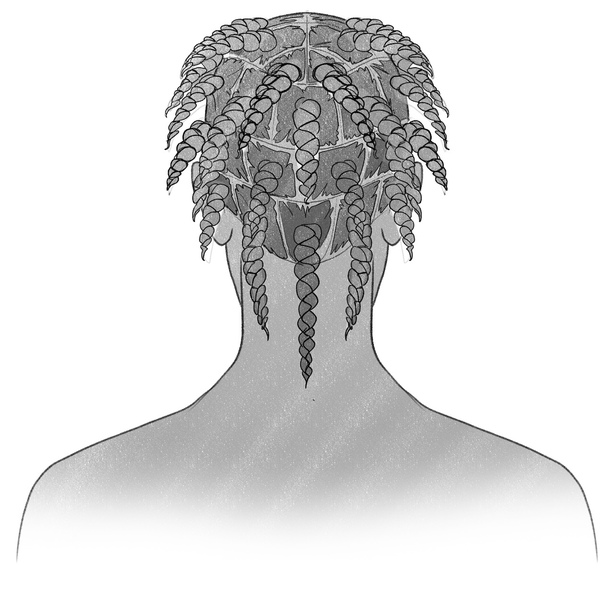
To shade the box braids, it’s best to start by coloring both the head and the braids in the same shade of grey.
When shading the scalp, make sure not to touch the edges of the squares you drew first. We want the hair partings to show:
Next, let’s make the braids a little darker, especially the roots.
You can switch to a B pencil for this:
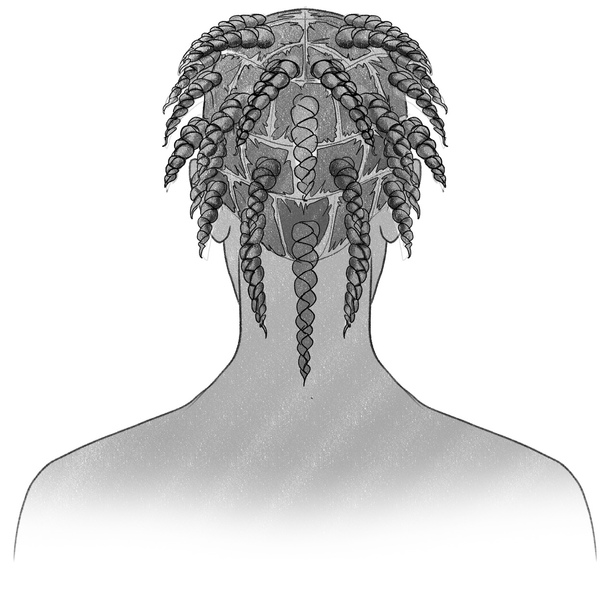
Pay special attention to the zig-zag lines; they should be the darkest of all elements.
Oh, and shade the parts of the scalp below the box braids, like so:
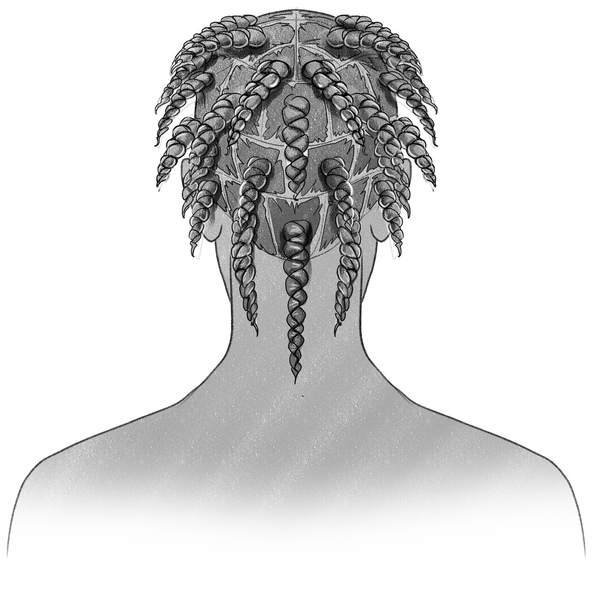
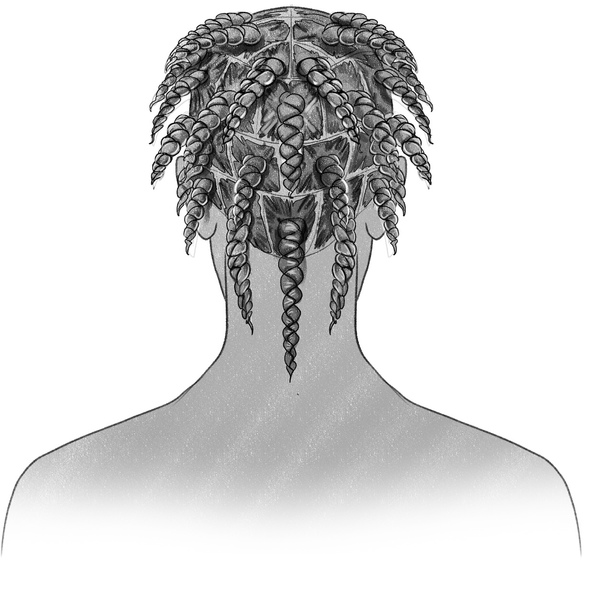
You can now make the surface of the braids a bit lighter than the rest of them. Simply go over them with an eraser.
Lastly, add short, straight, angled lines inside every hair segment on the scalp. Point the lines toward the center, i.e. the braid, to depict the hair that’s tied tightly tied in a braid:
How To Draw Cornrows
Did you know that enslaved people used to braid maps in cornrows to discreetly share information with each other?
Although there are different ways one can style cornrows, we’re going to stick to the simple, vertical cornrows that go from the hairline to the neck.
Once you master drawing this type of cornrows, you can experiment with other styles.
1. Draw The Base
Recommended tool: H pencil
As always, we start by drawing a person from the back.
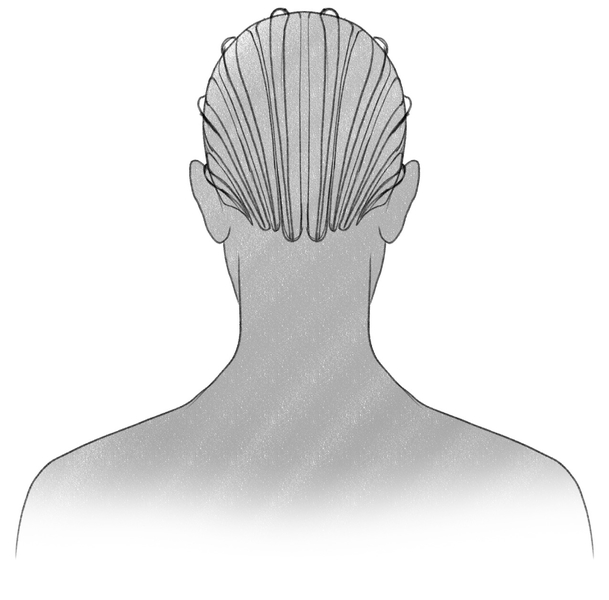
When drawing cornrows, you’ll want to divide the hair into several vertical sections.
We’re going to divide this guy’s hair into eight parts. The ones in the middle of the scalp should be the longest, and as you get closer to the ears, the sections should gradually become smaller, like this:
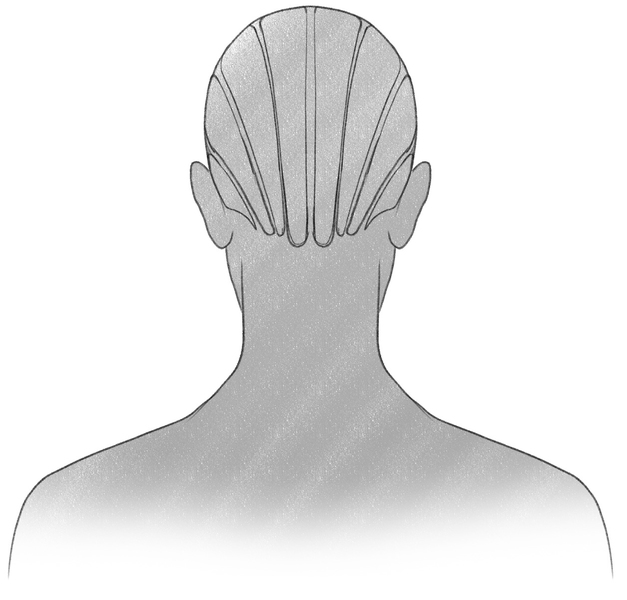
Next, draw the thin rectangle-like shapes in the middle of these sections.
The lines should be soft and the width of rectangles should become gradually smaller the closer to the neck you get:
2. Draw The Cornrows
Recommended tool: H pencil
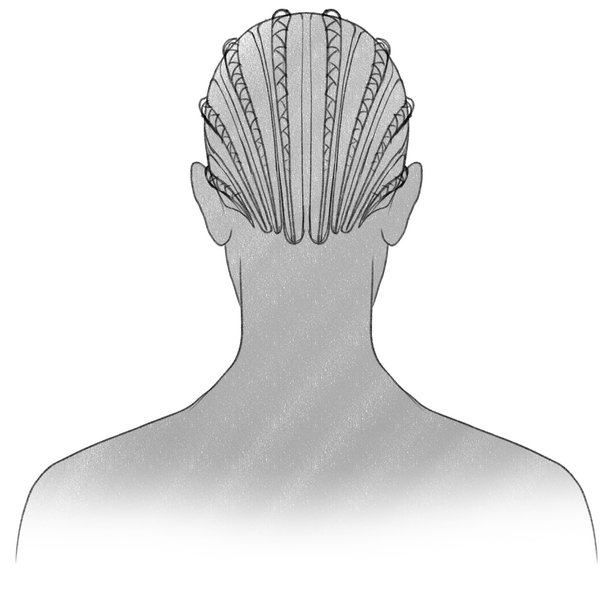
Zig-zag lines are your friends when drawing braids; let’s add a zig-zag line along every shape you drew in the previous step making sure we connect one vertical line to the other, like so:
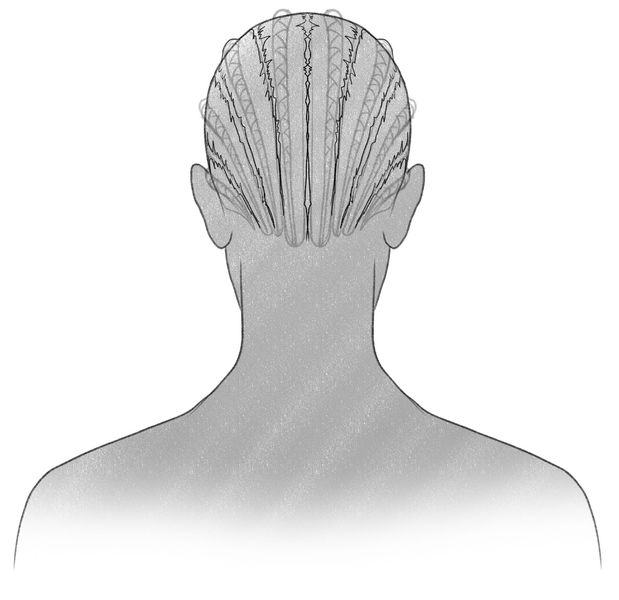
Now, we don’t want the hair partings between the cornrows to look like perfectly straight lines.
So, let’s also add zig-zag lines along the partings, like this:
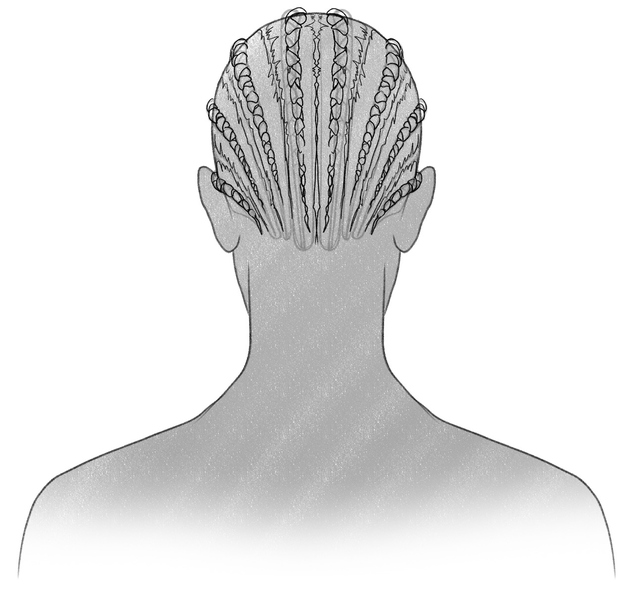
Next, make sure that the edges of the cornrows aren’t sharp.
So, go over them, and round them a bit, like so:
3. Shade Your Drawing
Recommended tool: HB and B pencils, kneaded eraser
Now’s the time to shade the cornrows!
Use a darker lead for shading the top of the hair.
Avoid the area around the hair partings — the color of the scalp is usually much lighter than the hair.
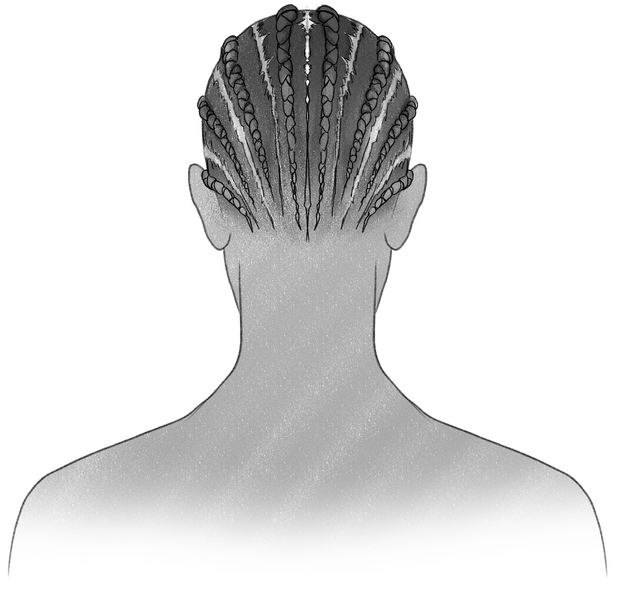
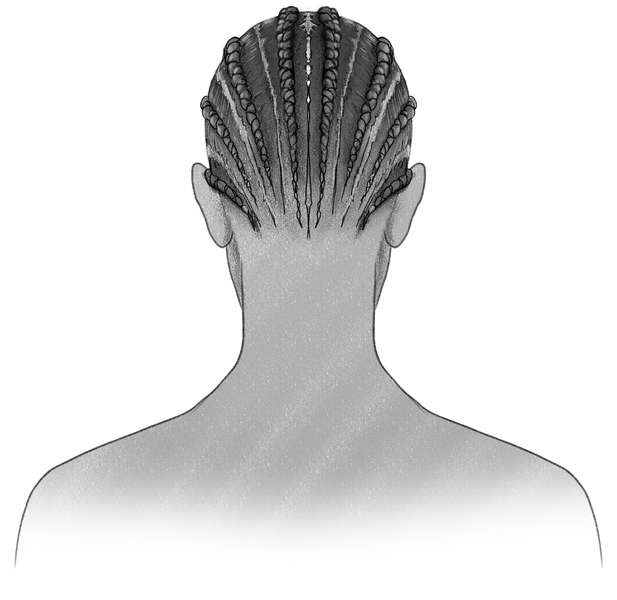
To add dimension to your drawing, make the outer side of every cornrow darker than the rest of it. That will make them pop!
With your eraser, you can also make the top of the cornrows lighter, like so:
Done Learning How To Draw Braids? Try These Next!
Alright, boss, now that you know how to draw braids, are you up for some more art tutorials?
We invite you to explore some more of our step-by-step guides, including:
- How to draw anime hair
- How to draw a person
- How to draw a face
- How to draw ears
- How to draw a mouth
- How to draw a nose
- How to draw eyes
A Recap On How To Draw Braids
When learning how to draw braids, the most important thing is to first create the base and outline the shape of the braid, no matter the hairstyle you opt for.
As you could see, whether you’re drawing a regular, three-strand braid, box braids, or cornrows, the principle stays the same — start small, outline the shapes, and then start adding the details.
Shading the braids in different hues of grey will help you make them pop and bring them to life.
