


Related Resources
Did you know that elephants can understand the emotional state of others?
These highly intelligent animals are empathic, self-aware, and they’d do anything to protect and help each other.
Like elephants, our goal here is to help too! We want to help you become better at elephant drawing, which is why we’ve put together this guide and included tips to make your elephant drawing easy and simple.
From the big ears to the wrinkly skin, there are a lot of details to get just right when drawing an elephant. But don’t worry — we’ve got your back! We’ll teach you all the tricks to make your elephant drawing tusk-tastic!
Sketching Tools For Simple Elephant Drawing
The tools you can use for your elephant drawing include:
- An H pencil: The hard lead is the ideal choice when you want to easily draw an elephant’s outline. Plus, the thinner and lighter the lines, the easier they are to erase if you mess up some parts of your elephant sketch.
- An HB pencil: A medium-hard lead leaves a moderately dark trace, which is great for adding details and soft, light grey shading.
- A 4B pencil: The hardest and darkest lead of the three, a 4B pencil is great for shading your elephant drawing.
- A kneaded eraser: We recommend getting a kneaded eraser simply because they’re easy to stretch and manipulate. That means you can change their shape and size, which makes erasing easier. You can also use this eraser to highlight parts of your sketch.
- Lightly sketched paper: The smooth surface of this paper ensures your pencil glides over it and allows you to erase where needed.
You can use all of the tools above, but if you don’t have them, that’s fine too! Simply opt for your favorite pencil and start sketching.

How To Draw An Elephant In 6 Easy Steps
When you’re learning how to draw an elephant, we recommend you start slow.
This means drawing the elephant’s body one step at a time; otherwise, getting the shape of the elephant’s back, trunk and ears right on the first try may seem too challenging.
So, let’s start with the basics — the following images on elephant drawing will make the learning process much easier!
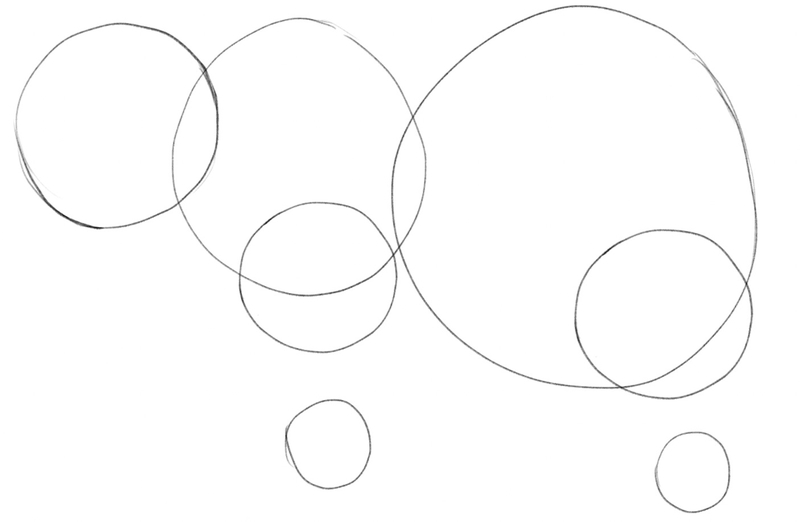
Step 1. Draw The Base
Recommended tool: H pencil
If you explored other BIOWARS tutorials, then you know that we’re big fans of using simple geometrical shapes to create outlines.
Circles, especially, come in handy; you’ll see how below.
The first thing we want to do is to define the size of the elephant’s body and outline it.
Let’s start by drawing a medium-sized circle.
The elephant we’re drawing is facing left, so we’ll position the circle toward the left-hand side of the paper.
This circle marks the elephant’s head:

Add another, slightly bigger, circle to the right and make the two circles overlap, like this:

Then, let’s add one more circle to the right.
Make it large, because this is where the elephant’s backside will be:

Step 2. Draw The Legs
Recommended tool: H pencil
Elephants are the largest land animals in the world and they need strong legs to support their impressive size and weight.
To draw the thighs, we’ll continue to sketch circles, except that we need these to be much smaller than the ones at the base of the elephant’s body:

Next, add two more small circles for the knees.
The circle in the back should be placed slightly below the one at the front, like so:
Step 3. Draw The Trunk, Tusks, Eyes, Ears, And Tail
Recommended tool: H pencil
We’ll finish drawing the legs in a minute — first, we want to add some more recognizable elements to the elephant’s head, like the trunk.
An elephant’s trunk is about seven feet long, so, when sketching it, we want to draw a super long shape that goes just below the knees, like this:

Once the trunk is in place, let’s sketch the mouth.
You can shape both the upper and lower lip into almost spherical forms, but make sure that the upper lip is about three times bigger than the lower lip:

Did you know that elephants’ tusks evolve from their teeth?
They use them to move objects, dig, display dominance and gather food.
From this angle, we can see only one tusk, so let’s attach a horn-like shape to the upper lip.
Next, let’s draw an eye at the place where the trunk and the head intersect:

Elephants have big ears that help them regulate their body temperature.
When sketching an ear, draw an almost triangular shape, but make sure that the angles are round.
Then, add a long tail in the back, like this:

Step 4. Finalize The Outline
Recommended tool: H pencil
Now, let’s finish drawing the elephant’s legs.
First, connect the two circles you drew earlier for the thighs and knees.
Then, extend the legs and add the feet at the end:

To finalize the outline, add the right back leg — it should slightly show behind the left back leg.
Then, connect the head, chest and backside outlines, to form the elephant’s back.
To create the belly, attach the bottom of the backside circle to the left leg’s thigh, like this:

Step 5. Add The Details
Recommended tools: HB pencil, kneaded eraser
Once the outline is ready, let’s switch to an HB pencil to add some details to the sketch and enhance the lines.
You can also stick to whatever pencil you’re using and apply more pressure to it to create darker grey strokes instead.
Let’s start at the head.
Enhance the outer lines and add some details, such as the eyelids, like this:

Continue softening the lines, especially around the ears.
The elephant’s skin isn’t rigid, so your lines shouldn’t be either.
Color the inside of the eye in dark grey to depict the iris and a pupil, and make sure the tusk on the right side slightly peaks below the one on the left.
Oh, and don’t forget to sketch the nails:

Elephants have wrinkled, rough skin.
Before we depict it, grab an eraser and remove the guidelines you no longer need.
Then, let’s draw thin, short, close-knit lines, like so:

Step 6. Shade Your Drawing
Recommended tools: HB and 4B pencils, kneaded eraser
To finish your beautiful elephant drawing, let’s shade it!
You can use your HB pencil to color the elephant’s entire body in a soft grey shade:

Next, switch to a 4B pencil (or add even more pressure to your pencil of choice), and add darker shade between the neck and the ear, behind the ear, on the belly and on the right legs:

To highlight parts of the elephant’s body bathed in sunlight, you can use your eraser to make sure that areas exposed to light are lighter than the rest.
And lastly, shade the ground beneath the elephant; that way, it will no longer look like it’s floating — instead, it’ll seem ready to stomp right off your paper!

Finished Your Elephant Drawing? Try These Next!
Despite how challenging drawing an elephant may have seemed at the start, that wasn’t so scary, was it?
We told you we’d simplify the steps and make the guide easy to follow. ?
If you’d like to learn how to draw other animals, explore these guides:
- How to draw a deer
- How to draw a fish
- How to draw a penguin
- How to draw a bat
- How to draw a wolf
- How to draw a horse
- How to draw a cat
- How to draw a dog

Meet The Artist
The lead BIOWARS artist, Goncalo Lopes, created this step-by-step guide on easy elephant drawing.
He’s worked as a professional artist for a number of years and has participated in many worldwide known projects, including
TMNT, Adventure Time, Transformers, GI-Joe, Godzilla and more.
And he’s here to help you learn how to draw so make sure to explore more of our tutorials!
A Recap On Easy Elephant Drawing
When learning how to draw an elephant easily, you can rely on circles — they’re your friend!
Use them to define the size of the elephant’s body and position its body parts.
When the outline’s ready, make the lines softer and darker, and pay attention to the details, such as the elephant’s skin — that’ll give more depth and dimension to your elephant drawing.
