Related Resources
In this guide, the lead BIOWARS illustrator shows you how to draw hair in four steps.
The tutorial is ideal for beginners and if you are drawing comic book characters.
We know that drawing hair seems scary, but it’s surprisingly simple when you start small with simple shapes!
The lead BIOWARS illustrator created a video guide you can follow if you prefer illustrating on a drawing tablet and a set of illustrations you can explore at your own pace and copy with a pencil:
If you prefer sketching on paper using a pencil, keep reading since we’re going to break down the tutorial into steps you can explore and copy at your own pace.
The Tools To Use When Hair Drawing
If you plan on drawing hair on paper with a pencil, we recommend using:
- An H pencil: Pencils with an H mark on them have a hard lead, which leaves a light and sharp trace on the paper. The harder the lead the less it smudges, so an H pencil is the best choice for outlining.
- An HB pencil: This type of pencil represents the middle ground. The lead is neither too dark nor too soft. An HB pencil is the best choice when softly shading your hair drawing and adding details to the sketch.
- A kneaded eraser: The reason we always recommend using a kneaded eraser is that you can stretch and compress them however you like, so you have better control over the lines you wish to erase. Also, you can use a kneaded eraser to highlight some areas of your sketch.
- Lightly textured sketch paper: The paper’s smooth surface ensures a seamless drawing experience since your pencil can smoothly glide over the paper’s surface.
If you prefer to use some other drawing tools, that’s totally okay! These are just recommendations, but you should stick to the tools you feel most comfortable using!
How To Draw Female Hair In 4 Steps
We’re going to start this beginner-friendly guide by showing you how to draw a simple female hairstyle — a long, slightly wavy bob.
Once you learn how to illustrate one of the simplest hairstyles, you’ll find it easier to sketch other, seemingly more complicated hair textures.
1. Draw The Head
Recommended pencil: an H pencil
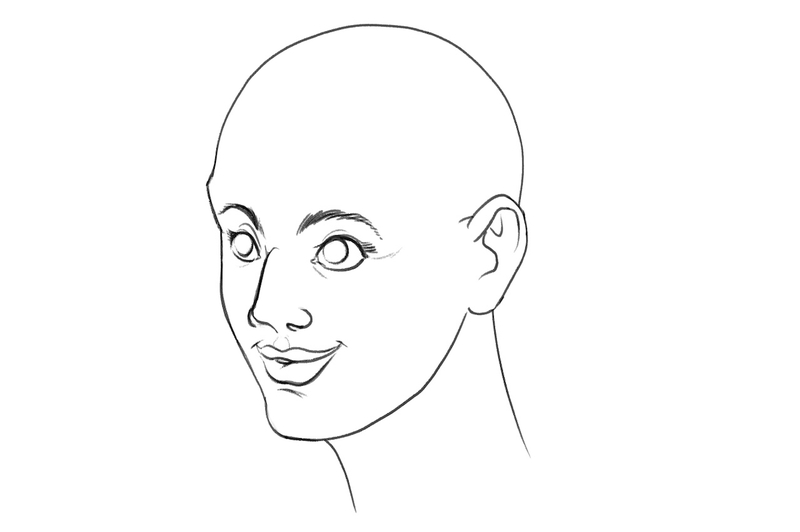
The first thing to draw is the head.
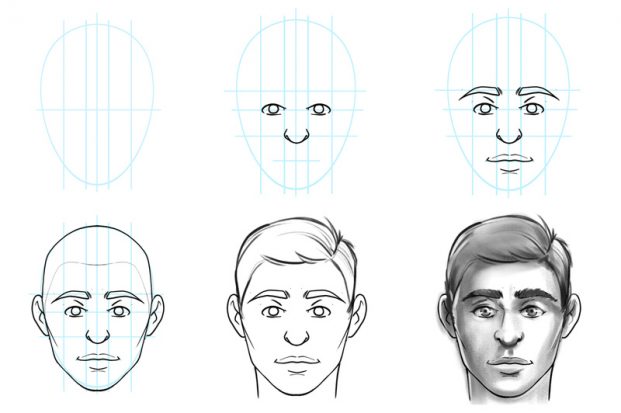
We won’t explain in detail how to draw a head in this tutorial, but Gonçalo created a step-by-step guide on how to draw different head angles, so, you should check it out if you need some expert tips!
2. Define The Hairstyle
Recommended pencil: an H pencil
Start with simple shapes to define the flow of hair strands and build them into a hairstyle. It can be a short bob with neat strands of hair layered and folded inwardly, or it can be a luscious big-hair moment with hair strands waving in various directions.
In this tutorial, we’ve opted for the more complex of the two: big, mid-length hair.
Here’s how we layered this hairstyle…
Let’s start by drawing the hair outline from the front.
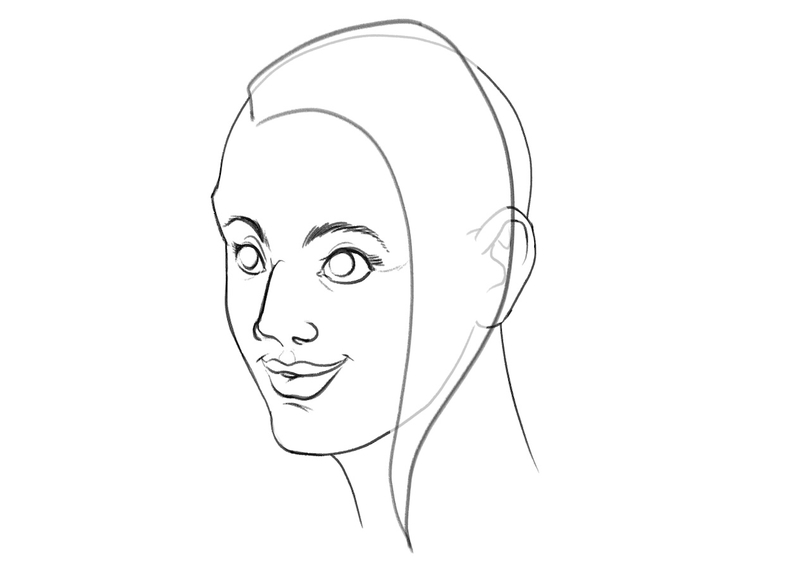
Draw a short, straight, upward line above the forehead. Its length marks how much volume the hair has. Since we’re drawing the hair with a side parting, there’ll be more hair on the left side than on the right, hence the bigger volume.
Then, draw a slightly curved line toward the crown of the head — that’s the very top part of your head.
From there, draw a wavy line toward the girl’s neck. The line should resemble the fish’s back, with the end gently turned outwards. Also, make the line cover approximately one-half of the ear.
All that’s left to do for now is connect the line above the forehead with the line going from the crown of the head.
To cover the ear with hair, draw a line from the ear rim and slant it downward toward the neck:
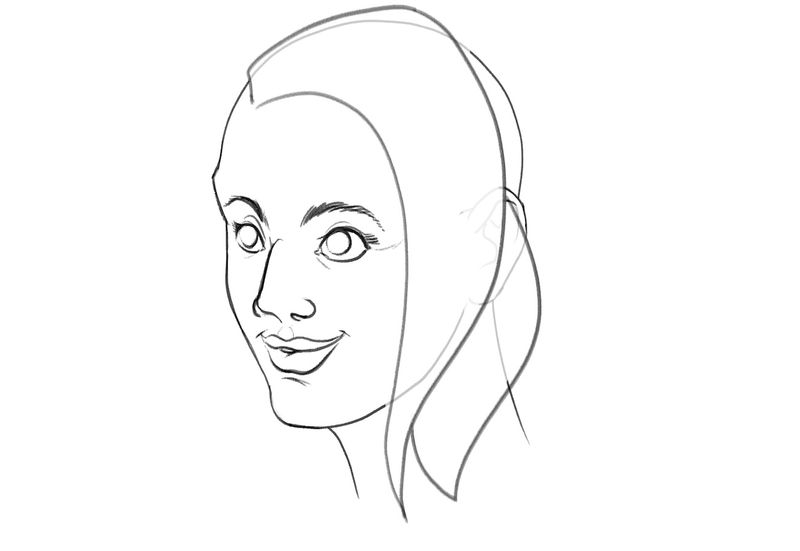
Since we’re illustrating a slightly wavy layered hairstyle, the line needs to be wavy.
You can follow the shape of the line you drew from the crown of the head and make the waves of both lines parallel with each other.
Next, connect the two lines together.
Now, let’s add the hair at the back of the head.
We’re sketching a woman from the side, so only a portion of the hair is visible.
Draw a line from the crown of the head toward the nape of the neck and then connect it to the part of the hair that covers the ear, like this:
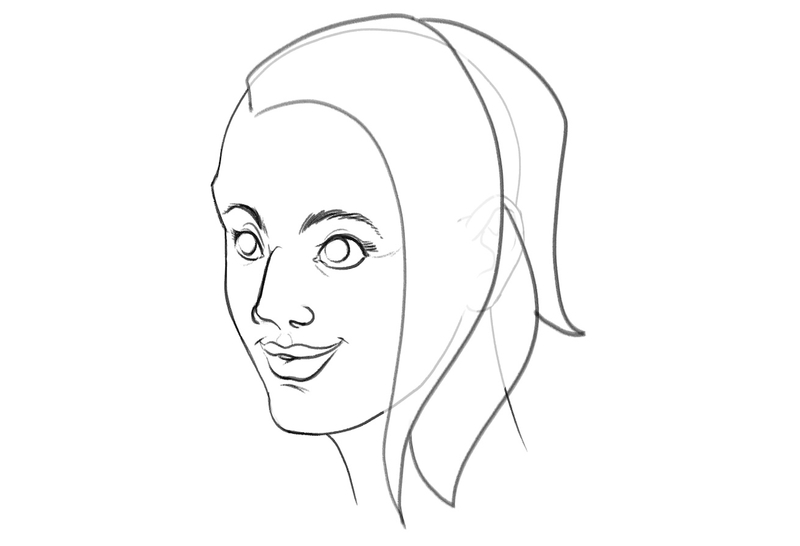
To make this hairstyle more exciting, let’s add layers to it!
That’s why the strand of hair at the back of the head should be shorter than the hair at the front and on the side.
As you can see, we drew the lines just slightly below the ear line because we want the hair length to gradually grow from the nape to the chin.
Since you just finished drawing the hair on one side, it’s time you added the hair outline on the other.
This time around, don’t start immediately above the forehead. Notice how we placed the line for about one-third of the head’s width upwards, closer to the head crown. That’s because we don’t want to draw a straight parting, but make it slightly zig-zag as you’ll see below:
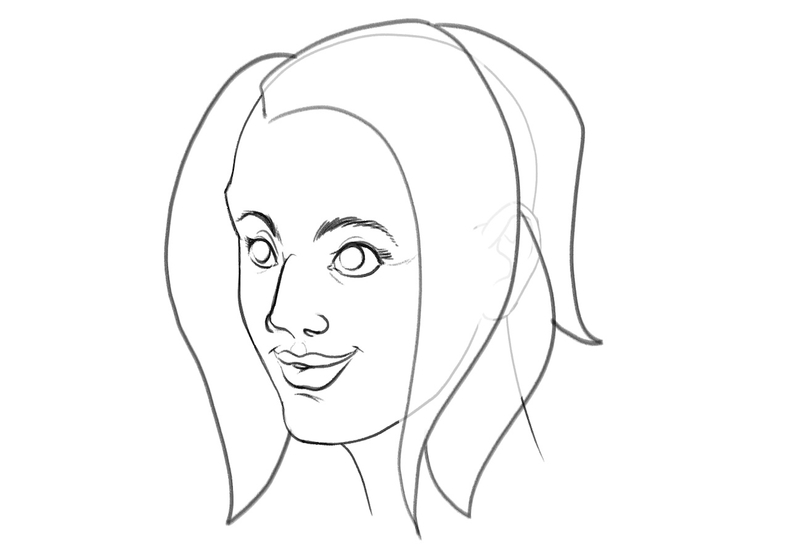
Finish the hair contour by connecting the hair with the character’s chin.
We’re now going to draw the patch of hair that’s closest to the forehead, right above the eye temple.
Start from the point where the hair on the left side touches the forehead.
From there, ensure that the line frames the face and have it blend with the line you drew in the previous step, like so:
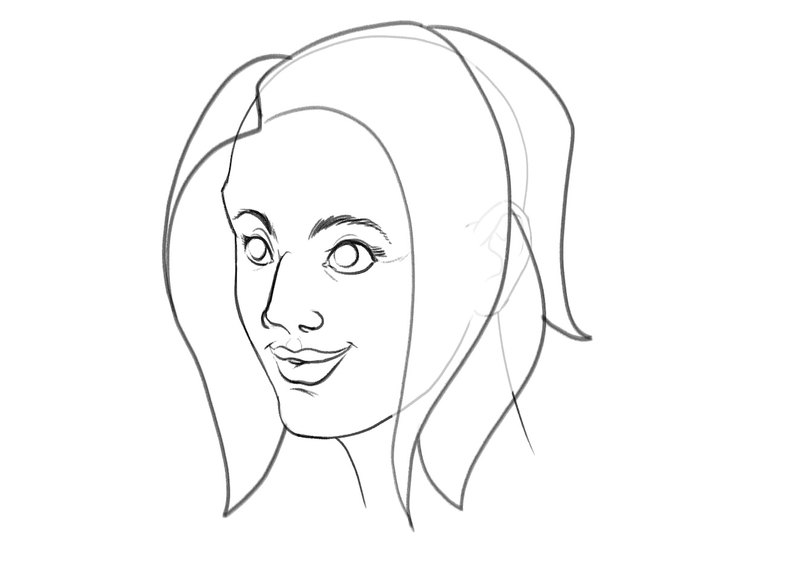
To complete the hair outline, all that’s left to sketch is the remaining part of the hair in the back.
This bit isn’t entirely visible because our character is turned to the right, so you can see only a portion of her hair.
To draw it, start from about two-thirds of the portion of the hair that covers the front-left part of the head. Angle the line so that it meets the part of the hair that’s in front of it, like this:
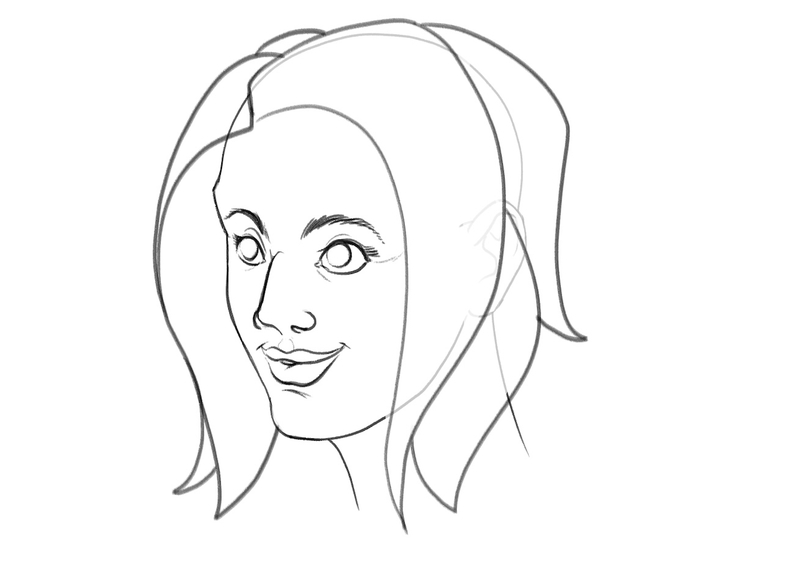
Don’t forget to illustrate a spike-like strand of hair at the bottom. Since this is a layered hairstyle, this strand should be slightly shorter than the one in front of it.
3. Add Texture
Recommended pencils: an H and HB pencil
When you have the hair outline ready, adding texture becomes easier.
You should follow the shape of contours and make the strands shorter the closer they are to the face.
Start from the right side and draw the hairs that are framing the face first. Just make sure not to place the lines too close to each other:
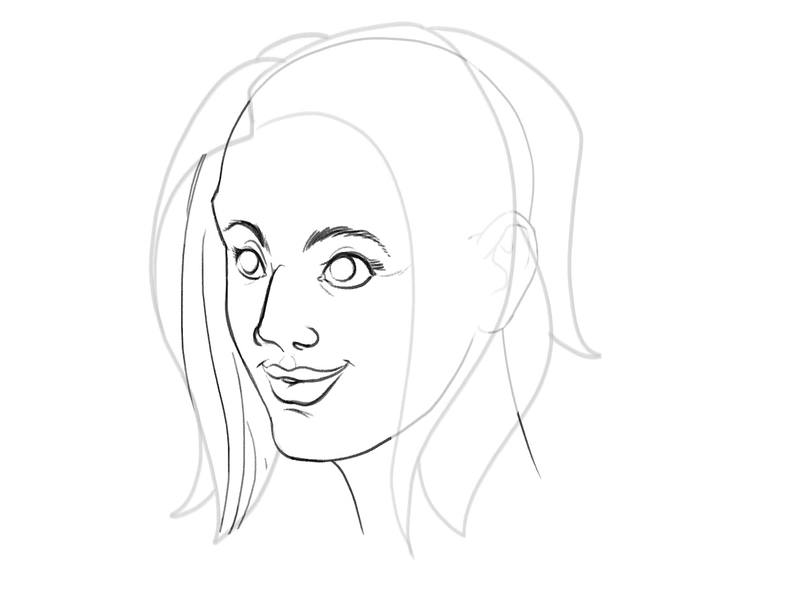
Now, let’s add some strands on the left side of the head.
Draw short curved lines close to the parting and along the forehead. That’s where most of us have baby hair and some short strands, and your sketch should reflect that.
Make some lines shorter than the others — that adds more structure and volume to the hair.
And since we all have stray strands, ensure your character has them, too. You can achieve that by sketching the lines that slightly stick out from the rest, like this:
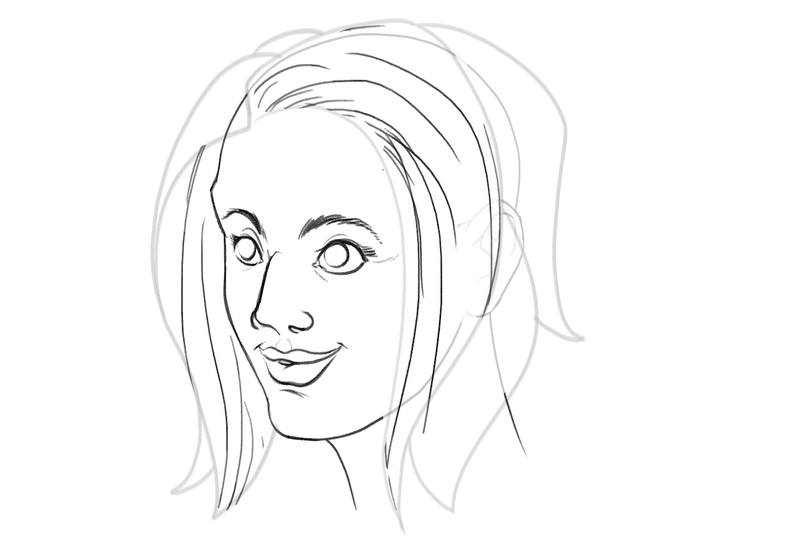
Once you finish drawing the strands at the front, add some in the back and at the top of the character’s head, like so:
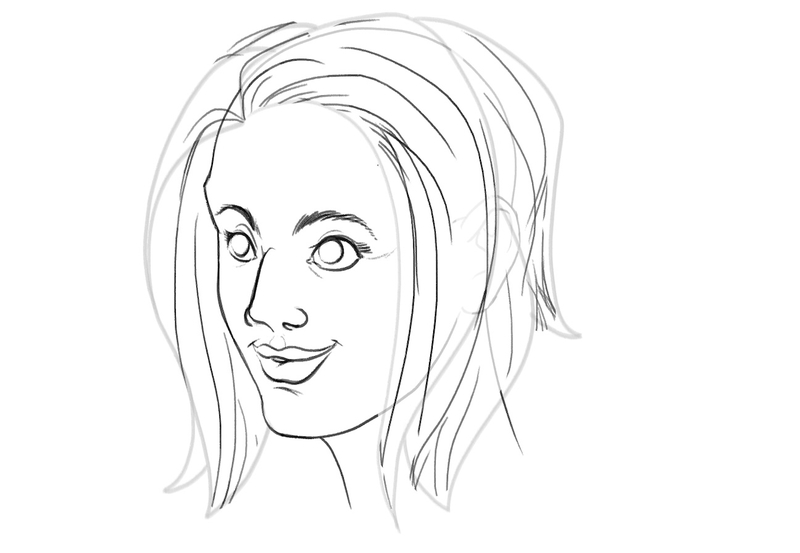
The hairs at the back follow the shape of the head and are shorter than others because that’s the kind of hairstyle we’re going for.
At this point, we recommend switching to an HB pencil and going over the hair contour you drew earlier. You can use it to make all hair strands more noticeable, like this:
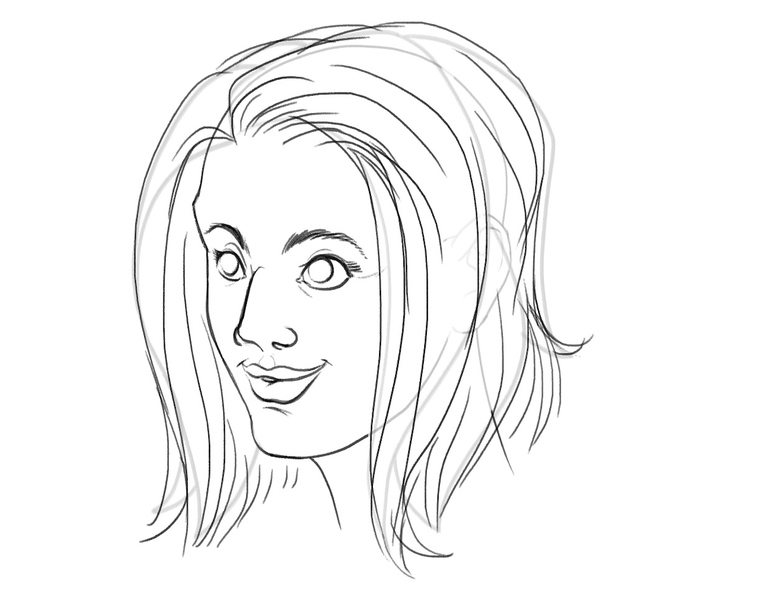
Make the hair texture rich by drawing more short lines at the ends.
Speaking of ends, feel free to draw them curled away from the face.
The hairstyle doesn’t need to be perfect — messy dos are always cool!
4. Erase The Unnecessary Details
Recommended tool: a kneaded eraser
The final step to learning how to draw hair is to erase all the lines that aren’t visible because of the hair.
For instance, in the sketch that Gonçalo drew, the ear is covered with hair, so we erased it.
Also, the outline of the cranium doesn’t show, so we also removed those lines.
The end result looks like this:
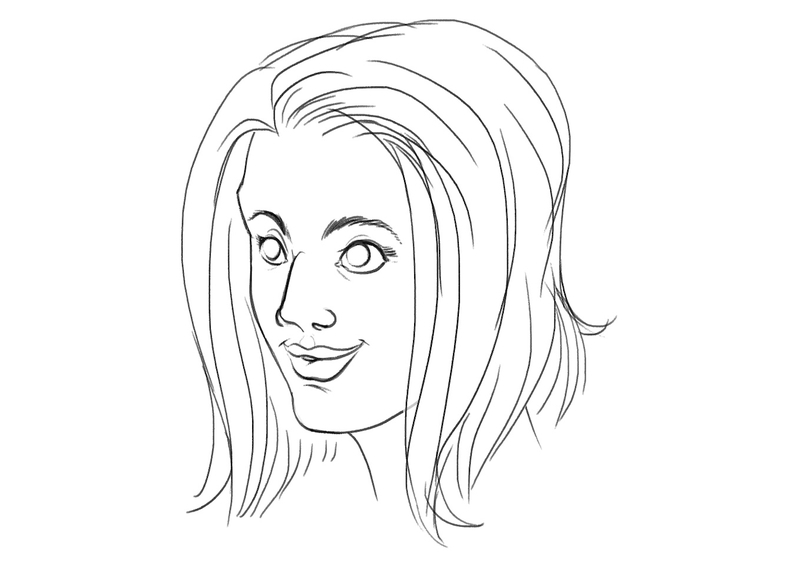
How To Draw Male Hair
Finished Drawing Hair? Draw These Next!
You just finished your hair drawing — great job!
If you’d like to continue your artistic streak, we recommend checking out the following tutorials:
Meet The Artist
Goncalo Lopes is the lead BIOWARS artist and the person behind all of our how-to-draw tutorials.
He’s an experienced artist who worked on Transformers, GI-Joe, TMNT, Adventure Time, Godzilla and many other popular movies and shows.
So, trust us when we say that you’re in good hands — this guy *clearly* knows what he’s doing!
A Recap On How To Draw Hair
When learning how to draw hair, you need an H pencil when drawing the outline, an HB pencil to make the lines more pronounced, a kneaded eraser, and paper. Oh, and a good guide!
To make the process of hair drawing easier, we recommend dividing the hair into several parts and drawing them one by one.
For starters, you should draw the hair contour.
You can start on one side at the front, then slowly add strands around the ears, at the back of the head, around the nape of the neck, and slowly progress to the other side of the head.
Once you’re happy with the outline, start sketching hairs of all sizes to make give more texture to your sketch.
Don’t forget about the baby hair and strand hairs — they help give more texture to your illustration.
