


Related Resources
Did you know that lions can eat up to 88lbs of meat in a single meal?
This majestic animal is hailed as “the king of the jungle” because of its power, strength and fearless attitude, which sets it apart from the rest of the animal kingdom.
We’ll take you through the process of lion drawing for beginners — you’ll learn how to draw a lion in just five steps:
Sketching Tools To Draw A Lion
Tools you might want to use for your lion drawing include:
- An H pencil: A hard lead that leaves a light trace on the paper, which makes it ideal for sketching — you can easily erase mistakes but also enhance the lines once you create your basic lion sketch.
- An HB pencil: A medium-hard lead is a good choice for enhancing lines, adding details and soft shading.
- A 4B pencil: B pencils are soft and dark, especially with the 4B mark. They’re many artists’ go-to pencils for shading and creating dark grey and almost black hues.
- A blending stump: We recommend getting your hands on this pencil-like tool to make blending easier. A blending stump allows you to create soft transitions from lighter to darker areas and vice versa.
- A kneaded eraser: Kneaded erasers are easy to manipulate, so you can change their shape and size depending on what you want to erase.
- Lightly textured sketch paper: This paper’s soft surface is perfect because your pencil can easily glide over it. Plus, it’s also easier to erase unneeded lines later on.
Remember — these are just recommendations. Feel free to stick to the pencils you enjoy drawing with!

How To Draw A Lion In 5 Steps
When you’re learning how to draw a lion, the best approach is to draw its body parts one by one.
And that’s exactly what we’re going to do.


1. Draw The Base Of The Lion’s Body
Recommended tool: H pencil
In some of our previous tutorials, such as the guide on dolphin drawing, we showed you that geometrical shapes, especially circles, can be of huge help when creating the base for your drawing.
We’ll use circles again to create the guidelines for the lion.
Let’s start from the lion’s back.
Draw a medium-sized circle either on the left or right-hand side of your paper, depending on the direction the lion is facing.
Our lion is turned to the left, so we’re drawing a circle close to the paper’s right side:

Next, let’s draw the belly.
We’ll draw another circle, slightly bigger than the first one.
When positioning the two circles, make sure that their centers align, like so:

For the head, draw a third circle and attach it to the middle circle.
The head should be the smallest of the three elements — make it approximately one-third the size of the belly, like this:

2. Add Details To The Lion’s Head
Recommended tools: H pencil
To outline the lion’s nose and mouth, draw a small circle on the lower left side of the head. Then, add a rectangle-like shape with soft edges on top of the small circle. Below the circle, draw a round 2D shape, like so:

Next, let’s add an eye and an ear.
For the eye, draw a triangle without the hypothenuse, i.e. the longest side of the triangle in line with the top of the nose.
Then, connect the sides of the triangle with a small curved line. That’s the lion’s eyeball.
To sketch the ears, we’ll use a triangle again; but this time, make the angles soft and add the third dimension to the triangle, like this:

3. Draw The Legs And The Tail
Recommended tool: H pencil
For the lion’s front and hind legs, draw two club-like shapes and attach them to the middle and back circles.
The hind leg is stronger, so make sure its upper part is wider than the front leg.
As for the length, both legs should be approximately as long as the belly is wide, like this:

Now it’s time to add the tail!
Sketch the tail as a 2D line that slightly curves up at the end, like this:

Now, let’s get back to the legs.
It’s time to add the lion’s feet; but first, draw the part that connects the knees to the feet, like so:

To draw the feet, simply add three curved lines to both feet; these are the lion’s toes.
Although lions have five toes on their front feet and four on the back, we’re adding three toes to each foot because we’re drawing a lion comic-book-style, so we can play with its look however we like:

Next, let’s connect the middle and back circles to outline the middle of the lion’s body.
Then, draw the front and hind legs on the right side. To do this, copy the shape of the legs on the left:

4. Draw The Mane And Add The Finishing Details
Recommended tool: HB pencil
Once the basic outline of the lion’s body is ready, it’s time to add the details that make this animal recognizable and magnificent.
We’re talking about the majestic mane, of course!
A lion’s mane helps it attract lionesses, so we better draw a large and beautiful one!
First, connect the triangle-like nose, the mouth and the forehead to make them look cohesive. Then, add a pupil to the eye and several tiny lines inside the ear, to give it depth.
When drawing the mane, start above the eyes and go over the circle you used to outline the head; have the mane gradually go down until it reaches the right side of the large circle in the middle.
Connect the hairs under the lion’s mouth with the mane in the back and add some fur along the lion’s belly:

Go over the rest of the lion’s body with a darker pencil to connect all the parts into a whole.
Oh, and make the end of the tail a bit fluffy, like this:

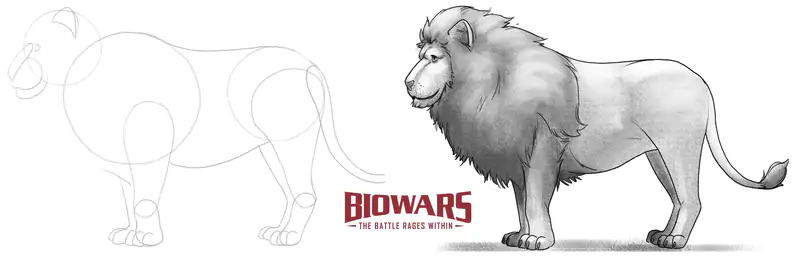
5. Erase The Guideline And Shade Your Lion Drawing
Recommended tools: HB and 4B pencils, blending stump, kneaded eraser
Now that all of the details are in, grab your eraser and carefully remove the guidelines.
Then, add some finishing touches, such as the claws and tiny dots above the lion’s mouth:

To shade the lion, go in with your HB pencil and shade its entire body in a light grey color. The top of the mane, the nose, the front left leg and the back should be lighter than the rest of its body, because that’s where the light shines on the lion.
You can use your eraser to highlight these bits:

Next, switch to a 4B pencil (or apply more pressure to your pencil of choice) and add darker hues to the mane — especially to the are below the lion’s face.
And don’t forget to shade the area beneath the lion’s body!
Last but not least, use a blending stump (or your fingers) to blend all the shades of grey and finalize your lion drawing:

Finished Your Lion Drawing? Try These Next!
Now that you know how to draw the king of the jungle, keep practicing your drawing skills!
Explore more of our beginner-friendly guides and learn how to draw other animals, including:
- How to draw a bird
- How to draw a fish
- How to draw a penguin
- How to draw a bat
- How to draw a wolf
- How to draw a horse
- How to draw a cat
- How to draw a dog

Meet The Artist
Goncalo Lopes is a professional artist and the lead BIOWARS creative who designed all the characters of our comic book.
He has extensive experience in the world of comics, games, TV shows and movies.
You’re probably familiar with some of the projects he’s worked on, such as Transformers, GI-Joe, TMNT, Adventure Time, Godzilla and many more!
A Recap On Lion Drawing
To master the steps to easy lion drawing, it’s important to draw its body parts one by one.
Use geometrical shapes such as circles and triangles to form the base of the lion’s body, then add the details one by one.
Pay special attention to the mane and make it as rich and glorious as possible!


