


Related Resources
Much like the rest of the human anatomy, drawing feet may pose a challenge to budding artists.
The unique combination of 26 bones, 19 muscles, ligaments and joints gives feet their unique, seemingly complicated shape, but if you break that shape down into basic forms, illustrating feet becomes easy!
We’ll show you how to draw feet in 12 easy steps (hint: it’s all about boxes!):
If you prefer text guides to videos, and pencil drawing to digital, scroll down to see the tutorial broken down into steps with pencil illustrations for each stage of the process.
The Tools You Need For Your Feet Drawing
To master the art of drawing feet, the right tools can make your job easier.
We recommend using:
- An H pencil: The hard type of lead is the best choice for outlining since it leaves a light trace on paper. This is important because you might make mistakes while drawing, so you want to make sure you can easily erase them.
- A kneaded eraser: We always recommend using a kneaded eraser because it’s soft and easy to manipulate, so you can easily erase even the smallest lines.
- Lightly textured paper: The surface of this paper is nice and smooth, so your pencil can easily move over its surface, making the drawing process enjoyable.
Of course, these are all just recommendations, and you should feel free to use the tools of your choice. Grab that whatever-pencil-this-is and let’s start sketching some feet!

How To Draw A Foot In 12 Steps
Now’s the time for those simple 12 steps to drawing feet that everyone can follow; yes, you too. You’ll get the hang of them in no time!
The simplest way to draw a foot is to start with the simplest shapes. In this case, we’ll draw boxes!
We’ll stack boxes of different shapes, sizes, and angles until we get the foundation for our foot.
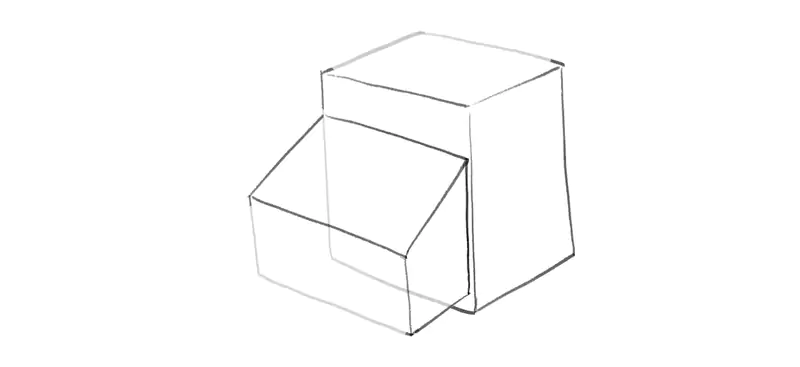
Step 1. The Heel Box
The first box we’re going to draw is the heel box.
So, grab your H pencil and sketch a cube-like shape, like this:

You don’t have to draw a perfect cube with all sides equal — we didn’t either!
What matters is that you draw a 3D shape because you’ll want to add the rest of the foot at the front and attach the ankle to the heel bone. Oh, and since we’re drawing the foot from the side, the Achilles tendon also partially shows — that’ll become more obvious once we soften the lines later on.
The width and the height of the heel bone represent how tall and wide your foot drawing will be!
Step 2. The Middle Foot Box a.k.a. “Half House”
Now’s the time to start drawing the middle part of your foot that goes from your heel to your toes.
First, let’s draw the part that’s the closest to your heel — that’s where your talus bone is.
The talus is right next to your heel bone. Although it’s only 5 – 6 cm long, this bone supports the entire weight of your body!
Talus is the tallest against your heel. From there, it tilts downwards, and your sketch needs to reflect that.
So, draw the talus bone slightly shorter than the heel bone, for about one-quarter of the heel’s height, like this:
Since your foot becomes slightly narrower toward the foot’s bridge, make sure that the talus is a bit narrower than the heel bone.
Don’t this part of the middle foot and the heel look like someone cut a house in half?!
Step 3. The Other Middle Foot Box
Now, let’s add another middle foot box.
Since your foot becomes slightly wider from the talus to the toes, angle the lines slightly outwards.
Although your foot is wider in the middle, it’s less tall than at the talus, and that has to be clear from your sketch. This box is approximately one-third of the heel box’s height:

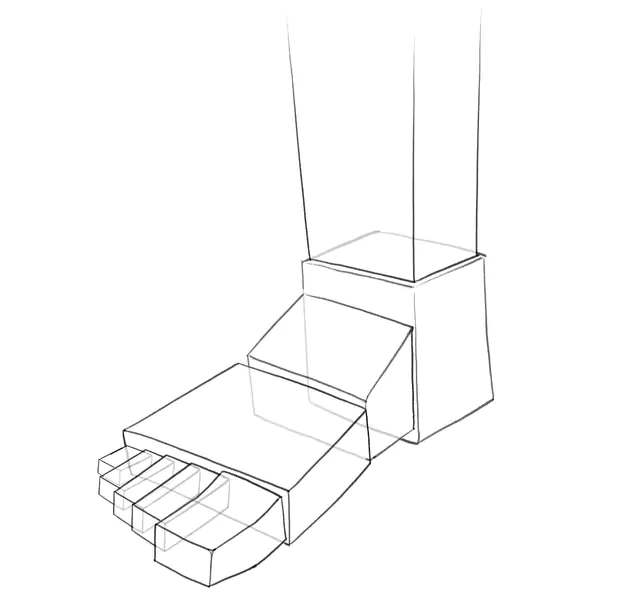
Step 4. The Big Toe Box
We’re keeping everything geometrical at this stage of drawing feet, and the toes won’t be any different.
We’ll continue to draw the boxes, but these will be significantly smaller than the previous ones.
To determine the size of each toe, take a look at how wide the middle foot box is.
You need to attach five toes of different sizes to it, with the big toe being the largest and the other toes gradually getting smaller.
Let’s draw the big toe first.
The big toe should resemble a cuboid, like so:

The big toe box in our sketch takes up about one-third of the middle foot’s width.
It is also just a bit shorter than the middle foot box, for about one-fifth of its height.
Notice that Gonçalo didn’t draw the lines straight. Since you have two bones in your toes, he made the lines at the top of the big toe slightly slanted downward and then straightened them to show the transition from one bone of the big toe to the other.
Step 5. The Long Toe Box
When drawing the long or the index toe box, you can go in with straight lines because, save for the big toe, other toes appear less bumpy.
So, sketch a cuboid next to the big toe, like this:

As for the length of the toes, as you know, the toe size doesn’t always gradually decrease from the big to the pinky toe. Some people have longer index toes than their big toes, so, if you want, you can sketch it like that!
The long toe box is about half a centimeter shorter than the big toe box. As for its width, we drew it so that it takes up almost half of the space next to the big toe box.
Step 6. The Middle Toe Box
Next, glue the middle toe box to the index toe box.
Again, keep the lines straight and draw them slightly shorter than the long toe:

The middle toe box takes up exactly one-half of the area against the long toe box.
Step 7. The Ring Toe Box
When drawing the ring toe box, use the same cuboid shape you drew for the other toes
The difference in the length of the middle and ring toe box should be bigger than the between the index and middle toe.
The ring toe box is around half-centimeter shorter than the middle toe, like so:

Step 8. The Pinky Toe Box
Let’s finish drawing the foot outline by sketching the pinky toe box.
You want to ensure the pinky toe is the smallest of them all, like this:

Step 9. The Ankle Box
Since all toes are in place, draw the ankle outline.
The ankle is narrow where it joins the heel bone and it becomes wider the closer it gets to the knees:
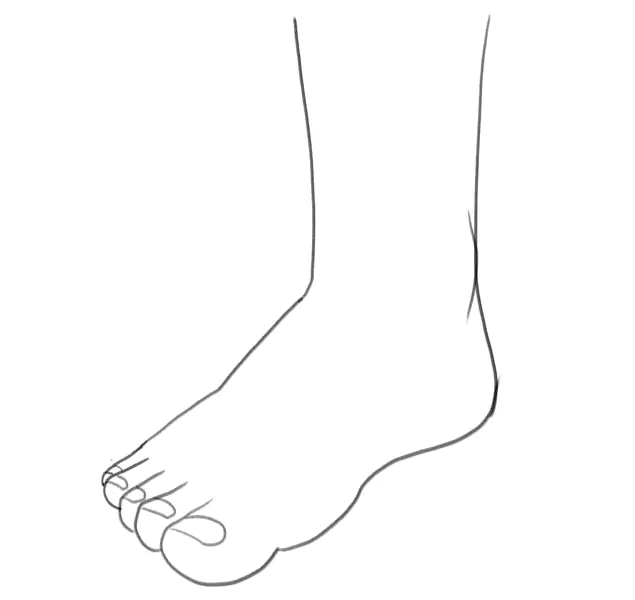
Step 10. Draw The Contours
Since you’ve just finished assembling all the boxes and created the foot outline, let’s draw the contours!
Loosen up your arm and draw soft lines following the edges of the foot shapes you sketched earlier, like this:
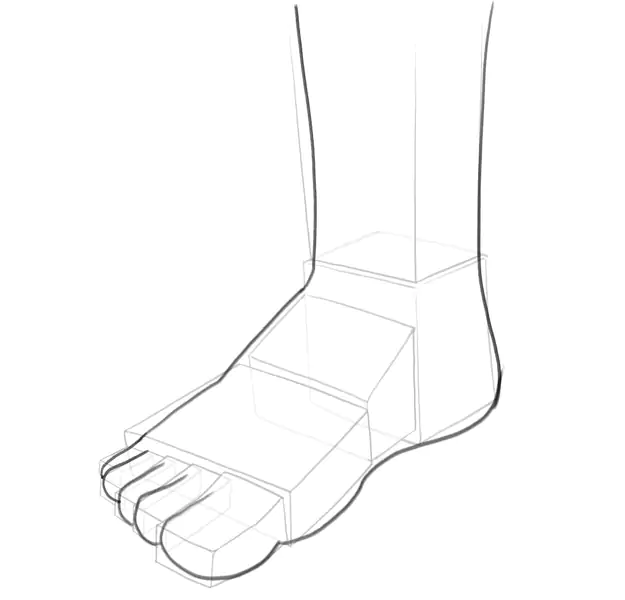
Ensure that the place where the talus and the middle part of the foot meet is curved.
Also, don’t forget to illustrate the arch on the inside of the foot by drawing an upward-curved line to mark it right in front of the heel.
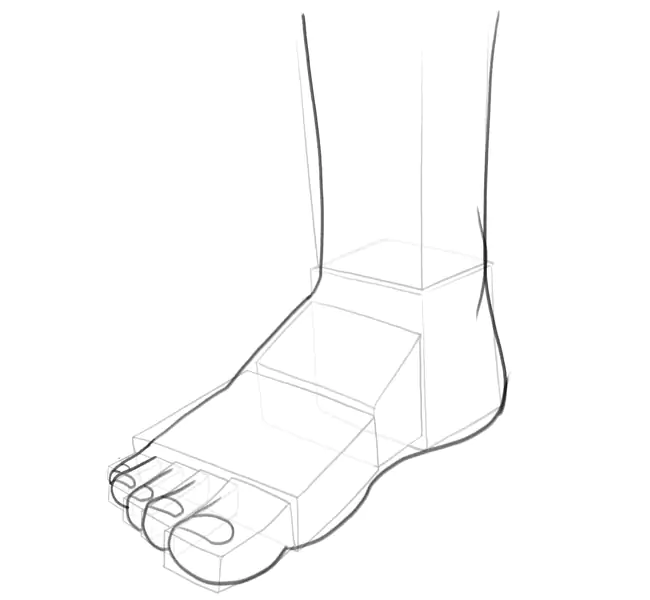
Step 11. Draw The Nails
You almost made it!
How about you add some more details to your sketch to make it look more like a real human foot?
Let’s draw the nails on each toe; the nails look like rectangles with soft edges and they take up about one-half of every toe’s length.
Once you finish drawing the nails, sketch the bumpy bone on the ankle to add dimension to your illustration:
Step 12. Finalize Your Feet Drawing
The final step to drawing feet is getting rid of all the unnecessary lines.
Go ahead and grab your kneaded eraser and erase the guidelines, so that your final sketch looks like this:
Finished Drawing Feet? Draw These Next!
Done with your feet drawing already?! Such a champ! And, great guide we’ve got there, don’t we? *wink*
Are you ready to amp up your drawing skills?
We have more beginner-friendly guides by BioWars’ professional artist you may like.
Check these out next:
- How To Draw A Face
- How To Draw A Person
- How To Draw Hands
- How To Draw Ears
- How To Draw Mouth
- How To Draw Nose
- How To Draw Head Angles

Meet The Artist
Goncalo Lopes is our lead artist, in charge of creating the unique appearance of the BIOWARS protagonists.
He also works in film and video game industry. Some of his most notable projects include Transformers, GI-Joe, TMNT, Adventure Time, and Godzilla.

A Recap On How To Draw Feet
To draw feet, all you need are a pencil, an eraser and a piece of paper.
If you’re a beginner, deconstruct the foot shape into boxes and draw one box at a time.
Start from the heel box, add the middle box and then draw the toe boxes. Keep the shapes geometrical, cuboid-like until you draw the entire outline.
Sketch the ankle to add more dimension to the drawing and don’t forget about the nails, so that the sketch looks realistic.
Once you have the foot form in place, use the outline edges to draw the soft foot contour.


