


Related Resources
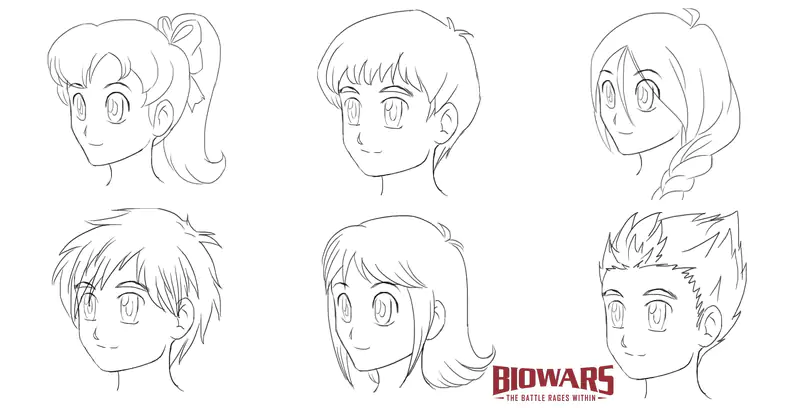
Anime characters are known for their big eyes and often playful, vividly-colored hairstyles.
Spikey hair, buns, blinding bangs and ponytails are among the most common hairstyles for both male and female anime characters.
Remember Goku’s gravity-defying hair in Dragon Ball? Or Usagi Tsukino’s long, vibrant yellow hair with buns in Sailor Moon?
BIOWARS’ lead illustrator created a video tutorial to show you how to draw three different female anime hairstyles:
And another guide on drawing male anime hair step-by-step for beginners:
These guides are beginner-friendly, so even if you don’t have any prior artistic experience, you’ll easily follow the tutorials.
The Tools You Need To Draw Anime Hair
To ensure the process of drawing anime hair runs smoothly, we recommend you use the following tools:
- An H pencil: A hard lead leaves a light trace on paper, so it’s easier to erase but also build. An H pencil is an ideal choice for sketching.
- An HB pencil: This is a medium-hard lead, which means that it’s softer than an H type of lead and that it leaves a darker trace. You can use it when contouring.
- A kneaded eraser: You can easily stretch and change the shape of kneaded erasers however work best for you because due to their softness. Oh, you can also go over some darker areas of your drawing with this eraser if you wish to highlight them!
- Lightly textured paper: We recommend this kind of paper because it’s easier to move your pencil over its surface. Plus, erasing badly sketched lines is also easier because of the paper’s smooth surface!
Now, you don’t *have* to use these tools for drawing. These are just our recommendations in case you’re unsure what sort of tools to get.
What matters the most is your wish to learn how to draw anime hair, so please know that any pencil and paper will do!

How To Draw Female Anime Hair Step-By-Step
In this guide, we’re going to show you how to draw some of the most popular anime hairstyles, starting with female characters.
We’ll begin with simple shapes to outline the hair style and start defining its texture, and then add the details.
We’ll take you through the steps on how to draw:
- A short hairstyle
- A ponytail
- A braid with long bangs
Step 1. How To Draw A Short Female Anime Hairstyle
We know that drawing hair isn’t easy for beginners — that’s why we’re going to break the process down into steps and show you how to draw hair by using simple forms.
Let’s start by drawing the character’s head with an H pencil. If you need help sketching it, check out our detailed guide on drawing anime characters’ faces.

Most female anime characters have bangs and we’re going to show you how to draw them.
Start at the center of the forehead and move your pencil upwards up to the top of the head.
Then, angle the line toward the ear but stop in line where the eyebrows end.
From there, draw a line that touches the eyebrow and move it up to the center of the forehead.
The shape you just drew should look like a wing or an inverted teardrop:

Next, add one smaller, similar shape next to the big “wing.”
It should be wider at the top with the lines gradually coming together above the eyebrows:

Let’s continue drawing bangs.
Draw the same shape as the previous one but make it about one-third bigger. You can have the tip touch the right eyebrow, like so:

To finish sketching the bangs, add the same shape as the previous two but make it almost as big as the first form on the left, like this:

We’re now going to start drawing the rest of this girl’s hair.
We want to draw a short hairstyle, so her hair shouldn’t go past her shoulders.
Now, to draw the hair, continue sketching the same shapes as you did for the bangs.
Since our character is looking to the left, we won’t see that much of her hair on the right side.
Still, parts of it will show at the front and below the neck, and that’s why we also need to outline the hair on this side.
We’ll draw two shapes now.
The first one should start above the eyebrows, touch the inner eye corner, go past the right nostril and end just below the neck. On the outside, the line shouldn’t stick out from the bangs, so make it look like the continuation of the bangs, like this:

Notice how we added the same but much shorter shape right next to the first one. It looks as if it splits the mouth in two. Don’t worry, this part won’t be visible at all — only the ends under the chin will show!
See why using a pencil with a hard lead is good for sketching?
Once you finish creating the outline, it’ll be much easier to erase the unnecessary lines when your strokes are light!
Now, repeat the process on the character’s left side and draw the hair outline at the front just like you did on the right side.
Make sure that the two shapes are parallel to each other and that they are the same length:

Next up, sketch the hair on the left side of the head from the ear to the back.
Start drawing the line from the middle of the head and tilt it downward toward the shoulders.
But don’t draw it straight!
Have some fun with the hairstyle as we did and angle the line outwards. Then, bring it back toward the face, have it touch the ear and connect it with the starting point, like this:

As for the hair at the back of the head, we can’t see much of it save for the part at the top.
To sketch that shape, simply connect the outline on the left you just drew with the bangs on the far right, like so:

We’re now going to draw another detail that makes anime hair recognizable.
Have you heard of ahoge?
That’s the cute flock of hair that sticks out at the top of some anime characters’ heads.
It’s usually exaggerated, like Edward Elric’s in Fullmetal Alchemist.
We want to add an ahoge to our illustration, but we won’t go to the extremes.
We’ll keep it small and sweet, like this:

You just finished drawing the outline of the short female anime hairstyle!
Now, let’s add the contours and make the drawing more cohesive.
At this point, you can pick up an HB pencil if you wish to make the lines darker.
Start from the bangs and follow the outline, like this:

Continue contouring the bangs on the left side.
As you can see in the image below, we segmented large shapes with several lines so now they look like real bangs:

Then, let’s contour the line below the ahoge and the ends under the ear. Again, add several more lines at the bottom of the outline to make the hairstyle appear realistic, like so:

Now, contour the ahoge and the top of the head, like so:

Next, let’s contour the hair on the right side of the character’s head.
Follow the outline and make sure to add several more lines at the ends, like this:

Lastly, let’s contour the hair strand at the front left side:

All that’s left to do now is to get a kneaded eraser and erase the lines that can’t be seen because of the hair, such as the cranium outline.
You can then take your HB pencil again to make the eyes, the nose, the mouth and the ears more prominent.

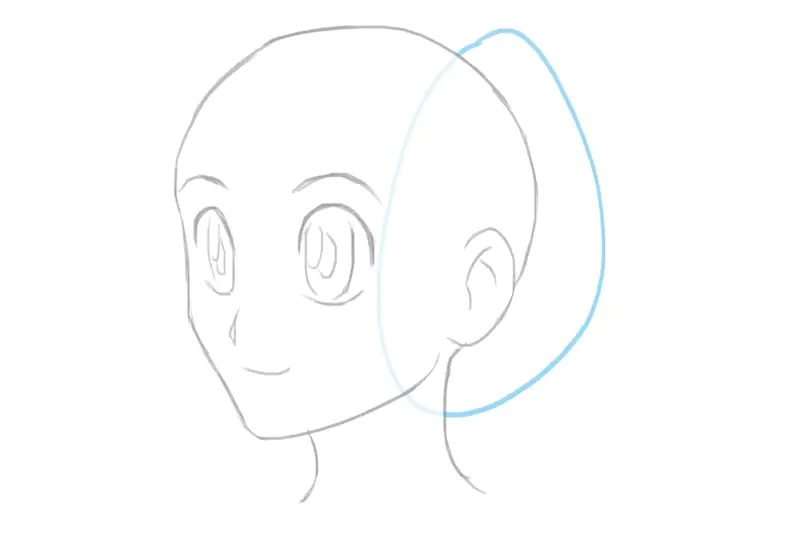
Step 2. How To Draw A Ponytail Anime Style
No matter the hairstyle you wish to draw, always start by sketching the head first.
We used an H pencil for outlining:

Almost every female anime character has bangs, so we’ll add them to our sketch as well.
This time, let’s draw a quarter-moon-like shape from the top of the forehead to just above the left eyebrow:

This part of the bangs has approximately the same length as the eyes.
Now, add a reversed drop-shape to the left and make it about twice as big as the first shape:

We want to give this girl big bangs that take up almost half of her head. That’s why we continue to add more big drop shapes to the left:

Now, let’s add bangs to the right side of the head.
First, draw a shape similar to the first one, like this:

Let’s now finish drawing the outline of the bangs.
On the right, draw a big, voluminous, bun-like shape that’s also going to be a part of the bangs.
You can sketch it so that its end touches the top of the right eyebrow while its top can touch the top of the cranium.
As for its width, feel free to exaggerate a bit, like this:

Once you finish outlining the bangs, it’s time to add the hair at the back of the head and on the sides.
Start from the middle of the largest bun on the right side of the face. Follow the shape of the head and keep the line above the top of the head.
The closer you get to the neck, gradually bring the line closer to the head line, like this:

Since the hair is pulled up in a ponytail, there’s no need to draw the hair at the sides save for some wisps in front of the ears.
Next up, let’s add the hair tie with a bow on it.
We drew three petal-like shapes one next to the other as if we were sketching a flower.
The position of the tie depends on how high you wish to place the ponytail.
We decided to draw it above the head crown, like so:

Once the hair tie is in place, we can sketch the ponytail!
The ponytail is the widest at the top around the hair tie and it slowly becomes narrower the closer it gets to the ends.
The easiest way to draw the ponytail outline is to draw a shape similar to a worm with the end gently curled upwards:

Once you draw the tail outline, you’re done with the first stage of the process of drawing anime hair.
Next comes contouring!
If you like, you can do it with an HB pencil.
For starters, go over the line that’s separated from the ponytail by the hair tie:

Then, contour the largest and the most voluminous part of the bangs on the right side of the character’s face:

Like before, add some more lines at the ends so that the hair appears more realistic. Even two or three lines will suffice!
Then, continue to contour the bangs:

And finish by contouring the wisps above the ear:

Lastly, contour the bow and the ponytail:

The final step of illustrating a female anime character with a ponytail is to erase the framework and make the face and the ear more eye-catching:

Step 3. How To Draw An Anime Braid With Long Bangs
The final female anime hairstyle we’d like to share with you is a side braid with long bangs that fall into the character’s eyes. That’s another popular hairstyle for female anime characters!
As always, the first thing to do is draw the head.

Then, draw an oval shape from the crown of the head to just under the jawline. Make the shape go from the outer corner of the left eye and above the cranium, like this:
From here, move slightly to the front and start sketching the bangs.
Start from the middle of the forehead, draw a slightly curved line toward the ear and have it end just above the oval outline you sketched earlier.
Then, bring back the line to the middle of the forehead and have it cover the outer part of the left eye. You can draw this strand of hair as a large reversed drop:

Now, let’s add a strand in the middle from the center of the forehead to the mouth:

Then, add one more tear-like form that falls from the top of the forehead to the cheekbones, like so:

Since this girl has a loosely tied braid, we imagine she has some stray strands.
So, let’s draw some on the right side of her face, right against her cheek:

Notice how we continue to use the reversed drop shape throughout this guide.
The reason we do so is that a drop is wide on one end and narrow on the other; this works if reversed when you’re drawing an anime hair outline since you want the hair at the root to be voluminous and the strands should be narrower than the rest of the hair.
Alright, let’s continue learning how to draw braided anime hair.
Time to add an ahoge at the very top of the head, i.e. at the top of the oval shape you first drew:

Next, let’s start drawing the braid.
We know that might seem tricky since the locks need to be interlocked, but, as with everything else, when you dissect a braid into simpler forms, illustrating it becomes easier.
We’re going to draw a braid on the left side of the character’s face.
So, let’s start by drawing a line from about two-thirds of the hair in the back. Follow the shape of the hair strand you first drew and have the first part of the braid end at the nape of the neck and then connect it to the hair below the ear, like this:

When intertwined, the hair locks form almost a “Y” shape, so have that in mind when sketching more locks.
The next piece of hair needs to be smaller than the previous one, so you should draw it from about two-thirds of the previous lock.
Its shape should remain the same:

Follow the same pattern when drawing the third interlocked curve. Just make sure it’s much smaller than the previous two:

The final interlocked curve doesn’t need to have the “Y” shape.
Instead, you can simply draw an oval lock, like this:

Now, draw a simple round hair tie, like this:

To finish learning how to draw anime braids, draw some loose hair under the hair tie:

When you’re done illustrating the braid, it’s time to connect the bangs to the hair at the back of the head:

You know the drill by now — when we’re done creating an outline, we start contouring!
It might be for the best to use an HB pencil since you want to make the contours darker than the guidelines, but you’re welcome to get your hands on whatever pencil you prefer!
Let’s start from the bangs on the right side of the girl’s face:

Then, continue contouring the hair at the back and on the side, right where the strands of hair begin to interlock.
Add some lines here and there following the shape of the braid to add more life to it:

Go over the bangs on the left side of the face:

And finally, make the strand that goes over the middle of the face stand out like so:

Now, go back to contouring the braid.
To add more texture and life to it, add some curved lines on the braid’s surface.
Be careful as you need to follow the shape of the interlocked curves, like this:

Add short and curved lines in the middle of the braid to mark the place where the strands intertwine:

Finally, make the hair tie more eye-catching and the strands under it.
And don’t forget to contour the ahoge!

Now, get your hands on an eraser and get rid of the superfluous lines.
When you’re done, get an HB pencil once again to make the face lines thicker:

How To Draw Male Anime Hair Step-By-Step
Once you finish learning how to draw female anime hair, it’s time to practice illustrating male anime hairstyles!
As always, we’ll start by sketching simple shapes and then join them into a defined hairstyle structure.
We’ll take you through the steps on how to draw three of the most popular male anime hairstyles, including:
- Short male hair
- Spiky short hair
- Medium-long hair with long bangs
Step 1. How To Draw Short Male Anime Hair
The first step to drawing a male anime hair is to sketch the character’s head.
We’re going to draw a male character facing left, like this:

You should now define the basic outline for the short hairstyle.
To do so, draw a line around the boy’s head starting from the right temple and have it end below the left ear:

Make sure that the line gets slightly further away from the head as it approaches the crown.
Then, curve the line toward the crown to create a soft V. Continue following the head shape until the line reaches the ear.
Now, most anime characters have bangs, both male and female, so we’re staying on trend.
Start drawing bangs one hair strand at a time. Stick to the wing, i.e., the inverted wing shape, like this:

Have the first strand of hair go from almost the top of the forehead to the bottom of the right pupil.
Start from just under the head outline and draw the strand approximately twice as wide as the space between the main hair outline and the head is.
The second strand should be significantly smaller than the first. Align the top with the top of the forehead while its bottom should reach the top of the eyebrows:


Now let’s add a slightly longer strand to mark where the bangs will part.
Instead, have the top of the new shape touch the top of the previous wing. Then, angle the wing toward the left eyebrow, like this:

Continue sketching bangs on the left side by adding the same inverted tear shapes.
The bangs should gradually become longer the closer to the ear they are, like this:

Finish drawing bangs by adding one last wing right next to the left ear.
Make it as big as the strand in front of it:

Let’s not forget about ahoge!
To finalize the outline, draw an ahoge at the small valley you drew earlier when sketching the hair outline:


Step 2. How To Draw Spiky Male Anime Hair
You know the drill by now.
When drawing a hairstyle, be it for male or female anime characters, you should always draw the head first.

We’re drawing a short spiky hairstyle with the hair pointing upwards.
So, when sketching the outline, draw a round shape across the boy’s face and have it touch the bottom of the left ear, the top of the nose and the outer corner of the right eyebrow.
Then, connect the lines in a pointy tip above the crown, like so:

Next, it’s time to start outlining the spikes!
We’re sticking to the reversed tear shape since it’s particularly handy when learning how to draw anime hair step-by-step.
Imagine there’s a line from the inner corner of the left eyebrow to the top of the hair outline. Now, start drawing the spike from just above that top of the hair outline and have it reach the spot where the forehead will be:

Now, add the hairline starting from the point where the hair outline and the face meet.
The distance between the hairline and the eyebrows marks the height of your character’s forehead.
We drew the hairline halfway between the crown and the eyebrows, like this:

The hairline and the first spike you drew should touch.
Once the hairline is in place, continue adding the spikes!
Draw a small tear shape on the left of the first spike:

Position the third spiky strand of hair on the right side of the boy’s head.
Its bottom should touch the head outline while the top should be right between the hair outline and the top of the first spike you drew, like so:

Now, draw a flame-like strand at the front of the boy’s head.
Have its root touch the hairline. Ensure you glue it to the strand you drew earlier that’s also right next to the hairline.

Now, we want this hairstyle to be seriously pointy, Naruto style.
So, add some more wing shapes all over the guy’s hair!
Draw pointy strands above the right eyebrow, below his left ear, and two more on either side of the large spike above his crown:

Continue adding spikes, but this time around, draw zig-zag lines along the hairline and the outer hair outline.
Then, join the spikes you drew earlier together. Erase the bottom part of every point so they don’t appear separated from the rest of the hair:


Step 3. How To Draw Medium Long Male Anime Hair
Last but not least, we want to show you how to draw another highly popular male anime hairstyle.
A lot of anime boys have long hair with bangs covering their forehead, like L from Death Note, so let’s see how to draw that hairstyle!
First up, draw the character’s head.


The circle is a guideline you will use when drawing the hair.
We drew it a little bit above the head since we want to add volume to the hair.
Now, draw a hair parting.
Since this will be another quite spiky hairstyle, draw a wave shape starting from the right cheek and go up to the forehead above the left eyebrow. Then, bring the wave down and have the line end next to the boy’s left ear:

Now, we go back to the wing shape.
Draw a reversed tear shape starting from the lower right eyelid and have it touch the hair parting you drew in the previous step:

The size of this shape marks the length of the hair strands at the front. Since we’re drawing a medium-long hairstyle, we added a bigger wing that touches the top of the boy’s head on purpose.
Next, draw a smaller wing on the right along the parting line. The wing should take up about one-third of the large strand you just added. Ensure its end reaches the pupil:

Glue the third wing to it.
Draw it from just above the right eyebrow and go all the way down to the lower eyelid.

Male anime characters usually have messy hair, and we want the character we’re drawing to have untamed locks.
So, add a small reversed-tear shape above the right eyebrow and point it to the right, so that it stands out from the circle outline you drew at the beginning:


Continue drawing wings following the shape of the character’s head.
The strands shouldn’t be of the same size. The one above the crown should be the largest, but the others should vary in size, like this:

Add three more reversed-tear shapes to cover the part of the head above and next to the boy’s left ear.
Have the wings of the same size go over one another, like so:

When you reach the left ear, draw a small wing along the nape:
Then, draw one large wing that follows the shape of the wave you first drew. The wing should cover about two-thirds of the “wave’s height:”

Next, add two more wings of the same size next to the one you just drew, with the strand above the ear reaching the earlobe.
Glue the wings together, like this:


With that, you finished sketching the rough outline of the medium-length male anime hairstyle!
Since all strands are in place, you can connect them, like so:

Go over the outer part of each strand with your pencil so that it appears as if you drew one line to outline the hairstyle.
At this point, you can erase the wing parts that no longer serve you, like this:


Finished Your Anime Hair Drawings? Try These Next!
How fun was it drawing anime hair?!
You’re such a boss for completing the entire tutorial, big kudos!
If you’re up for some more drawing, check out these next:

A Recap On How To Draw Anime Hair
When drawing anime hair, you should draw a character’s head first and then sketch a hairstyle to your liking one step at a time.
Don’t draw the hair outline at once.
Instead, start slow. Draw the strands one by one, starting from the bangs. Then slowly progress to the sides and the bask of the head.
Don’t forget about the ahoge! Most anime characters have it, so you can also add it to your illustrations.


