


Related Resources
Some scientists believe that frogs have been around for over 200 million years!
Sure, they may have never been the epitome of elegance with their slimy bodies, but you have to hand it to them for persevering and diversifying into the more than 7,500 frog species we know today.
With their sleek bodies, big eyes, and distinctive webbed feet, frogs are unique animals that can be challenging to draw — especially for beginners.
If you want to depict a balmy summer evening and add a frog or two to your sketch or perfect frog drawing for your comic book, keep exploring this guide and unlock the secret to bringing these amphibians to life on paper:
Sketching Tools For Simple Frog Drawing
The tools you can use for your frog drawing include:
- An H pencil: This hard lead is the best choice for outlining. You want to start with thin lines because the lighter they are, the easier they are to erase if you mess up some parts of the frog.
- An HB pencil: We recommend using a medium-hard lead for light shading and adding details to your sketch because of its moderately dark grey trace.
- A 4B pencil: This is the hardest and darkest lead of the three, which is why it’s ideal for shading your frog drawing.
- A kneaded eraser: A kneaded eraser is easy to stretch and manipulate, so you can change its shape and size. Plus, you can also highlight parts of the frog with this eraser.
- Lightly sketched paper: The smooth surface of this paper ensures that your pencil can glide over it. Plus, erasing is also easy easier.
You can use all of the tools above, but if you don’t have them, that’s okay too! Just grab your favorite pencil and start sketching!

How To Draw A Frog In 5 Steps
To make frog drawing as easy as possible, it’s best to start small and sketch one body part at a time.
We’ll start by outlining the base of the frog’s body.
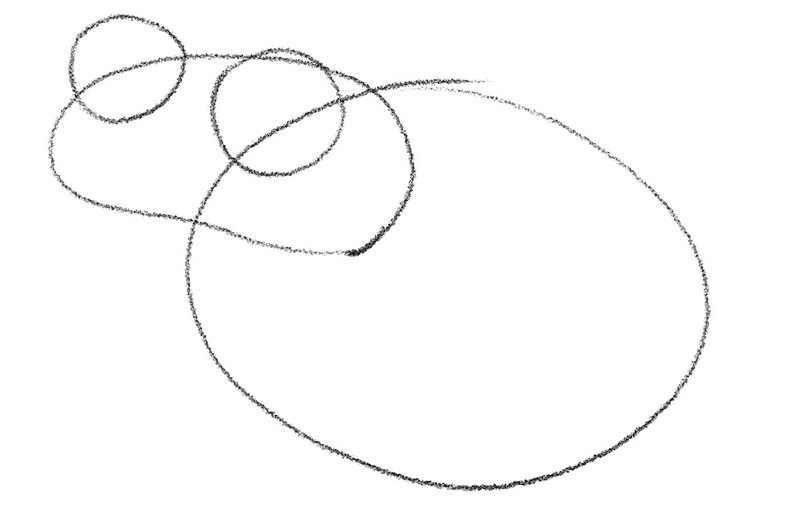
1. Draw The Base, Head And The Eyes
Recommended tool: H pencil
Let’s kick things off by sketching a medium-sized oval shape.
This is where the frog’s belly and back will be.
The size of the shape depends on how big you’d like the frog to be.
We don’t want to go overboard, but still, we’ll leave enough room around the oval form for the rest of the frog’s body:

Next, let’s add the head.
We’ll keep it pretty oval, like the base of the frog’s body, but this time, let’s make the shape more potato-like, like this:

Now, let’s add the eyes.
Frogs have recognizable bulging eyes that help them swallow food! Yep, you read that right.
When these peculiar animals have food in their mouth, they use their eyes to push the food down and swallow it.
Anyway, back to drawing.
To sketch the eyes, simply draw two large circles at the top of the head, like this:
2. Draw The Legs
Recommended tool: H pencil
We’ll now draw the frog’s legs — two at the front and two in the back.
To do that, we’ll first mark the position of each leg by drawing a circle to connect the leg to the rest of the body.
Since frogs have their legs bent, we’ll also add smaller circles next to larger ones to mark the point where the joints are.
(Oh, and since the frog we’re drawing is facing left, we can’t see its hind left leg from this angle.)

We’ll add more circles to highlight where the legs end and mark the position of the webbed feet:

Before we finish drawing the legs, let’s add the eardrum, i.e., the tympanum. To do that, sketch an oval shape below the eye.
Next, it’s time to finish drawing the legs, so let’s connect the circles we drew earlier.
After the legs are done, make sure to add tiny circles at the end of each toe, like this:

3. Finalize The Head Outline
Recommended tool: H pencil
To finalize the outline, let’s add some finishing touches to the frog’s head.
First, draw the mouth by sketching a line from the eardrum to the opposite side of the head.
Then, let’s add some details to the frog’s eyes.
Their recognizable protruding eyes have large irises and pupils, so, when drawing them, ensure you sketch large circles for both, like this:

4. Enhance The Lines And Add The Details
Recommended tools: HB pencil, kneaded eraser
Once the outline is ready, it’s time to enhance the lines and add some finishing touches to the sketch before you shade it.
Let’s start from the head, like so:

Continue going over the lines to make them more pronounced, like this:

To get rid of the guidelines, grab a kneaded eraser (or whatever eraser you prefer) and remove the parts that you don’t need anymore:

Now it’s time to add texture to the frog’s skin.
To do so, sketch irregular shapes all over the frog’s body using curvy lines and circles.
Oh, and color the irises all black, like this:

5. Shade Your Frog Drawing
Recommended tools: HB and 4B pencils, kneaded eraser
The final step to your frog drawing is shading the sketch.
We recommend using a combination of HB and 4B pencils to create grey hues of different intensities. You can also use whatever pencil you prefer and apply more or less pressure to it to make lighter and darker shades of grey.
Don’t forget to shade the area below the body so that the frog doesn’t appear to be floating mid-air:

Finished Your Frog Drawing? Try These Next!
When you finish drawing a frog, we encourage you to keep those creative juices flowing and continue exploring more of our guides.
If you’d like to keep practicing how to draw animals, explore these guides:
- How to draw a deer
- How to draw a fish
- How to draw a horse
- How to draw a cat
- How to draw a dog
- How to draw a penguin
- How to draw a bat
- How to draw a wolf
We also have tutorials on how to draw landscapes that you can use to enrich your comic book or a sketch:
And if you’re interested in learning how to draw people, we have several tutorials that could be of help:
- How to draw a mouth
- How to draw hands
- How to draw ears
- How to draw a face
- How to draw eyes
- How to draw a person
- How to draw a nose
You can explore all of our helpful art tutorials and keep perfecting your drawing skills with our detailed guides.
We invite you to head over to our YouTube channel and watch the helpful step-by-step video guides created by our resident BIOWARS artist.

Meet The Artist
The man behind all Biowars how-to-draw guides is Goncalo Lopes.
He’s a professional comic book artist who also works on films, TV shows and video games.
Some of the most notable projects he has worked on include Transformers, GI-Joe, TMNT, Adventure Time and Godzilla.
A Recap On How To Draw A Frog
No matter how difficult drawing a frog may seem at first, by breaking down the process into simple steps, such as sketching the basic shapes, refining the outline, adding details and shading the sketch, you can gradually build your artistic skills.
Just don’t be discouraged if your initial attempts don’t turn out well. After all, drawing is a skill that develops with time and practice.
Embrace the learning process and have fun experimenting with different techniques and styles. The more you practice, the more confidence you’ll gain and the better your abilities will be.
